Epson R380 Product Information Guide - Page 6
Printing on CDs and DVDs, Cleaning the Rollers, Inserting a CD or DVD - stylus photo ink
 |
UPC - 010343859074
View all Epson R380 manuals
Add to My Manuals
Save this manual to your list of manuals |
Page 6 highlights
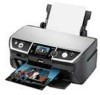
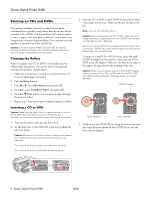
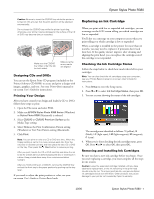
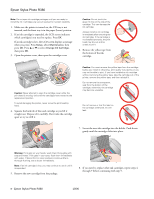
Epson Stylus Photo R380 Printing on CDs and DVDs Your printer includes a special tray that lets you print customized text, graphics, and photos directly on any ink jetprintable CD or DVD. The Epson Print CD software makes it easy to import your own photos, add text, and modify your designs with a variety of special effects. You can print on both regular 12-cm and 8-cm CDs and DVDs. Caution: Use only ink jet-printable CDs and DVDs for printing. Thermal-printable and regular CDs and DVDs should not be used with this printer; otherwise the ink may smear. Cleaning the Rollers Before you print on a CD or DVD, you should clean the rollers inside the printer. You can do this by feeding and ejecting several sheets of plain paper. 1. Make sure your printer is turned on and several sheets of letter-size plain paper are loaded. 2. Press the Setup button. 3. Press l or r select Maintenance, then press OK. 4. Press u to select Load/Eject Paper, then press OK. 5. Press the Start button to run a sheet of paper through the printer's rollers. 6. Repeat step 5 four more times to finish cleaning the rollers. Inserting a CD or DVD Caution: Make sure the data, music, or video is burned on your ink jet-printable CD or DVD before you print. Otherwise, dirt or scratches on the surface may cause errors when you burn the data. 1. Turn on the printer and open the front cover. 2. Set the front tray to the CD/DVD position by pulling the tray lever down. Caution: Before you move the tray lever, make sure no paper or other objects are on the front tray and the front tray is not extended. Do not touch the front tray when you move the tray lever. Do not move the tray lever while the printer is printing. 3. Place the CD or DVD on the CD/DVD tray with the white or printable side face-up. Make sure the disc lies flat in the tray. Note: Use only one CD/DVD at a time. Caution: Before you position the CD or DVD, make sure that no foreign particles or substances are on the CD/DVD tray, as these may damage the disc's data side. Be sure to use the CD/DVD tray provided with this printer. If you use another CD/DVD tray, there may be a gap in the print position and printing may not be accurate. To print on a small CD or DVD (8-cm), place the small CD/DVD adapter on the tray first, then place the CD or DVD inside the adapter. Make sure the tabs on the edge of the adapter fit squarely into the molding of the tray. Caution: Make sure you always use the small CD/DVD adapter when you print on 8-cm CDs or DVDs and that the CD or DVD and adapter lie flat on the tray; otherwise the printer may be damaged. CD/DVD adapter 12-cm CD/DVD 8-cm CD/DVD 4. Gently insert the CD/DVD tray along the base of the front tray until the arrow marks on the CD/DVD tray and the front tray are aligned. 6 - Epson Stylus Photo R380 10/06
-
 1
1 -
 2
2 -
 3
3 -
 4
4 -
 5
5 -
 6
6 -
 7
7 -
 8
8 -
 9
9 -
 10
10 -
 11
11 -
 12
12
 |
 |