Epson R380 Product Information Guide - Page 8
Epson Stylus Photo R380, Open the printer cover, then open the cartridge cover. - stylus photo continuous ink system
 |
UPC - 010343859074
View all Epson R380 manuals
Add to My Manuals
Save this manual to your list of manuals |
Page 8 highlights
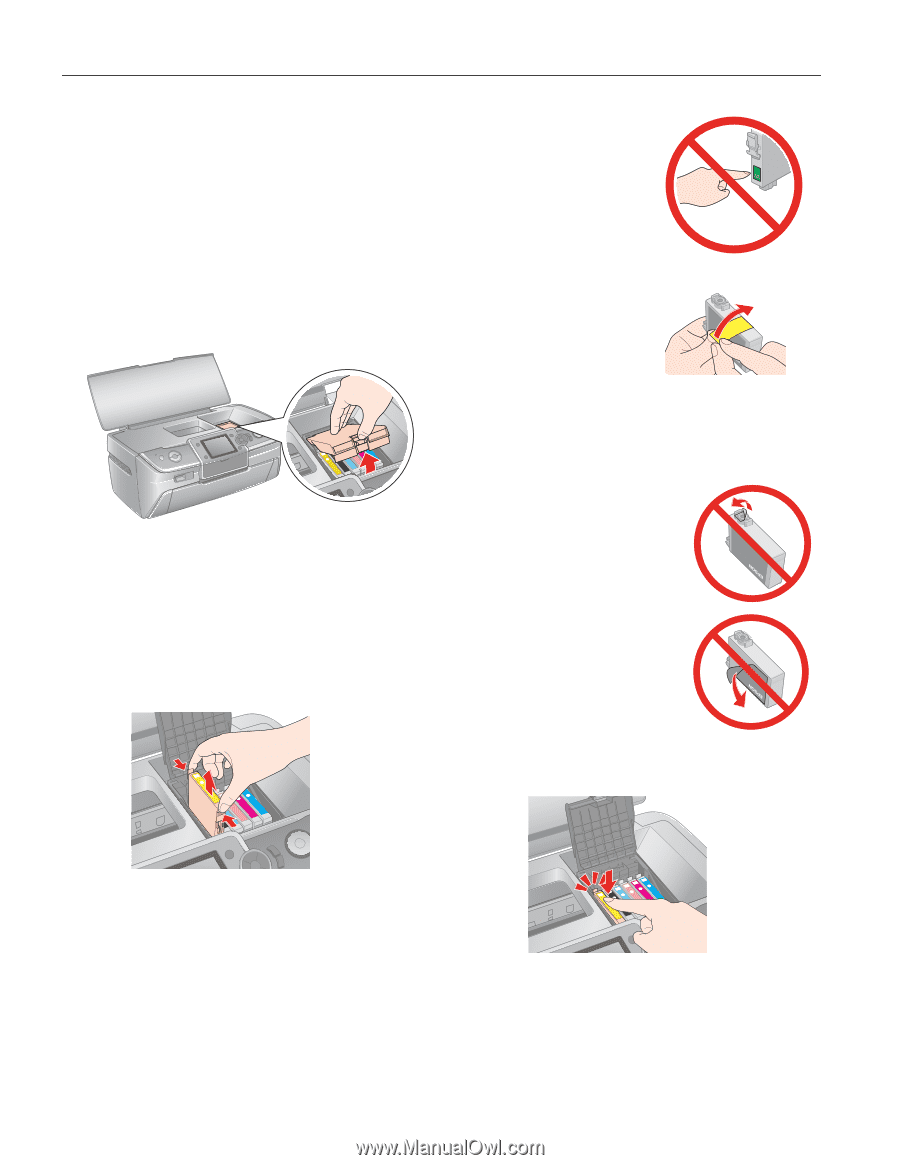
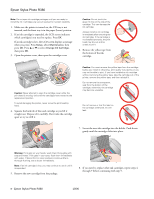
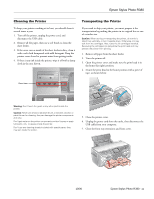
Epson Stylus Photo R380 Note: Do not open ink cartridge packages until you are ready to install the ink. Cartridges are vacuum packed to maintain reliability. 1. Make sure the printer is turned on, the CD tray is not inserted, and the front tray is in the paper (lower) position. 2. If an ink cartridge is expended, the LCD screen indicates which cartridge(s) you need to replace. Press OK. If an ink cartridge is low, the LCD screen displays a message when you print. Press Setup, select Maintenance, then press OK. Press u or d to select Change Ink Cartridge, then press OK. 3. Open the printer cover, then open the cartridge cover. Caution: Do not touch the green IC chip on the side of the cartridge. This can damage the ink cartridge. Always install an ink cartridge immediately after removing the old cartridge. If the cartridge is not installed promptly, the print head may dry out and be unable to print. 6. Remove the yellow tape from the bottom of the ink cartridge. Caution: Never attempt to open the cartridge cover while the print head is moving; wait until the cartridges have moved to the replacement position. To avoid damaging the printer, never move the print head by hand. 4. Squeeze the back tab of the used cartridge as you lift it straight out. Dispose of it carefully. Don't take the cartridge apart or try to refill it. Caution: You must remove the yellow tape from the cartridge before you install it; otherwise, print quality may decline or you may not be able to print. If you have installed an ink cartridge without removing the yellow tape, take the cartridge out of the printer, remove the yellow tape, and then reinstall it. Do not remove the transparent seal from the bottom of the cartridge; otherwise, the cartridge may become unusable. Do not remove or tear the label on the cartridge; otherwise, ink will leak. 7. Lower the new ink cartridge into the holder. Push down gently until the cartridge clicks into place. Warning: If ink gets on your hands, wash them thoroughly with soap and water. If ink gets in your eyes, flush them immediately with water. If discomfort or vision problems continue after a thorough flushing, see a doctor immediately. Note: If an ink cartridge is low, you may continue to use it until it is expended. 5. Remove the new cartridge from the package. 8. If you need to replace other ink cartridges, repeat steps 4 through 7 before continuing with step 9. 8 - Epson Stylus Photo R380 10/06
-
 1
1 -
2
-
 3
3 -
 4
4 -
 5
5 -
 6
6 -
 7
7 -
 8
8 -
 9
9 -
 10
10 -
 11
11 -
 12
12
 |
 |