Epson Stylus C84N User Manual - Supplement - Page 14
EpsonNet Install Wizard, Installing EpsonNet Install Wizard
 |
View all Epson Stylus C84N manuals
Add to My Manuals
Save this manual to your list of manuals |
Page 14 highlights
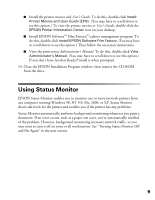
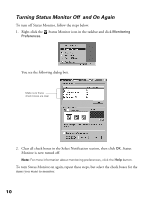
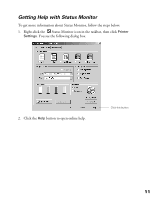
EpsonNet Install Wizard EpsonNet Install Wizard automatically finds the print server, installs the printer driver, and configures the network port for your printer. It is the easiest way to set up the printer for TCP/IP printing on a Windows system. Installing EpsonNet Install Wizard Before you begin, make sure you set up your printer and print server as described on the Start Here sheet. 1. Make sure the printer and print server are set up as described on the Start Here sheet. Also, make sure both the printer and print server are on. 2. Make sure your Windows computer is connected to the network, then turn it on. 3. Insert the EPSON Printer Software CD in your CD-ROM or DVD drive. You see the EPSON Installation Program window. 4. Double-click Install EpsonNet Install Wizard. Follow the on-screen instructions to install Install Wizard. 5. When you're prompted to launch Install Wizard, click Yes. 6. You see a license agreement. Read it and click Accept to continue. Install Wizard searches the network, finds your printer, and displays it in a dialog box. This can take 20 to 30 seconds. Note: Install Wizard may find more than one printer. To identify your printer, press the print server's status sheet button for two seconds to print a status report. The printer's name and/or IP address are listed on the report. 7. Select the check box next to your printer and click Next. Install Wizard automatically installs the printer driver and configures the printer port. This takes about 10 seconds. 8. Make sure there is letter-size plain paper in the printer, then click the Print button to print a test page. If the test page prints, the installation was successful. 14
-
 1
1 -
2
-
3
-
4
-
5
-
6
-
7
-
8
-
 9
9 -
 10
10 -
 11
11 -
 12
12 -
 13
13 -
 14
14 -
 15
15 -
 16
16 -
 17
17 -
 18
18 -
 19
19 -
20
 |
 |
