Epson SureColor T5000 User Manual - Page 205
Job Cancel, Hard Disk Unit, Print only, Hard Disk Unit Settings, Message, What to
 |
View all Epson SureColor T5000 manuals
Add to My Manuals
Save this manual to your list of manuals |
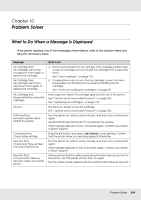
Page 205 highlights
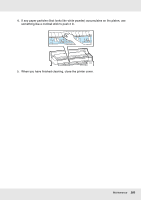
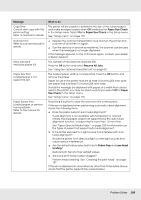
Message What to do Auto Take-up Reel Unit is disconnected. Do you continue? The auto take-up reel unit is not connected. After reconnecting the cable connecting the auto take-up reel unit to the printer, select No to turn the printer off. Turn the printer on again after a short pause. See the Setup Guide supplied with the optional auto take-up reel unit. To continue printing without using the auto take-up reel unit, select Yes. Take-Up Error Is anything obstructing the take-up reel sensor system? After checking the take-up reel unit sensor and removing any obstructions, press the OK button. If there is loose paper around the take-up reel unit roll core, set the Auto switch to Off and keep the Manual pressed in the take-up direction to remove the slack. After confirming that the paper is correctly attached, return the Auto switch to its original position and press the OK button. See "Using the Auto Take-up Reel Unit (SureColor T7000 Only)" on page 61. HDD Error HDD used for another printer needs to be formatted. Continue? Optional hard disk units that have been installed on other devices must be formatted after being transferred to this printer. The disk cannot be used until it is formatted. To format the disk, use the Setup menu in the control panel. See "Setup menu" on page 175. Storage Error Check if hard disk unit is correctly installed. Press the W button and select Job Cancel to stop printing. Remove and reinstall the hard disk unit. If this message appears on the LCD panel again, contact your dealer or Epson Support. To print regardless of hard disk status, select the Advanced tab in the printer driver, open the Settings dialog of Hard Disk Unit, and select Print only. Paper Cut Error Remove uncut paper. After pressing the OK button, pull out the paper and cut along the line of the failed cut using scissors or a third-party cutter. Align the end of the paper with all the poster board supports and press the OK button. Data Size Error Data size of print job is too large. Check on print job. The optional hard disk unit can store print jobs up to 100 GB in size. To print larger jobs, select the Advanced tab in the printer driver, open the Settings dialog of Hard Disk Unit, and select Print only; alternatively, ensure that print jobs are less than 100 GB in size. HDD Store Error Hard disk does not have enough space. See documentation for how to delete stored print jobs. Unwanted jobs can be deleted from Remote Manager or the LFP HDD Utility. See "Using the Optional Hard Disk Unit" on page 87. HDD Boot Error Hard disk error. Hard disk cannot be used. Press the OK button to clear the error from the control panel. To continue printing regardless of hard disk status, select Print Only for Hard Disk Unit Settings in the printer driver. If this message appears on the LCD panel again, contact your dealer or Epson Support. Problem Solver 205
-
 1
1 -
2
-
3
-
4
-
5
-
6
-
7
-
8
-
9
-
10
-
11
-
12
-
13
-
14
-
15
-
16
-
17
-
18
-
19
-
20
-
21
-
22
-
23
-
24
-
25
-
26
-
27
-
28
-
29
-
30
-
31
-
32
-
33
-
34
-
35
-
36
-
37
-
38
-
39
-
40
-
41
-
42
-
43
-
44
-
45
-
46
-
47
-
48
-
49
-
50
-
51
-
52
-
53
-
54
-
55
-
56
-
57
-
58
-
59
-
60
-
61
-
62
-
63
-
64
-
65
-
66
-
67
-
68
-
69
-
70
-
71
-
72
-
73
-
74
-
75
-
76
-
77
-
78
-
79
-
80
-
81
-
82
-
83
-
84
-
85
-
86
-
87
-
88
-
89
-
90
-
91
-
92
-
93
-
94
-
95
-
96
-
97
-
98
-
99
-
100
-
101
-
102
-
103
-
104
-
105
-
106
-
107
-
108
-
109
-
110
-
111
-
112
-
113
-
114
-
115
-
116
-
117
-
118
-
119
-
120
-
121
-
122
-
123
-
124
-
125
-
126
-
127
-
128
-
129
-
130
-
131
-
132
-
133
-
134
-
135
-
136
-
137
-
138
-
139
-
140
-
141
-
142
-
143
-
144
-
145
-
146
-
147
-
148
-
149
-
150
-
151
-
152
-
153
-
154
-
155
-
156
-
157
-
158
-
159
-
160
-
161
-
162
-
163
-
164
-
165
-
166
-
167
-
168
-
169
-
170
-
171
-
172
-
173
-
174
-
175
-
176
-
177
-
178
-
179
-
180
-
181
-
182
-
183
-
184
-
185
-
186
-
187
-
188
-
189
-
190
-
191
-
192
-
193
-
194
-
195
-
196
-
197
-
198
-
199
-
 200
200 -
 201
201 -
 202
202 -
 203
203 -
 204
204 -
 205
205 -
 206
206 -
 207
207 -
 208
208 -
 209
209 -
 210
210 -
211
-
212
-
213
-
214
-
215
-
216
-
217
-
218
-
219
-
220
-
221
-
222
-
223
-
224
-
225
-
226
-
227
-
228
-
229
-
230
-
231
-
232
-
233
-
234
-
235
-
236
-
237
-
238
-
239
-
240
-
241
-
242
-
243
-
244
-
245
-
246
-
247
-
248
-
249
-
250
-
251
 |
 |
