Epson SureColor T7000 User Manual - Page 171
Paper menu, Print Job Log Sheet
 |
View all Epson SureColor T7000 manuals
Add to My Manuals
Save this manual to your list of manuals |
Page 171 highlights
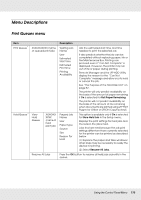
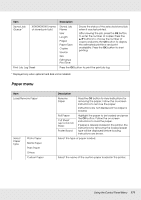
Item Saved Job Queue * XXXXXXXXXXX (name of stored print job) Print Job Log Sheet Description Stored Job Name User Length Pages Paper Type Copies Source Size Estimated Print Time Shows the status of the selected stored job when it was last printed. After viewing the job, press the OK button to enter the number of copies. Press the u/d buttons to choose the number of copies and press the OK button to display the estimated print time and print availability. Press the OK button to start printing. Press the OK button to print the print job log. * Displayed only when optional hard disk unit is installed. Paper menu Item Load/Remove Paper Select Paper Type Photo Paper Matte Paper Plain Paper Others Custom Paper Description Remove Paper Press the OK button to view instructions for removing the paper. Follow the on-screen instructions to remove the paper. Instructions are not displayed if no paper is loaded. Roll Paper Cut Sheet (up to 0.8 mm thick) Poster Board Highlight the paper to be loaded and press the OK button. Follow the on-screen instructions to load the paper. If paper is already loaded in the printer, the instructions for removing the loaded paper type will be displayed before loading instructions are shown. Select the type of paper loaded. Select the name of the custom paper loaded in the printer. Using the Control Panel Menu 171
-
 1
1 -
2
-
3
-
4
-
5
-
6
-
7
-
8
-
9
-
10
-
11
-
12
-
13
-
14
-
15
-
16
-
17
-
18
-
19
-
20
-
21
-
22
-
23
-
24
-
25
-
26
-
27
-
28
-
29
-
30
-
31
-
32
-
33
-
34
-
35
-
36
-
37
-
38
-
39
-
40
-
41
-
42
-
43
-
44
-
45
-
46
-
47
-
48
-
49
-
50
-
51
-
52
-
53
-
54
-
55
-
56
-
57
-
58
-
59
-
60
-
61
-
62
-
63
-
64
-
65
-
66
-
67
-
68
-
69
-
70
-
71
-
72
-
73
-
74
-
75
-
76
-
77
-
78
-
79
-
80
-
81
-
82
-
83
-
84
-
85
-
86
-
87
-
88
-
89
-
90
-
91
-
92
-
93
-
94
-
95
-
96
-
97
-
98
-
99
-
100
-
101
-
102
-
103
-
104
-
105
-
106
-
107
-
108
-
109
-
110
-
111
-
112
-
113
-
114
-
115
-
116
-
117
-
118
-
119
-
120
-
121
-
122
-
123
-
124
-
125
-
126
-
127
-
128
-
129
-
130
-
131
-
132
-
133
-
134
-
135
-
136
-
137
-
138
-
139
-
140
-
141
-
142
-
143
-
144
-
145
-
146
-
147
-
148
-
149
-
150
-
151
-
152
-
153
-
154
-
155
-
156
-
157
-
158
-
159
-
160
-
161
-
162
-
163
-
164
-
165
-
 166
166 -
 167
167 -
 168
168 -
 169
169 -
 170
170 -
 171
171 -
 172
172 -
 173
173 -
 174
174 -
 175
175 -
 176
176 -
177
-
178
-
179
-
180
-
181
-
182
-
183
-
184
-
185
-
186
-
187
-
188
-
189
-
190
-
191
-
192
-
193
-
194
-
195
-
196
-
197
-
198
-
199
-
200
-
201
-
202
-
203
-
204
-
205
-
206
-
207
-
208
-
209
-
210
-
211
-
212
-
213
-
214
-
215
-
216
-
217
-
218
-
219
-
220
-
221
-
222
-
223
-
224
-
225
-
226
-
227
-
228
-
229
-
230
-
231
-
232
-
233
-
234
-
235
-
236
-
237
-
238
-
239
-
240
-
241
-
242
-
243
-
244
-
245
-
246
-
247
-
248
-
249
-
250
-
251
 |
 |