Epson TM-T20II-i Users Manual
Epson TM-T20II-i Manual
 |
View all Epson TM-T20II-i manuals
Add to My Manuals
Save this manual to your list of manuals |
Epson TM-T20II-i manual content summary:
- Epson TM-T20II-i | Users Manual - Page 1
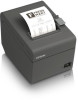
User's Manual Important Safety Information page 2 Part Names and Functions page 4 Setup page 6 Basic Operations page 13 Installing/Replacing the Roll Paper page 15 Cleaning page 16 Troubleshooting page 17 Specifications page 19 Appendix page 20 M00076101EN - Epson TM-T20II-i | Users Manual - Page 2
Reference Guide. You can access Technical Reference Guide from the included Manual CD. Key to Symbols The symbols in this manual are identified , immediately unplug the AC cable, and then contact your dealer or an Epson service center for advice. Continued use may lead to fire or shock. ❏ Do - Epson TM-T20II-i | Users Manual - Page 3
high humidity or dust levels. Excessive humidity and dust may cause paper jams and other problems, such as fire, or electric shock. ❏ Be sure to set of the external devices by checking the descriptions on the devices or manuals. Connect the external devices only when those total rated current is - Epson TM-T20II-i | Users Manual - Page 4
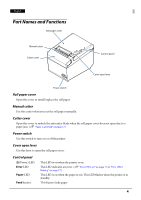
English Part Names and Functions Roll paper cover Manual cutter Cutter cover Control panel Cover open lever Power switch Roll paper cover Open this cover to install/replace the roll paper. Manual cutter Use this cutter when you cut the roll paper manually. Cutter cover Open this cover to - Epson TM-T20II-i | Users Manual - Page 5
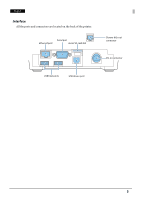
English Interface All the ports and connectors are located on the back of the printer. Serial port Ethernet port micro SD card slot Drawer kick-out connector DC-in connector USB host ports USB device port 5 - Epson TM-T20II-i | Users Manual - Page 6
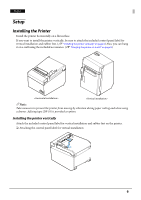
hang it on a wall using the included accessories. (U "Hanging the printer on a wall" on page 8) QNote: Take measures to prevent the printer from moving by vibration during paper cutting and when using a drawer. Affixing tape (DF-10) is provided - Epson TM-T20II-i | Users Manual - Page 7
English ❏ Attaching the rubber feet QNote: You can install the printer so that the roll paper cover is upright to the mounting surface using the included wall hanging bracket. Follow the steps below. 1. Install the wall hanging bracket on the printer, and fix it using 2 included screws. 2. Attach 2 - Epson TM-T20II-i | Users Manual - Page 8
on a wall Follow the steps below to hang the printer on the wall. !CAUTION: ❏ To fix the printer securely, install printer on a wall made of wood, concrete, or metal. The thickness of the wall should be 10 mm {0.4"} or more. ❏ Be sure to use metallic screws. ❏ - Epson TM-T20II-i | Users Manual - Page 9
English 3. Install the wall hanging bracket on the printer, and fix it using the screws removed in Step 2. 4. Align the holes in the wall hanging bracket with the screws on the wall, and hook it securely. 9 - Epson TM-T20II-i | Users Manual - Page 10
below to connect the AC adapter. 1. Firmly insert the DC connector of the AC adapter all the way into the DC-in connector on the printer. 2. Firmly insert the connector of the AC cable all the way into the AC inlet on the AC adapter. 3. Firmly insert the plug all the - Epson TM-T20II-i | Users Manual - Page 11
through the cable band to prevent them from coming off. Cable band ❏ When using the printer, make sure the protective cover fits firmly into place. ❏ When Ethernet cables are installed outdoors, make sure devices without proper surge protection are cushioned by being connected through devices that - Epson TM-T20II-i | Users Manual - Page 12
English Attaching the Power Switch Cover Attaching the enclosed power switch cover prevents inadvertent changing of the power switch and tampering. You can turn the power switch on and off by inserting a sharp-pointed object in the holes in the power switch cover. A waterproof cover for the power - Epson TM-T20II-i | Users Manual - Page 13
Basic Operations Turning Power On/Off Press the power switch to turn on/off the printer. QNote: It takes approximately 30 seconds after the printer is turned on until it is ready for printing. Opening the Covers Opening the roll paper cover Pull the cover open lever to open the roll paper cover. 13 - Epson TM-T20II-i | Users Manual - Page 14
English Opening the cutter cover Put your fingers in the indents in both sides of the cutter cover, and pull it to open it. 14 - Epson TM-T20II-i | Users Manual - Page 15
Open the roll paper cover. (U "Opening the roll paper cover" on page 13) 2. Remove the used roll paper core, if there is one. 3. Insert the roll paper in the correct direction. 4. Pull out some paper, and close the roll paper cover. When the printer power is on, the roll paper is automatically cut - Epson TM-T20II-i | Users Manual - Page 16
printer with alcohol, benzine, thinner, or other such solvents. Doing so may damage or break the parts made of plastic and rubber. Cleaning the Thermal Head To maintain print quality, Epson printer. (U "Turning Power On/Off" on page 13) 2. Open the roll paper cover. (U "Opening the roll paper cover - Epson TM-T20II-i | Users Manual - Page 17
English Troubleshooting (Power) LED does not light Check whether the AC adapter is correctly connected. (U "Connecting the AC Adapter" on page 10) Error LED is on ❏ Check whether the roll paper cover is correctly closed. ❏ If the Paper LED is on, check whether the roll paper is correctly installed - Epson TM-T20II-i | Users Manual - Page 18
cover will not open When the autocutter blade is locked, the roll paper cover will not open. Follow the steps below to return the autocutter blade to the normal position. 1. Turn off the printer. (U "Turning Power On/Off" on page 13) 2. Open the cutter cover. (U "Opening the cutter cover" on page - Epson TM-T20II-i | Users Manual - Page 19
paper type NTP080-80 Interface Ethernet paper width, see Technical Reference Guide. *2: 500 mA at maximum for one port. 800 mA at maximum for total of the two ports. *3: Available when the PHP function is enabled. For information on how to setup PHP environment, see TM-i Series PHP Setup Manual - Epson TM-T20II-i | Users Manual - Page 20
, utilities, and manuals can be downloaded from one of the following URLs. For customers in North America, go to the following web site: http://www.epsonexpert.com/ For customers in other countries, go to the following web site: http://download.epson-biz.com/?service=pos Open Source Software License - Epson TM-T20II-i | Users Manual - Page 21
Seiko Epson Corporation's operating and maintenance instructions. Seiko Epson Corporation shall not be liable against any damages or problems arising from of their respective companies. Epson disclaims any and all rights in those marks. NOTICE: The contents of this manual are subject to change
-
 1
1 -
 2
2 -
 3
3 -
 4
4 -
 5
5 -
 6
6 -
 7
7 -
8
-
9
-
10
-
11
-
12
-
13
-
14
-
15
-
16
-
17
-
18
-
19
-
20
-
21
 |
 |
User’s Manual
Important Safety Information. . . . . . . . . . . . . . . . . . .page 2
Part Names and Functions. . . . . . . . . . . . . . . . . . . . . .page 4
Setup. . . . . . . . . . . . . . . . . . . . . . . . . . . . . . . . . . . . . . . . . .page 6
Basic Operations . . . . . . . . . . . . . . . . . . . . . . . . . . . . . page 13
Installing/Replacing the Roll Paper . . . . . . . . . . . page 15
Cleaning. . . . . . . . . . . . . . . . . . . . . . . . . . . . . . . . . . . . . page 16
Troubleshooting . . . . . . . . . . . . . . . . . . . . . . . . . . . . . page 17
Specifications . . . . . . . . . . . . . . . . . . . . . . . . . . . . . . . . page 19
Appendix . . . . . . . . . . . . . . . . . . . . . . . . . . . . . . . . . . . . page 20
M00076101EN