Epson TM-T20II-i Users Manual - Page 7
Attaching the rubber feet, fix it using 2 included screws.
 |
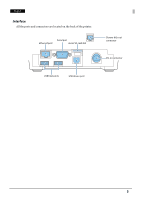
View all Epson TM-T20II-i manuals
Add to My Manuals
Save this manual to your list of manuals |
Page 7 highlights
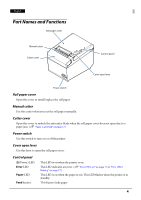
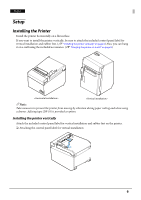
English ❏ Attaching the rubber feet QNote: You can install the printer so that the roll paper cover is upright to the mounting surface using the included wall hanging bracket. Follow the steps below. 1. Install the wall hanging bracket on the printer, and fix it using 2 included screws. 2. Attach 2 rubber feet on the printer case, and attach 2 rubber feet on the hanging bracket. 207 mm {8.15"} 7
-
 1
1 -
 2
2 -
 3
3 -
 4
4 -
 5
5 -
 6
6 -
 7
7 -
 8
8 -
 9
9 -
 10
10 -
 11
11 -
 12
12 -
13
-
14
-
15
-
16
-
17
-
18
-
19
-
20
-
21
 |
 |

7
English
❏
Attaching the rubber feet
Q
Note:
You can install the printer so that the roll paper cover is
upright to the mounting surface using the included wall
hanging bracket. Follow the steps below.
1.
Install the wall hanging bracket on the printer, and
fix it using 2 included screws.
2.
Attach 2 rubber feet on the printer case, and attach
2 rubber feet on the hanging bracket.
207 mm
{8.15"}