Epson TM-T20II-i Users Manual - Page 8
CAUTION, Hanging the printer on a wall
 |
View all Epson TM-T20II-i manuals
Add to My Manuals
Save this manual to your list of manuals |
Page 8 highlights
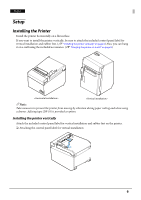
English Hanging the printer on a wall Follow the steps below to hang the printer on the wall. !CAUTION: ❏ To fix the printer securely, install printer on a wall made of wood, concrete, or metal. The thickness of the wall should be 10 mm {0.4"} or more. ❏ Be sure to use metallic screws. ❏ The screws on the wall side must have a pull-out strength of 150 N (15.3 kgf) or more. 1. Install 2 screws (screw diameter: 4 mm {0.16"}, head diameter: 7 to 9 mm {0.28" to 0.35"} in the wall at an interval of 80 mm {3.15"}. Make sure the length of the screw's body in the wall is 10 mm {0.39"} or more, and the length outside the wall is 3 to 4 mm {0.12" to 0.16"}. 3 ~ 4 mm 80 mm 7 ~ 9 mm 4 mm 10 mm or more 2. Remove the installed 2 screws from the printer. 8
-
 1
1 -
2
-
 3
3 -
 4
4 -
 5
5 -
 6
6 -
 7
7 -
 8
8 -
 9
9 -
 10
10 -
 11
11 -
 12
12 -
 13
13 -
14
-
15
-
16
-
17
-
18
-
19
-
20
-
21
 |
 |
