Epson TM-U675 Users Manual - Page 8
If you need to remove roll paper before it is all gone, follow these
 |
View all Epson TM-U675 manuals
Add to My Manuals
Save this manual to your list of manuals |
Page 8 highlights
English Turn on the printer. Hold both edges of the paper and insert it into the paper slot. It will be fed automatically into the printer. For 2-ply paper, insert the journal paper into the take-up spool as shown below. Be sure that 40mm to 60 mm (1.5" to 2.25") of paper extends beyond the spool and that the edge of the paper is against the flange. Insert the take-up spool and tear off the receipt paper, as shown below. If you need to remove roll paper before it is all gone, follow these steps: 1. Lift up the take-up spool with the journal paper attached. 2. Cut the paper off behind the paper insert slot. 3. Push the release lever (located on the right side of the paper roll). 6 TM-U675/TM-U675P User's Manual
-
 1
1 -
2
-
 3
3 -
 4
4 -
 5
5 -
 6
6 -
 7
7 -
 8
8 -
 9
9 -
 10
10 -
 11
11 -
 12
12 -
 13
13 -
14
-
15
-
16
-
17
-
18
-
19
-
20
-
21
-
22
-
23
-
24
-
25
-
26
-
27
-
28
-
29
-
30
-
31
-
32
-
33
-
34
-
35
-
36
-
37
-
38
-
39
-
40
-
41
-
42
-
43
-
44
-
45
-
46
-
47
-
48
-
49
-
50
-
51
-
52
-
53
-
54
-
55
-
56
-
57
-
58
-
59
-
60
-
61
-
62
-
63
-
64
-
65
-
66
-
67
-
68
-
69
-
70
 |
 |

6
TM-U675/TM-U675P User’s Manual
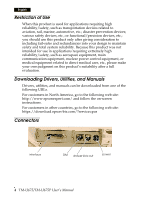
English
Turn on the printer. Hold both edges of the paper and insert it into
the paper slot. It will be fed automatically into the printer.
For 2-ply paper, insert the journal paper into the take-up spool as
shown below. Be sure that 40mm to 60 mm (1.5" to 2.25") of paper
extends beyond the spool and that the edge of the paper is against
the flange.
Insert the take-up spool and tear off the receipt paper, as shown
below.
If you need to remove roll paper before it is all gone, follow these
steps:
1.
Lift up the take-up spool with the journal paper attached.
2.
Cut the paper off behind the paper insert slot.
3.
Push the release lever (located on the right side of the paper
roll).