Epson TM-U950 Users Manual - Page 8
Inserting Slip Paper, Installing a Ribbon, Using the MICR Reader Option
 |
View all Epson TM-U950 manuals
Add to My Manuals
Save this manual to your list of manuals |
Page 8 highlights
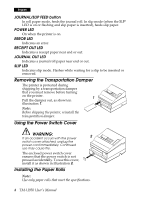
English Inserting Slip Paper Notes: Do not use wrinkled, folded, or curled paper. Use only slip paper that matches the printer's specifications. To prevent paper jams, install both paper rolls in the printer even if you plan to print only on slip paper. 1. When the SLIP LED flashes, insert slip paper, using the right 7 edge of the slip paper inlet as a guide. See illustration 7. 2. When the printer detects the paper, it automatically draws it in and begins printing. CAUTION: Be sure to put the caution label exactly in the position shown. If you put it another place, such as over the slip paper inlet, the printer may be damaged. Installing a Ribbon Use the EPSON ERC-31. The use of any ribbon cassettes other than those approved by Epson may damage the printer and will void the warranty. 1. Turn the printer on and open the ribbon cover. 2. Turn the ribbon cassette's knob 2 or 3 times in 8 the direction of the arrow in illustration 8 to take up any slack. 3. Insert the ribbon in the printer and rotate the cassette's knob 2 or 3 more times to place the ribbon in the correct position. 4. Make sure the ribbon is installed in front of the print head without wrinkles or creases. 5. To remove the ribbon cassette, grasp the ribbon cassette's tab and pull it out of the printer. Using the MICR Reader (Option) The optional, factory-installed magnetic ink character recognition (MICR) reader lets the printer read MICR ink on personal checks. 6 TM-U950 User's Manual
-
 1
1 -
2
-
 3
3 -
 4
4 -
 5
5 -
 6
6 -
 7
7 -
 8
8 -
 9
9 -
 10
10 -
 11
11 -
 12
12 -
 13
13 -
14
-
15
-
16
-
17
-
18
-
19
-
20
-
21
-
22
-
23
-
24
-
25
-
26
-
27
-
28
-
29
-
30
-
31
-
32
-
33
-
34
-
35
-
36
-
37
-
38
-
39
-
40
-
41
-
42
-
43
-
44
-
45
-
46
-
47
-
48
-
49
-
50
-
51
-
52
-
53
-
54
-
55
-
56
-
57
-
58
-
59
-
60
-
61
-
62
-
63
-
64
-
65
-
66
-
67
-
68
-
69
-
70
-
71
-
72
-
73
-
74
-
75
-
76
-
77
-
78
-
79
-
80
-
81
-
82
-
83
-
84
-
85
-
86
-
87
-
88
-
89
-
90
-
91
-
92
-
93
-
94
-
95
-
96
-
97
-
98
-
99
-
100
-
101
-
102
-
103
-
104
-
105
-
106
-
107
-
108
-
109
-
110
-
111
-
112
-
113
-
114
-
115
-
116
-
117
-
118
 |
 |
