Epson WF-3640 User Manual - Page 171
Proceed, Rings to Answer, Start, On the Receive Mode Setting screen, select
 |
View all Epson WF-3640 manuals
Add to My Manuals
Save this manual to your list of manuals |
Page 171 highlights
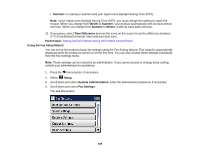
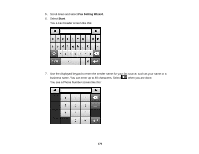
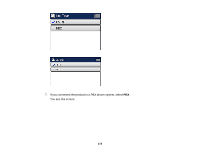
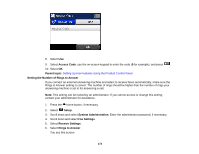
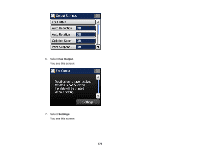
8. Use the displayed keypad or the buttons on the product to enter your fax number, up to 20 characters. Press when you are done. 9. On the Distinctive Ring Setting screen, do one of the following: • If you have subscribed to a distinctive ring service from your telephone company, select Proceed. Then, select the ring pattern to be used for incoming faxes. Go to step 12. • If you do not have distinctive ring service, select Skip, then go to the next step. Note: • Distinctive ring service allows you to have several phone numbers on one phone line. Each number is assigned a different ring pattern. You can use one number for voice calls and another for fax calls. Select the ring pattern assigned to fax calls in the DRD Setting. • If you select On or one of the ring patterns other than All, Receive Mode is automatically set to Auto. 10. On the Receive Mode Setting screen, select Yes if you have connected an external telephone or answering machine to the product, and then go to the next step. Otherwise select No, then go to step 12. (Receive Mode is automatically set to Auto.) Note: When no external telephone is connected to the product, Receive Mode must be set to Auto; otherwise you cannot receive faxes. 11. On the next Receive Mode Setting screen, select Yes to receive faxes automatically or select No to receive faxes manually. Note: If you have connected an external answering machine and selected to receive faxes automatically, make sure the Rings to Answer setting is correct. If you select to receive faxes manually, you need to answer every call and use the product's control panel or your phone to receive faxes. 12. On the Confirm Settings screen, confirm the displayed settings and select Proceed. (Press the back button if you need to correct or change the settings.) 13. On the Confirmation screen, select Start to check the fax connection and print a report of the check result. If there are any errors reported, try the solutions on the report, and run the check again. Note: • If the Select Line Type screen is displayed, select the correct line type. 171
-
 1
1 -
2
-
3
-
4
-
5
-
6
-
7
-
8
-
9
-
10
-
11
-
12
-
13
-
14
-
15
-
16
-
17
-
18
-
19
-
20
-
21
-
22
-
23
-
24
-
25
-
26
-
27
-
28
-
29
-
30
-
31
-
32
-
33
-
34
-
35
-
36
-
37
-
38
-
39
-
40
-
41
-
42
-
43
-
44
-
45
-
46
-
47
-
48
-
49
-
50
-
51
-
52
-
53
-
54
-
55
-
56
-
57
-
58
-
59
-
60
-
61
-
62
-
63
-
64
-
65
-
66
-
67
-
68
-
69
-
70
-
71
-
72
-
73
-
74
-
75
-
76
-
77
-
78
-
79
-
80
-
81
-
82
-
83
-
84
-
85
-
86
-
87
-
88
-
89
-
90
-
91
-
92
-
93
-
94
-
95
-
96
-
97
-
98
-
99
-
100
-
101
-
102
-
103
-
104
-
105
-
106
-
107
-
108
-
109
-
110
-
111
-
112
-
113
-
114
-
115
-
116
-
117
-
118
-
119
-
120
-
121
-
122
-
123
-
124
-
125
-
126
-
127
-
128
-
129
-
130
-
131
-
132
-
133
-
134
-
135
-
136
-
137
-
138
-
139
-
140
-
141
-
142
-
143
-
144
-
145
-
146
-
147
-
148
-
149
-
150
-
151
-
152
-
153
-
154
-
155
-
156
-
157
-
158
-
159
-
160
-
161
-
162
-
163
-
164
-
165
-
 166
166 -
 167
167 -
 168
168 -
 169
169 -
 170
170 -
 171
171 -
 172
172 -
 173
173 -
 174
174 -
 175
175 -
 176
176 -
177
-
178
-
179
-
180
-
181
-
182
-
183
-
184
-
185
-
186
-
187
-
188
-
189
-
190
-
191
-
192
-
193
-
194
-
195
-
196
-
197
-
198
-
199
-
200
-
201
-
202
-
203
-
204
-
205
-
206
-
207
-
208
-
209
-
210
-
211
-
212
-
213
-
214
-
215
-
216
-
217
-
218
-
219
-
220
-
221
-
222
-
223
-
224
-
225
-
226
-
227
-
228
-
229
-
230
-
231
-
232
-
233
-
234
-
235
-
236
-
237
-
238
-
239
-
240
-
241
-
242
-
243
-
244
-
245
-
246
-
247
-
248
-
249
-
250
-
251
-
252
-
253
-
254
-
255
-
256
-
257
-
258
-
259
-
260
-
261
-
262
-
263
-
264
-
265
-
266
-
267
-
268
-
269
-
270
-
271
-
272
-
273
-
274
-
275
-
276
-
277
-
278
-
279
-
280
-
281
-
282
-
283
-
284
-
285
-
286
-
287
-
288
-
289
-
290
-
291
-
292
-
293
-
294
-
295
-
296
-
297
-
298
-
299
-
300
-
301
-
302
-
303
-
304
-
305
-
306
-
307
-
308
-
309
-
310
-
311
-
312
-
313
-
314
-
315
-
316
-
317
-
318
-
319
-
320
-
321
-
322
-
323
-
324
-
325
-
326
-
327
-
328
-
329
-
330
-
331
-
332
-
333
-
334
-
335
-
336
-
337
-
338
-
339
-
340
-
341
-
342
-
343
-
344
-
345
-
346
-
347
 |
 |
