Fluke 124 FE 123 & 124 Users Manual - Page 36
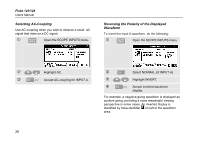
Selecting the Trigger Parameters
 |
View all Fluke 124 manuals
Add to My Manuals
Save this manual to your list of manuals |
Page 36 highlights
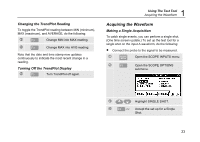
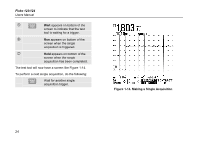
Fluke 123/124 Users Manual Selecting the Trigger Parameters To trigger on the input A waveform, with automatic screen update, and to configure the auto range triggering for waveforms from 1 Hz, do the following: Open the SCOPE INPUTS menu. Open the TRIGGER submenu. Accept all trigger selections and return to normal measurement. Note Setting the automatic triggering to >1Hz will slow down the auto range. TRIG:A appears in gray text on bottom of the screen when no trigger is found. Note Gray text in a menu or button bar indicates that the function is disabled or the status is not valid. Highlight Input 'A'. Select Input 'A'. Highlight FREE RUN. Select FREE RUN. Highlight >1 Hz 28
-
 1
1 -
2
-
3
-
4
-
5
-
6
-
7
-
8
-
9
-
10
-
11
-
12
-
13
-
14
-
15
-
16
-
17
-
18
-
19
-
20
-
21
-
22
-
23
-
24
-
25
-
26
-
27
-
28
-
29
-
30
-
 31
31 -
 32
32 -
 33
33 -
 34
34 -
 35
35 -
 36
36 -
 37
37 -
 38
38 -
 39
39 -
 40
40 -
 41
41 -
42
-
43
-
44
-
45
-
46
-
47
-
48
-
49
-
50
-
51
-
52
-
53
-
54
-
55
-
56
-
57
-
58
-
59
-
60
-
61
-
62
-
63
-
64
-
65
-
66
-
67
-
68
-
69
-
70
-
71
-
72
-
73
-
74
-
75
-
76
-
77
-
78
-
79
-
80
-
81
-
82
-
83
-
84
-
85
-
86
 |
 |

Fluke 123/124
Users Manual
28
Selecting the Trigger Parameters
To trigger on the input A waveform, with automatic screen
update, and to configure the auto range triggering for
waveforms from 1 Hz, do the following:
±
Open the SCOPE INPUTS menu.
²
Open the TRIGGER submenu.
³
Highlight Input ‘A’.
´
Select Input ‘A’.
µ
Highlight FREE RUN.
Select FREE RUN.
·
Highlight >1 Hz
¸
Accept all trigger selections and
return to normal measurement.
Note
Setting the automatic triggering to >1Hz will slow
down the auto range.
TRIG:A
appears in gray text on bottom of the screen
when no trigger is found.
Note
Gray text in a menu or button bar indicates that
the function is disabled or the status is not valid.