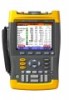
Fluke 225C Getting Started Guide
Fluke 225C Manual
 |
View all Fluke 225C manuals
Add to My Manuals
Save this manual to your list of manuals |
Fluke 225C manual content summary:
- Fluke 225C | Getting Started Guide - Page 1
Fluke 19xC-2x5C ScopeMeter Software version 8.00 onwards GB Jun 2008, Rev. 1, 09/2009 © 2008, 2009 Fluke Corporation, All rights reserved. Printed in the Netherlands All product names are trademarks of their respective companies. Getting Started - Fluke 225C | Getting Started Guide - Page 2
- Fluke 225C | Getting Started Guide - Page 3
Tool Kit ii Introduction ...1 Contacting Fluke ...1 Safety Information: Read First 1 Preparing for Use ...4 Powering/Resetting the Test Tool Changing the Information Language 5 Adjusting Contrast and Brightness 5 Using the Scope ...5 Multimeter ...7 Recorder Functions ...8 Fieldbus Measurements - Fluke 225C | Getting Started Guide - Page 4
complete Users Manual 8. Shipment box (basic version only) The -S versions also include: 9. Optically Isolated USB Adapter/Cable 10. CD ROM with FlukeView® Software 11. Hard Case (2x) e (2x) d (2x) 1 a (2x) (2x) b Fluke 215C/225C 2 (2x) c 5 6 7 34 S-version 9 10 11 8 Figure 1. ScopeMeter - Fluke 225C | Getting Started Guide - Page 5
, 196C, 199C, 215C and 225C, software versions V08.00 and newer. Refer to the Users Manual on the accompanying CD-ROM for complete operating instructions. Contacting Fluke To locate an authorized service center, visit us on the World Wide Web at: www.fluke.com or call Fluke using any of the phone - Fluke 225C | Getting Started Guide - Page 6
indicated by Fluke as suitable for the Fluke 19xC-2x5C ScopeMeter series. • Before use, inspect voltage probes, test leads and accessories for mechanical damage and replace when damaged. • Remove all probes, test leads and accessories that are not in use. • Always connect the battery charger first - Fluke 225C | Getting Started Guide - Page 7
use the test tool only in the manner specified. Max. Input Voltages Input A and B directly 300 V CAT III Input A and B via 10:1 probe 1000 V CAT II 600 V CAT III METER floating' are used in this manual to indicate a Before use, inspect the test leads for mechanical damage and replace damaged test - Fluke 225C | Getting Started Guide - Page 8
turned off) to reach full charge: • use only the Fluke Battery Charger/Power Adapter model BC190 • before use check that the BC190 voltage and frequency range match the local line power range • connect the battery charger to the ac outlet • connect the battery charger to the appropriate input on the - Fluke 225C | Getting Started Guide - Page 9
Display the USER key labels. Enable the arrow keys for adjustment. Adjust the contrast of the screen. Change the backlight brightness. Getting Started Changing the Information Language Using the Scope Connect the probe(s) as shown in figure 2. Figure 2. Scope Connections AUTO- MANUAL ranging After - Fluke 225C | Getting Started Guide - Page 10
Fluke 19xC-2x5C Getting Started Scope Readings and Waveforms Automatic scope measurement results are shown as Reading 1 (READING 1) and Reading 2 (READING 2) at the upper left and - Fluke 225C | Getting Started Guide - Page 11
, 10 kHz, 20 MHz. Getting Started Multimeter Multimeter Connect the test leads (Figure 1, item 5) to the 4-mm safety banana jack METER input. Figure 3. Meter connections Select a measurement function. Relative measurements on or off. Automatic ranging. Manual ranging. Use range. to select a 7 - Fluke 225C | Getting Started Guide - Page 12
) or Measurement... (Meter) show the measurement function menu. VIEW ALL : see all stored samples. NORMAL : see the most recent 9 divisions. EXIT : exit the recorder mode. Fieldbus Measurements (Bushealth) The Bushealth function is standard available in the Fluke 215C-225C. Selecting the Bus Type - Fluke 225C | Getting Started Guide - Page 13
bushealth screen (ON). Bushealth Screen The following icons are used to indicate the bus measurement status: bus activity indicators: Q (filled) : voltage measured { ( up the Limits To set up the test limits of the current bus type, do the following: From the bushealth screen select SETUP LIMITS - Fluke 225C | Getting Started Guide - Page 14
Fluke 19xC-2x5C Getting Started Replay In scope mode, the test tool automatically stores the 100 most recent screens. Use REPLAY to the next screens. Continuously play the stored screens. Exit the REPLAY mode. Zoom Use the zoom function to obtain a more detailed view of a waveform. Display the - Fluke 225C | Getting Started Guide - Page 15
and fall time. Select the cursor to be moved. Use the blue arrow keys to move. Depending on cursor measurement type: Automatic or manual risetime measurement on a single channel. Reading 2 is A B : trigger on input A or B waveform Ext : trigger on the meter-input signal. Select the trigger slope. 11 - Fluke 225C | Getting Started Guide - Page 16
TRIG): AUTO LEVEL : automatic level control. MANUAL : manual level control. • at triggering via the meter input (Ext): 0.12V 1.2V : select level 0.12V or 1.2V. • at triggering on edges via input A or B (EDGE TRIG, see F4 below): LEVEL : adjust the level manually. Use to adjust the trigger level - Fluke 225C | Getting Started Guide - Page 17
a screen + setup, or a record + setup. Test tool is in hold mode. CANCEL: Close menu PRINT: Print the displayed screen. Refer to the User Options below for printer setup information. VIEW DELETE : open the View/Delete menu. DELETE: clear the selected memory. RENAME... : rename a saved item. VIEW - Fluke 225C | Getting Started Guide - Page 18
Fluke 19xC-2x5C Getting Started User Options Display the USER key labels. Open the to On) or don't change the glitch detection setting. Battery Save Options... When powered on the battery only, the test tool initially shuts itself down 30 minutes color (Color) or black and white (Black and White). 14
-
 1
1 -
 2
2 -
 3
3 -
 4
4 -
 5
5 -
 6
6 -
 7
7 -
8
-
9
-
10
-
11
-
12
-
13
-
14
-
15
-
16
-
17
-
18
 |
 |

Fluke 19xC-2x5C
ScopeMeter
Software version 8.00 onwards
Getting Started
GB
Jun 2008, Rev. 1, 09/2009
© 2008, 2009 Fluke Corporation, All rights reserved. Printed in the Netherlands
All product names are trademarks of their respective companies.