Fluke 744 Fluke 744 Users Manual - Page 20
Getting Started Exercise, of jacks V MEAS. See - instruction manual
 |
View all Fluke 744 manuals
Add to My Manuals
Save this manual to your list of manuals |
Page 20 highlights
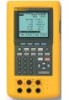
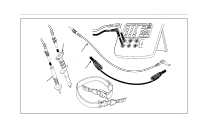
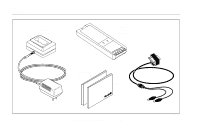
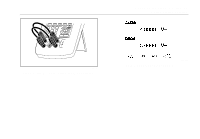
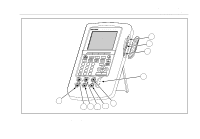
744 Users Manual Getting Started Exercise The following is a brief getting started exercise that will make it easier to understand the instructions in the rest of the manual. 1. When you first unpack the calibrator, you will need to charge the battery. See Figure 9 and charge the battery for 2 hours. 2. Reinstall the battery in the calibrator. 3. Connect the calibrator's voltage output to its voltage input as follows: connect leftmost pair of jacks (V Ω RTD SOURCE) to the right most pair of jacks (V MEAS). (See Figure 3.) 4. Press o to turn on the calibrator. Press u and d to adjust the display contrast for the best looking display. The calibrator powers up in the dc voltage measurement function, and is taking readings on the V MEAS pair of input jacks. 5. Press s to switch to the SOURCE screen. The calibrator is still measuring dc voltage, and you can see the active measurements at the top of the display. 6. Press v to select dc voltage sourcing. Press 5 on the keypad and eto begin sourcing 5.0000 V dc. 7. Now press M to go to the split-screen, simultaneous MEASURE/SOURCE mode. The calibrator is simultaneously sourcing dc volts and measuring dc volts. You can see the measurement readings in the top window, and the active source value in the bottom window as shown in Figure 4. 10
-
 1
1 -
2
-
3
-
4
-
5
-
6
-
7
-
8
-
9
-
10
-
11
-
12
-
13
-
14
-
 15
15 -
 16
16 -
 17
17 -
 18
18 -
 19
19 -
 20
20 -
 21
21 -
 22
22 -
 23
23 -
 24
24 -
 25
25 -
26
-
27
-
28
-
29
-
30
-
31
-
32
-
33
-
34
-
35
-
36
-
37
-
38
-
39
-
40
-
41
-
42
-
43
-
44
-
45
-
46
-
47
-
48
-
49
-
50
-
51
-
52
-
53
-
54
-
55
-
56
-
57
-
58
-
59
-
60
-
61
-
62
-
63
-
64
-
65
-
66
-
67
-
68
-
69
-
70
-
71
-
72
-
73
-
74
-
75
-
76
-
77
-
78
-
79
-
80
-
81
-
82
-
83
-
84
-
85
-
86
-
87
-
88
-
89
-
90
-
91
-
92
-
93
-
94
-
95
-
96
-
97
-
98
-
99
-
100
-
101
-
102
-
103
-
104
-
105
-
106
-
107
-
108
-
109
-
110
-
111
-
112
-
113
-
114
-
115
-
116
-
117
-
118
-
119
-
120
-
121
-
122
-
123
-
124
-
125
-
126
-
127
-
128
-
129
-
130
-
131
-
132
-
133
-
134
-
135
-
136
-
137
-
138
 |
 |