Fluke 744 Fluke 744 Users Manual - Page 38
Using Measure Mode, Measurement Ranges, Measuring Electrical Parameters - videos
 |
View all Fluke 744 manuals
Add to My Manuals
Save this manual to your list of manuals |
Page 38 highlights
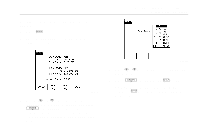
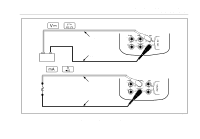
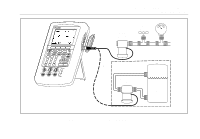
744 Users Manual Using Measure Mode Note To achieve best noise rejection and highest accuracy performance, do not use the battery eliminator, and tie all three common jacks together. The operating mode (i.e., MEASURE, SOURCE) is shown in a reverse-video bar on the display. If the calibrator is not in MEASURE mode, press M until MEASURE is shown. You must be in MEASURE mode to change any of the MEASURE parameters. Measurement Ranges The calibrator normally changes to the appropriate measurement range automatically. The lower right side of the display shows either "Range" or "Auto Range" depending on the range status. Auto Range switch points are shown in the specifications at the end of this manual. When you press the Range softkey, the range is locked. Press it again to cycle to and lock on the next higher range. Auto Range is reactivated when you select another measurement function. If the range is locked, overrange inputs produce a display of In Auto Range, out of range inputs produce a display of Measuring Electrical Parameters When you turn on the calibrator, it powers up in the dc voltage measurement function. Figure 10 shows electrical measurement connections. To select an electrical measurement function from either SOURCE or MEASURE/SOURCE mode, first press M for MEASURE mode, then proceed as follows: 1. Press m for current, v for dc voltage, h once for ac voltage or twice for frequency, or q for resistance. 28
-
 1
1 -
2
-
3
-
4
-
5
-
6
-
7
-
8
-
9
-
10
-
11
-
12
-
13
-
14
-
15
-
16
-
17
-
18
-
19
-
20
-
21
-
22
-
23
-
24
-
25
-
26
-
27
-
28
-
29
-
30
-
31
-
32
-
 33
33 -
 34
34 -
 35
35 -
 36
36 -
 37
37 -
 38
38 -
 39
39 -
 40
40 -
 41
41 -
 42
42 -
 43
43 -
44
-
45
-
46
-
47
-
48
-
49
-
50
-
51
-
52
-
53
-
54
-
55
-
56
-
57
-
58
-
59
-
60
-
61
-
62
-
63
-
64
-
65
-
66
-
67
-
68
-
69
-
70
-
71
-
72
-
73
-
74
-
75
-
76
-
77
-
78
-
79
-
80
-
81
-
82
-
83
-
84
-
85
-
86
-
87
-
88
-
89
-
90
-
91
-
92
-
93
-
94
-
95
-
96
-
97
-
98
-
99
-
100
-
101
-
102
-
103
-
104
-
105
-
106
-
107
-
108
-
109
-
110
-
111
-
112
-
113
-
114
-
115
-
116
-
117
-
118
-
119
-
120
-
121
-
122
-
123
-
124
-
125
-
126
-
127
-
128
-
129
-
130
-
131
-
132
-
133
-
134
-
135
-
136
-
137
-
138
 |
 |