Fluke 83V FE 83V & 87V Users Manual - Page 44
Replacing the Battery
 |
View all Fluke 83V manuals
Add to My Manuals
Save this manual to your list of manuals |
Page 44 highlights
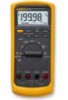
80 Series V Users Manual Good F2 fuse: 00.0 Ω to 00.5 Ω Replace fuse: OL Touch top half of input contacts 87 V TRUE RMS MULTIMETER MIN MAX Peak MIN MAX 4½ DIGITS 1 Second ˚C/˚F RANGE REL mV V AutoHOLD Hz % mA A V LO A OFF A mA A COM V 10A MAX FUSED 400mA FUSED Good F1 fuse: 0.995 kΩ to 1.005 kΩ Replace fuse: OL 87 V TRUE RMS MULTIMETER MIN MAX Peak MIN MAX 4½ DIGITS 1 Second ˚C/˚F RANGE REL mV V AutoHOLD Hz % mA A V LO A OFF A mA A COM V 10A MAX FUSED 400mA FUSED aom5f.eps Figure 10. Testing the Current Fuses Replacing the Battery Replace the battery with a 9 V battery (NEDA A1604, 6F22, or 006P). XWWarning To avoid false readings, which could lead to possible electric shock or personal injury, replace the battery as soon as the battery indicator (b) appears. If the display shows "bAtt" the Meter will not function until the battery is replaced. Replace the battery as follows, refer to Figure 11: 1. Turn the rotary switch to OFF and remove the test leads from the terminals. 2. Remove the battery door by using a standard-blade screwdriver to turn the battery door screws onequarter turn counterclockwise. 3. Replace the battery and the battery door. Secure the door by turning the screws one-quarter turn clockwise. 36
-
 1
1 -
2
-
3
-
4
-
5
-
6
-
7
-
8
-
9
-
10
-
11
-
12
-
13
-
14
-
15
-
16
-
17
-
18
-
19
-
20
-
21
-
22
-
23
-
24
-
25
-
26
-
27
-
28
-
29
-
30
-
31
-
32
-
33
-
34
-
35
-
36
-
37
-
38
-
 39
39 -
 40
40 -
 41
41 -
 42
42 -
 43
43 -
 44
44 -
 45
45 -
 46
46 -
 47
47 -
 48
48 -
 49
49 -
50
-
51
-
52
-
53
-
54
-
55
-
56
-
57
-
58
-
59
-
60
 |
 |
