Fluke 83V FE 83V & 87V Users Manual - Page 45
Replacing the Fuses, Service and Parts - reviews
 |
View all Fluke 83V manuals
Add to My Manuals
Save this manual to your list of manuals |
Page 45 highlights
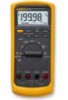
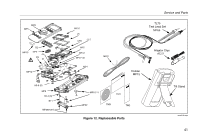
Replacing the Fuses Referring to Figure 11, examine or replace the Meter's fuses as follows: 1. Turn the rotary switch to OFF and remove the test leads from the terminals. 2. Remove the battery door by using a standard-blade screwdriver to turn the battery door screws onequarter turn counterclockwise. 3. Remove the three Phillips-head screws from the case bottom and turn the case over. 4. Gently push up the input terminal-end of the top case from inside of the battery compartment to separate the two halves of the case. 5. Remove the fuse by gently prying one end loose, then sliding the fuse out of its bracket. 6. Install ONLY specified replacement fuses with the amperage, voltage, and speed ratings shown in Table 8. Service and Parts 7. Verify that the rotary switch and the circuit board switch are in the OFF position. 8. Replace the case top, ensuring that the gasket is properly seated and case snaps together above the LCD (item A). 9. Reinstall the three screws and the battery door. Secure the door by turning the screws one-quarter turn clockwise. Service and Parts If the Meter fails, check the battery and fuses. Review this manual to verify proper use of the Meter. Replacement parts and accessories are shown in Tables 8 and 9 and Figure 12. To order parts and accessories, refer to "Contacting Fluke". 37
-
 1
1 -
2
-
3
-
4
-
5
-
6
-
7
-
8
-
9
-
10
-
11
-
12
-
13
-
14
-
15
-
16
-
17
-
18
-
19
-
20
-
21
-
22
-
23
-
24
-
25
-
26
-
27
-
28
-
29
-
30
-
31
-
32
-
33
-
34
-
35
-
36
-
37
-
38
-
39
-
 40
40 -
 41
41 -
 42
42 -
 43
43 -
 44
44 -
 45
45 -
 46
46 -
 47
47 -
 48
48 -
 49
49 -
 50
50 -
51
-
52
-
53
-
54
-
55
-
56
-
57
-
58
-
59
-
60
 |
 |
