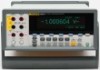
Fluke 8845A FE 8845A & 8846A Users Manual - Page 47
Adjusting the Meter's Range, Navigating the Front-Panel Menu, Configuring the Meter for a Measurement
 |
View all Fluke 8845A manuals
Add to My Manuals
Save this manual to your list of manuals |
Page 47 highlights
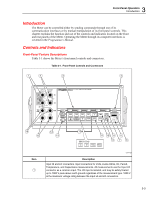
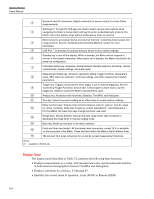
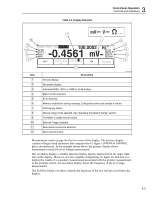
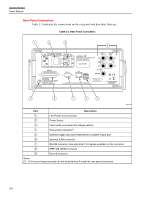
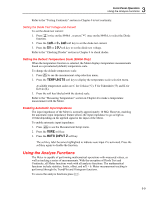
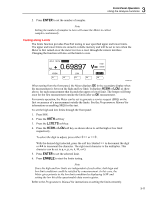
3 Front-Panel Operation Navigating the Front-Panel Menu Adjusting the Meter's Range The range keys, (URV), switch the Meter between auto and manual ranging. The presence or absence of MAN in the display indicates the Meter's range mode. All functions utilize these keys to control the Meter's range except continuity, diode test, temperature (8846A only), frequency and period, which only have a single range. Note The secondary display's range is always the same as that of the primary display when the functions are the same. Pressing R causes the Meter to toggle between auto and manual ranging mode. The range, autorange selected when you enter the manual range mode, becomes the selected range. The Meter will extinguish MAN when autorange is selected. Pressing U or V causes the Meter to switch from auto to manual ranging and moves the range up or down respectively from the range autorange had selected. MAN will also appear in the display. If the input signal is greater than the selected range can measure, the Meter displays overload and sends 9.9000 E+37 over the remote interface. In autorange mode, the Meter automatically selects the next highest range when the measured value exceeds full scale of the present range. If no higher range is available, overload is displayed on the primary or secondary display. The Meter automatically selects the next lower range if the measured value drops below (11%) of full scale. Navigating the Front-Panel Menu The Meter uses a multilevel menu system for the selection of function parameters, configuration, and features. Menu selection and navigation is accomplished with the front panel's five function keys (12345) and B key. Labeling of the five function keys is presented across the bottom row of the display and is dependent on which function is selected. The following sections, "Configuring the Meter for a Measurement" and Chapter four's instructions on "Making Measurements", cover the use of the Meter's menu system. Configuring the Meter for a Measurement The Meter's display resolution, reading rate, trigger, continuity threshold, diode test current level, default temperature scale, and Resistive Temperature Detector (RTD) type are adjustable through the Measurement Setup function. Setting the Display Resolution The steps for setting the Meter's displayed resolution, varies depending on the selected function. The dc volts, dc current and ohms functions set the resolution based on input power line cycle (PLC). AC volts, ac current, frequency, period, capacitance and temperature set resolution using a low, medium and high setting. To set the Meter's display resolution dc volts, dc current and ohms: 1. Press L to see the measurement Setup menu. 2. Press the soft key under the DIGITS PLC label to reveal the resolution selection menu. 3-7
-
 1
1 -
2
-
3
-
4
-
5
-
6
-
7
-
8
-
9
-
10
-
11
-
12
-
13
-
14
-
15
-
16
-
17
-
18
-
19
-
20
-
21
-
22
-
23
-
24
-
25
-
26
-
27
-
28
-
29
-
30
-
31
-
32
-
33
-
34
-
35
-
36
-
37
-
38
-
39
-
40
-
41
-
 42
42 -
 43
43 -
 44
44 -
 45
45 -
 46
46 -
 47
47 -
 48
48 -
 49
49 -
 50
50 -
 51
51 -
 52
52 -
53
-
54
-
55
-
56
-
57
-
58
-
59
-
60
-
61
-
62
-
63
-
64
-
65
-
66
-
67
-
68
-
69
-
70
-
71
-
72
-
73
-
74
-
75
-
76
-
77
-
78
-
79
-
80
-
81
-
82
-
83
-
84
-
85
-
86
-
87
-
88
-
89
-
90
-
91
-
92
-
93
 |
 |