Fluke P3011-MMHG Product Manual - Page 28
NEVER FORCE THE PISTON INTO ITS CYLINDER OR DAMAGE, cylinder to stick.
 |
View all Fluke P3011-MMHG manuals
Add to My Manuals
Save this manual to your list of manuals |
Page 28 highlights
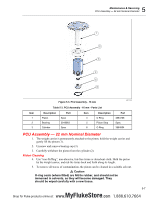
P3000 Series Users Manual 6. After removal from the solvent, using a NEW tissue, repeat the cleaning procedure in step 4, take great care to ensure that all traces of solvent are removed from inside the tubular piston. 7. Place piston carefully on a NEW tissue where it will not be damaged while the cylinder is cleaned. W Caution Never touch the working surface of a clean piston with bare fingers - the natural oil in your skin can cause the piston and cylinder to stick. 8. Lift off the bearing (2), and wipe any dirt or moisture from the outside surfaces of the cylinder (3). 9. Roll a NEW tissue into a tapered rod of appropriate size. Force the tissue through the cylinder bore whilst rotating. Ensure that the tissue is a tight fit inside the bore so that dirt and contamination is removed. 10. Repeat step 9, using a NEW tissue, but from the opposite end of the cylinder. 11. Immerse the cylinder in a suitable, clean solvent, see note in step 5 above. 12. After removal from the solvent, using a NEW tissue, repeat the cleaning procedure in 9 & 10. Piston Re-Assembly 1. Refit the bearing (2) to the top of the cylinder. 2. Holding the piston by the weight carrier, carefully introduce the piston into the cylinder, and push gently through (the piston will normally slide freely through due to its own weight). W Caution NEVER FORCE THE PISTON INTO ITS CYLINDER OR DAMAGE WILL RESULT. If resistance is felt, re-clean piston, cylinder or both. If, after repeated cleaning, the piston still will not slide freely within the cylinder, then permanent damage may have occurred. In which case, the parts should be returned to the factory for evaluation or replacement. 13. Screw piston stop (5) and O-ring (4) back into the underside of the piston. 14. Carefully screw the assembly into the instrument, ensuring that O ring (6) is clean and undamaged, and correctly fitted to the piston body. Replacement PCU Assembly W Caution The piston and cylinder assembly is a matched pair, which is calibrated and adjusted to a calculated mass figure. If, for any reason, the piston or cylinder becomes damaged, then the entire assembly must be replaced. The replacement assembly consists of the following components: Item numbers 1 through 5. 5-6 MyFlukeStore Shop for Fluke products online at: www. .com 1.888.610.7664
-
 1
1 -
2
-
3
-
4
-
5
-
6
-
7
-
8
-
9
-
10
-
11
-
12
-
13
-
14
-
15
-
16
-
17
-
18
-
19
-
20
-
21
-
22
-
 23
23 -
 24
24 -
 25
25 -
 26
26 -
 27
27 -
 28
28 -
 29
29 -
 30
30 -
 31
31 -
 32
32 -
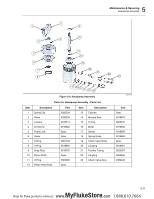 33
33 -
34
-
35
-
36
-
37
-
38
-
39
-
40
-
41
 |
 |
