Frigidaire FRT15B3JW Use and Care Guide - Page 15
Care & Cleaning Chart
 |
UPC - 761101001364
View all Frigidaire FRT15B3JW manuals
Add to My Manuals
Save this manual to your list of manuals |
Page 15 highlights
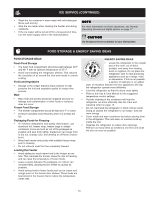
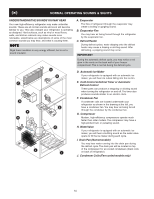
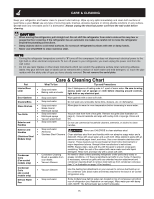
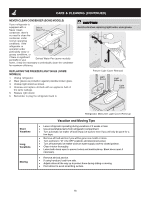
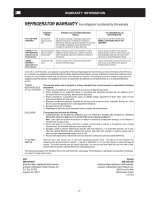
CARE & CLEANING Keep your refrigerator and freezer clean to prevent odor build-up. Wipe up any spills immediately and clean both sections at least twice a year. Never use any type of scouring pads, brushes, abrasive cleaners or strong alkaline solutions on any surface. Do not wash any removable parts in a dishwasher. Always unplug the electrical power cord from the wall outlet before cleaning. CAUTION • When moving the refrigerator, pull straight out. Do not shift the refrigerator from side to side as this may tear or gouge the floor covering. If the refrigerator has an automatic ice maker, be careful not to move the refrigerator beyond the plumbing connections. • Damp objects stick to cold metal surfaces. Do not touch refrigerated surfaces with wet or damp hands. • Never use CHLORIDE to clean stainless steel. NOTE • Turning the refrigerator temperature control to "0" turns off the compressor, but does not disconnect electrical power to the light bulb or other electrical components. To turn off power to your refrigerator, you must unplug the power cord from the wall outlet. • Do not use razor blades or other sharp instruments which can scratch the appliance surface when removing adhesive labels. Any glue left from tape or labels can be removed with a mixture of warm water and mild detergent, or, touch the glue residue with the sticky side of tape you have already removed. Do not remove the serial plate. Care & Cleaning Chart Part What To Use Tips and Precautions Interior/Door Liner • Soap and water • Baking soda and water Use 2 tablespoons of baking soda in 1 quart of warm water. Be sure to wring excess water out of sponge or cloth before cleaning around controls, light bulb or any electrical part. Door Gaskets Drawers/Bins Glass Shelves Toe Grille Exterior and Handles • Soap and water • Soap and water • Soap and water • Glass cleaner • Mild liquid sprays • Soap and water • Mild liquid sprays • Vacuum attachment • Soap and water Wipe gaskets with a clean soft cloth. Do not wash any removable items (bins, drawers, etc.) in dishwasher. Allow glass to warm to room temperature before immersing in warm water. Vacuum dust from front of toe grille. Remove toe grille (See illustration on page 4). Vacuum backside and wipe with sudsy cloth or sponge. Rinse and dry. Do not use commercial household cleaners, ammonia, or alcohol to clean handles. Exterior and Handles • Soap and water • Ammonia Never use CHLORIDE to clean stainless steel. • Stainless Steel Cleaners Clean stainless steel front and handles with non-abrasive soapy water and a (Stainless Steel dishcloth. Rinse with clean water and a soft cloth. Wipe stubborn spots with an Models Only) ammonia-soaked paper towel, and rinse. Use a non-abrasive stainless steel cleaner. These cleaners can be purchased at most home improvement or major department stores. Always follow manufacturer's instructions. NOTE: Always clean, wipe and dry with the grain to prevent cross-grain scratching. Wash the rest of the cabinet with warm water and mild liquid detergent. Rinse well, and wipe dry with a clean soft cloth. Condenser Coils (Fan-cooled models only) • Condenser Cleaning Brush is available from your dealer. • Vacuum Cleaner No need to clean unless operating refrigerator under particularly dusty or greasy conditions, or if there is significant pet traffic in your home. If cleaning is necessary, remove toe grille and use extended vacuum attachment and condenser cleaning brush to remove dust build-up from condenser coils (see item "J" in illustration on page 14 for location). Condenser Coils (Air-cooled models only) • Vacuum Cleaner Use the dusting tool attachment on your vacuum to remove dust build-up on the condenser coils (black tubes and wires) attached to the back of air-cooled refrigerators only. Defrost Water Pan • Soap and water Some models have defrost water pan located on top of compressor at bottom rear of refrigerator (see illustration on next page). Wipe water pan with damp cloth. NOTE: The defrost water pan is NOT removable. 15
-
 1
1 -
2
-
3
-
4
-
5
-
6
-
7
-
8
-
9
-
 10
10 -
 11
11 -
 12
12 -
 13
13 -
 14
14 -
 15
15 -
 16
16 -
 17
17 -
 18
18
 |
 |