Frigidaire FRT15B3JW Use and Care Guide - Page 5
Installation - Connecting Ice Maker To Water Supply
 |
UPC - 761101001364
View all Frigidaire FRT15B3JW manuals
Add to My Manuals
Save this manual to your list of manuals |
Page 5 highlights
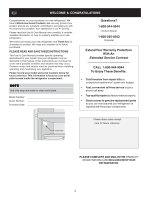
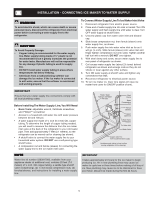
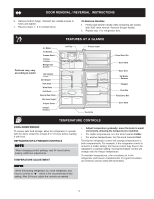
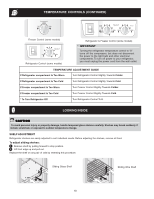
INSTALLATION - CONNECTING ICE MAKER TO WATER SUPPLY WARNING To avoid electric shock, which can cause death or severe personal injury, disconnect the refrigerator from electrical power before connecting a water supply line to the refrigerator. CAUTION To Avoid Property Damage: • Copper tubing is recommended for the water supply line. Water supply tubing made of ¼" plastic is not recommended since it greatly increases the potential for water leaks. Manufacturer will not be responsible for any damage if plastic tubing is used for supply line. • DO NOT install water supply tubing in areas where temperatures fall below freezing. • Chemicals from a malfunctioning softener can damage the ice maker. If the ice maker is connected to soft water, ensure that the softener is maintained and working properly. To Connect Water Supply Line To Ice Maker Inlet Valve 1. Disconnect refrigerator from electric power source. 2. Place end of water supply line into sink or bucket. Turn ON water supply and flush supply line until water is clear. Turn OFF water supply at shutoff valve. 3. Unscrew plastic cap from water valve inlet and discard cap. 4. Slide brass compression nut, then ferrule (sleeve) onto water supply line, as shown. 5. Push water supply line into water valve inlet as far as it will go (¼ inch). Slide ferrule (sleeve) into valve inlet and finger tighten compression nut onto valve. Tighten another half turn with a wrench; DO NOT over tighten. 6. With steel clamp and screw, secure water supply line to rear panel of refrigerator as shown. 7. Coil excess water supply line (about 2½ turns) behind refrigerator as shown and arrange coils so they do not vibrate or wear against any other surface. 8. Turn ON water supply at shutoff valve and tighten any connections that leak. 9. Reconnect refrigerator to electrical power source. 10. To turn ice maker on, lower wire signal arm (see ice maker front cover for ON/OFF position of arm). IMPORTANT Ensure that your water supply line connections comply with all local plumbing codes. Before Installing The Water Supply Line,You Will Need • Basic Tools: adjustable wrench, flat-blade screwdriver, and PhillipsTM screwdriver • Access to a household cold water line with water pressure between 30 and 100 psi. • A water supply line made of ¼ inch (6.4 mm) OD, copper tubing. To determine the length of copper tubing needed, you will need to measure the distance from the ice maker inlet valve at the back of the refrigerator to your cold water pipe. Then add approximately 7 feet (2.1 meters), so the refrigerator can be moved out for cleaning (as shown). • A shutoff valve to connect the water supply line to your household water system. DO NOT use a self-piercing type shutoff valve. • A compression nut and ferrule (sleeve) for connecting the water supply line to the ice maker inlet valve. NOTE Water line kit number 5303917950, available from your appliance dealer at additional cost, contains 25 feet (7.6 meters) of ¼ inch OD copper tubing, a saddle type shutoff valve (nonpiercing), (2) ¼ inch brass compression nuts, (2) ferrules/sleeves, and instructions for installing a water supply line. IMPORTANT It takes approximately 24 hours for the ice maker to begin producing ice. Air in new plumbing lines may cause ice maker to cycle two or three times before making a full tray of ice. New plumbing may cause ice to be discolored or have poor flavor. Discard ice made during the first 24 hours. 5
-
 1
1 -
 2
2 -
 3
3 -
 4
4 -
 5
5 -
 6
6 -
 7
7 -
 8
8 -
 9
9 -
 10
10 -
 11
11 -
12
-
13
-
14
-
15
-
16
-
17
-
18
 |
 |