Frigidaire FRT15B3JW Use and Care Guide - Page 7
To Remove Freezer Handle, To Attach Freezer, Handle, Trim Removal Full-length Trim Models Only,
 |
UPC - 761101001364
View all Frigidaire FRT15B3JW manuals
Add to My Manuals
Save this manual to your list of manuals |
Page 7 highlights
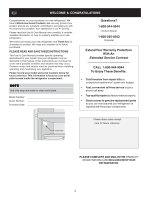
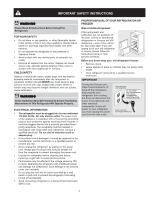
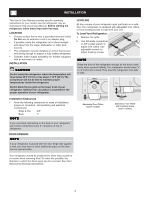
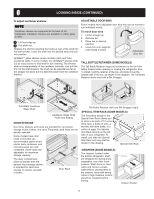
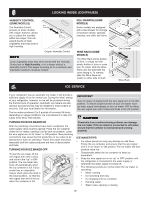
DOOR REMOVAL / REVERSAL INSTRUCTIONS NOTE Some models have "pocket" handles, which are recessed into the sides of the door. On these models, only the hinges will need to be reversed. TO REMOVE FREEZER HANDLE: (Handles may be easier to reverse while doors are off.) 1. Remove two screws attaching handle to bottom of freezer door. 2. Remove short trim piece by sliding trim straight up and off of handle bracket. 3. Remove screw attaching top of handle to door. 4. Magnetic Nameplate Models: Gently pry magnetic nameplate frame from door. Remove nameplate from its frame, turn frame upside down and install in old handle holes. Insert magnetic nameplate into frame. Self-Adhesive Nameplate Models: Gently peel off nameplate from door and reapply over old handle holes. TO ATTACH FREEZER HANDLE: 1. Reinstall handle on opposite side, using same hole as nameplate. 2. Attach handle to bottom of door. 3. Slide trim piece straight down onto handle bracket. TO REMOVE FREEZER HANDLE: (Handles may be easier to reverse while doors are off.) 1. Remove two screws attaching handle to bottom of freezer door. 2. Remove button plug using edge of putty knife. 3. Remove screw on side of freezer door and remove handle. TO ATTACH FREEZER HANDLE: 1. Secure side of handle to door and replace button plug. 2. Secure handle to bottom of door. TO REMOVE FREEZER HANDLE: (Handles may be easier to reverse while doors are off.) 1. Remove two screws attaching handle to bottom of freezer door. 2. Swing bottom of handle away from the door and slide handle straight up and off of dovetail button. 3. Remove screw and dovetail button and install on other side, using the same holes as nameplate. 4. Magnetic Nameplate Models: Use putty knife to gently pry magnetic nameplate frame from door. Remove nameplate from its frame, turn frame upside down and install in old handle holes. Insert magnetic nameplate into frame. Self-Adhesive Nameplate Models: Use putty knife to gently peel off nameplate from door and reapply over old handle holes. TO ATTACH FREEZER HANDLE: 1. Start with handle offset away from door. Place top of handle over dovetail button, swing handle into an upright position and pull downward, locking it into place. 2. Secure bottom of handle with two screws removed earlier. TRIM REMOVAL (FULL-LENGTH TRIM MODELS ONLY) In some models, the refrigerator door has a full length trim piece which continues from the bottom of the handle to the bottom of the door. The top of the trim attaches to the handle bracket (Figure 1) or fits around the base of the handle (Figure 2). An adhesive "trim lock" is positioned about halfway down. The bottom of the trim is held in place by either an adhesive trim lock, or a trim lock with two prongs inserted into a hole on the face of the door. TO REMOVE TRIM: 1. Remove trim by gently pulling trim lock areas out and away from door. 2. When trim is free from door, slide the trim straight down and away from base of handle. NOTE For models with short handle trim, remove by sliding trim straight down and off of handle bracket. NOTE To remove freezer handle, refer to figure 3 on page 9. 7
-
 1
1 -
 2
2 -
 3
3 -
 4
4 -
 5
5 -
 6
6 -
 7
7 -
 8
8 -
 9
9 -
 10
10 -
 11
11 -
 12
12 -
13
-
14
-
15
-
16
-
17
-
18
 |
 |