Frigidaire FRT15B3JW Use and Care Guide - Page 9
Door Removal / Reversal, Instructions, Features At A Glance, Temperature Controls
 |
UPC - 761101001364
View all Frigidaire FRT15B3JW manuals
Add to My Manuals
Save this manual to your list of manuals |
Page 9 highlights
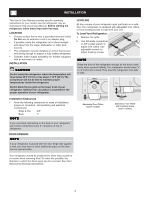
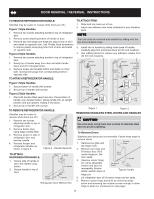
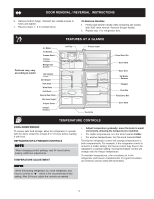
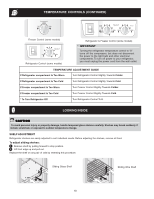
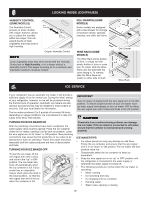
DOOR REMOVAL / REVERSAL INSTRUCTIONS 6. Remove bottom hinge. Reinsert two outside screws in holes and tighten. 7. Reverse steps 1 - 6 to reinstall doors To Remove Handles 1. Firmly hold freezer handle while loosening set screws with 3/32" allen wrench. Remove freezer handle. 2. Repeat step 1 for refrigerator door. Features may vary according to model Ice Maker Ice Bucket Freezer Shelf Freezer Control Refrigerator Control Deli Drawer Cover Deli Drawer Half Shelf Wine Rack Full Shelf Special Item Rack Mid Level Light Crisper Cover Crisper Drawers FEATURES AT A GLANCE Ice Tray Freezer Light Toe Grille Fixed Door Bin Door Rack Dairy Door Tall Bottle Retainer Snugger Door Bin Fixed Door Bin Door Rack TEMPERATURE CONTROLS COOL DOWN PERIOD To ensure safe food storage, allow the refrigerator to operate with the doors closed for at least 8 to 12 hours before loading it with food. REFRIGERATOR & FREEZER CONTROLS NOTE When changing control settings, wait 24 hours before making additional adjustments. TEMPERATURE ADJUSTMENT NOTE When first turning refrigerator on, move refrigerator and freezer controls to W which is the recommended initial setting. After 24 hours, adjust the controls as needed. • Adjust temperature gradually: move the knob in small increments, allowing the temperature to stabilize. • For colder temperatures, turn the knob towards Colder. • For warmer temperatures, turn the knob towards Cold. Turning the refrigerator control will change temperatures in both compartments. For example, if the refrigerator control is turned to a colder setting, the freezer control may have to be adjusted to a warmer setting. Turning the freezer control will change only the freezer temperature. To maintain temperatures, a fan circulates air in the refrigerator and freezer compartments. For good circulation, do not block cold air vents with food items. 9
-
 1
1 -
2
-
3
-
 4
4 -
 5
5 -
 6
6 -
 7
7 -
 8
8 -
 9
9 -
 10
10 -
 11
11 -
 12
12 -
 13
13 -
 14
14 -
15
-
16
-
17
-
18
 |
 |