Fujitsu 5530C2 Getting Started Guide - Page 15
Preparations, Installing the FUJITSU ISIS, Scanner Driver, FUJITSU ISIS Scanner Driver - vista drivers
 |
UPC - 097564307201
View all Fujitsu 5530C2 manuals
Add to My Manuals
Save this manual to your list of manuals |
Page 15 highlights
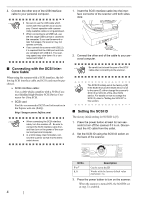
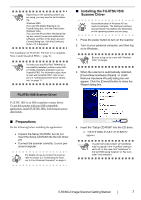
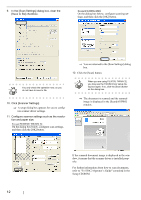
ATTENTION Depending on the operating system you are using, you may need to do the following. Windows 2000: If you see the [Digital Signature not Found] dialog box, click the [Yes] button. Windows Vista: If you see the [Found New Hardware] dialog box, select [Locate and install driver software], and then in the [User Account Control] dialog box, click the [Continue] button, if it is displayed. The installation of FUJITSU TWAIN 32 is complete. Next, install ScandAll PRO (-> page 8). ATTENTION To make sure that FUJITSU TWAIN 32 is successfully installed, perform a scan with a TWAIN-compliant application such as ScandAll PRO. For information about how to scan with ScandAll PRO, refer to section 2.4 "Checking Scanner Driver Operation" on page 11. ■ Installing the FUJITSU ISIS Scanner Driver Screenshots taken in Windows XP are HINT used as examples. The displayed windows and operations may slightly vary depending on the operating system you are using. 1. Press the power button to turn on the scanner. 2. Turn on your personal computer, and then log on to Windows.. ATTENTION Be sure to log on as a user with "Administrator" privileges. 3. When the scanner is automatically detected, [Found New Hardware Wizard] or [Add/ Remove Hardware Wizard] dialog box will appear. Click the [Cancel] button to close the Wizard dialog box. FUJITSU ISIS Scanner Driver FUJITSU ISIS is an ISIS-compliant scanner driver. To use this scanner with any ISIS-compatible application, install FUJITSU ISIS, following the procedure below. ■ Preparations Do the following before installing the application: • Unpack the Setup CD-ROM, but do not insert the Setup CD-ROM into the CD driver yet. • Connect the scanner correctly to your personal computer. For details on how to connect the scanner, HINT refer to section 2.2 "Connecting the Scan- ner to Your Personal Computer" on page 3. 4. Insert the "Setup CD-ROM" into the CD drive. ⇒ appears. ATTENTION The [SETUP DISK START UP SCREEN] may not appear if the "AutoPlay" setting is set to off. In this case, find "Install.exe" in the CD-ROM using "Explore" or "My Computer" and execute it. fi-5530C2 Image Scanner Getting Started 7
-
 1
1 -
2
-
3
-
4
-
5
-
6
-
7
-
8
-
9
-
 10
10 -
 11
11 -
 12
12 -
 13
13 -
 14
14 -
 15
15 -
 16
16 -
 17
17 -
 18
18 -
 19
19 -
 20
20 -
21
-
22
-
23
-
24
-
25
-
26
-
27
-
28
 |
 |