Fujitsu PA03420-B001 Getting Started - Page 14
Connecting the Scanner to Your PC, Connecting the USB Interface Cable
 |
UPC - 097564306105
View all Fujitsu PA03420-B001 manuals
Add to My Manuals
Save this manual to your list of manuals |
Page 14 highlights
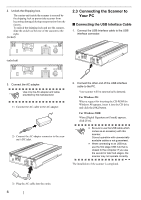
2. Unlock the Shipping lock. The carrier unit inside the scanner is secured by the shipping lock to prevent the scanner from becoming damaged during transportation from the factory. To unlock the shipping lock and use the scanner, slide the switch on the rear of the scanner to the right. (locked) 2.3 Connecting the Scanner to Your PC ■ Connecting the USB Interface Cable 1. Connect the USB interface cable to the USB interface connector. (unlocked) 3. Connect the AC adapter. ATTENTION Use only the AC adapter and cable provided by the manufacturer. 1) Connect the AC cable to the AC adapter. 2) Connect the AC adapter connector to the scanner's DC inlet. 2. Connect the other end of the USB interface cable to the PC. Your scanner will be automatically detected. For Windows 98: When a request for inserting the CD-ROM for Windows 98 appears, insert it into the CD drive and click the [OK] button. For Windows 2000: When [Digital Signature not Found] appears, click [Yes]. ATTENTION • Be sure to use the USB cable which comes as an accessory with this scanner. Correct operation with commercially available cables is not guaranteed. • When connecting to an USB hub, use the first stage USB hub that is closest to the computer. If you use the second or later hub stages, the scanner may not operate correctly. The installation of the scanner is completed. 3) Plug the AC cable into the outlet. 6
-
 1
1 -
2
-
3
-
4
-
5
-
6
-
7
-
8
-
 9
9 -
 10
10 -
 11
11 -
 12
12 -
 13
13 -
 14
14 -
 15
15 -
 16
16 -
 17
17 -
 18
18 -
 19
19 -
20
 |
 |
