Fujitsu XG2600 Hardware Guide - Page 53
Prepare a Setup PC, Log on using the terminal software.
 |
View all Fujitsu XG2600 manuals
Add to My Manuals
Save this manual to your list of manuals |
Page 53 highlights
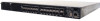
XG2600 Hardware Guide 3. POWER LED of PSU1 and PSU1 LED of the switch will light in green. Next, plug in the power cable to the power connecter of PSU2. The POWER LED of PSU2 and PSU2 LED of the switch will light in green. POWER PSU1 PSU2 Chapter 2 Installation Prepare a Setup PC Log on using the terminal software. 1. Start up the terminal software by using the set up PC. 2. Set the setting conditions to the following; Setup Items Start Bit 1 Data Bit 8 Parity Bit n/a Stop Bit 1 Synchronous System Asynchronous Communication System (Start-Stop Communication System) Communication Speed 9600 Flow Control None Number of digits on screen 80 (If other than 80 digits, set it through terminal command) Number of rows on screen 24 (If other than 24 rows, set it through terminal command) Please refer to the terminal software manual for instructions on setting conditions. 3. Press [Return] key or [Enter] key. Precautions The following message may appear When pressing the [Return] key or [Enter] key. In such case, the switch is processing another job, and waiting for such process to finish. Please wait for a moment until it finishes such process. Waiting for completion of the other operation... 4. Confirm "Login :" on screen. 5. Key in "admin" and press [Return] key or [Enter] key. 6. Confirm "Password:" on screen 7. Key in password, then press the [Return] key or [Enter] key. Since password is not set at the initial state, simply press [Return] key or [Enter] key without keying in the password. If the password is already set, key in the password. Then press [Return] key or [Enter] key. 53 Connecting a Setup PC
-
 1
1 -
2
-
3
-
4
-
5
-
6
-
7
-
8
-
9
-
10
-
11
-
12
-
13
-
14
-
15
-
16
-
17
-
18
-
19
-
20
-
21
-
22
-
23
-
24
-
25
-
26
-
27
-
28
-
29
-
30
-
31
-
32
-
33
-
34
-
35
-
36
-
37
-
38
-
39
-
40
-
41
-
42
-
43
-
44
-
45
-
46
-
47
-
 48
48 -
 49
49 -
 50
50 -
 51
51 -
 52
52 -
 53
53 -
 54
54 -
 55
55 -
 56
56 -
 57
57 -
 58
58 -
59
 |
 |
