Ganz Security PT112N PT112N/ Manual - Page 7
Parts Name & Functions
 |
View all Ganz Security PT112N manuals
Add to My Manuals
Save this manual to your list of manuals |
Page 7 highlights
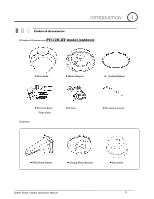
Parts Name & Functions Mount Adapter INTRODUCTION 1 Cabling Terminal Block Safety Retention Spring Main Body Gasket (PT11 2 NXT Model only) Lock-up Screw Dome Cover Main Unit / Surface Mount Bracket DIP Switch Back of Main Unit z Dome Cover z Surface Mount Bracket z Gasket (PT112N-XT model only) Do not remove protective vinyl from dome cover before finishing all U installation processes to protect dome cover from scratches or dust. U The surface mount bracket is used for installing either a ceiling mount or wall mount bracket. Separate the cover first and then attach it directly to ceiling. Camera must be assembled at the last stage. Protect it from dust and rainstorm. Move projecting part of the gasket which should be placed on the low to main body position z Lockup Screw z Cabling Terminal Block z DIP Switch z Fall-proof spring Fixes main unit to surface mount bracket. During installation, Power, Video, Communication, Alarm Input cables are connected on to this cabling terminal block. Pull out from Surface Mount Bracket and connect to Main Body hook. Adjusts camera ID and protocols. After installing fall-proof spring on Bracket , hang on the safety ring to protect the camera from falling Speed Dome Camera Instruction Manual 7
-
 1
1 -
 2
2 -
 3
3 -
 4
4 -
 5
5 -
 6
6 -
 7
7 -
 8
8 -
 9
9 -
 10
10 -
 11
11 -
 12
12 -
13
-
14
-
15
-
16
-
17
-
18
-
19
-
20
-
21
-
22
-
23
-
24
-
25
-
26
-
27
-
28
-
29
-
30
-
31
-
32
-
33
-
34
-
35
-
36
-
37
-
38
-
39
-
40
-
41
 |
 |
