Garmin G2000 Cockpit Reference - Page 33
ADF Tuning (Optional), Selecting a NAV frequency using the PFD Controller, Selecting an ADF frequency
 |
View all Garmin G2000 manuals
Add to My Manuals
Save this manual to your list of manuals |
Page 33 highlights
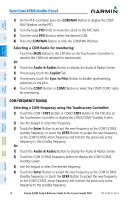
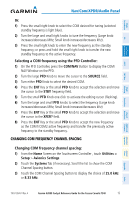
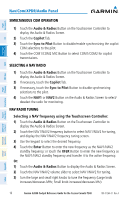
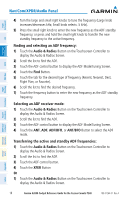
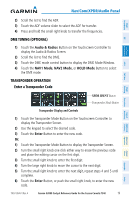
Flight Instruments EIS Nav/Com/ XPDR/Audio AFCS FMS Nav Flight Planning Nav/Com/XPDR/Audio Panel 4) Press the small right knob to enter the new frequency as the NAV1/NAV2 standby frequency; or press and hold the small right knob to transfer the new standby frequency to the active frequency. Selecting a NAV frequency using the PFD Controller: 1) On the PFD Controller, press the COM/NAV Button to display the COM/ NAV Window. 2) Turn the large PFD Knob to move the cursor to the SOURCE field. 3) Turn either PFD Knob to select the desired NAV. 4) Press the ENT Key or the small PFD Knob to accept the selection and move the cursor to the STBY frequency field. 5) Turn the small PFD Knob one click to activate the editing cursor (flashing). 6) Turn the large and small PFD knobs to tune the frequency (Large knob increases/decreases MHz; Small knob increases/decreases kHz). 7) Press the ENT Key or the small PFD Knob to accept the selection and move the cursor to the XFER? field. 8) Press the ENT Key or the small PFD Knob to transfer the standby frequency to the active frequency. ADF TUNING (OPTIONAL) Selecting an ADF frequency: 1) Touch the Audio & Radios Button on the Touchscreen Controller to display the Audio & Radios Screen. 2) Scroll the list to find the ADF enable/disable button. 3) Touch the ADF control button to display the ADF Mode/Tuning Screen. 4) Use the keypad to select the desired frequency. 5) Touch the Enter Button to enter the new frequency as the ADF standby frequency; or touch the XFER Button to enter the new frequency as the ADF standby frequency and transfer it to the active frequency. Or: 1) Touch the Audio & Radios Button to display the Audio & Radios Screen. 2) Scroll the list to find the ADF. 3) Touch the ADF control button to display the ADF Mode/Tuning Screen. Procedures Hazard Avoidance Additional Features Abnormal Operation Annun/ Alerts Appendix Index 190-01264-01 Rev. A Garmin G2000 Cockpit Reference Guide for the Cessna Corvalis T240 17
-
 1
1 -
2
-
3
-
4
-
5
-
6
-
7
-
8
-
9
-
10
-
11
-
12
-
13
-
14
-
15
-
16
-
17
-
18
-
19
-
20
-
21
-
22
-
23
-
24
-
25
-
26
-
27
-
 28
28 -
 29
29 -
 30
30 -
 31
31 -
 32
32 -
 33
33 -
 34
34 -
 35
35 -
 36
36 -
 37
37 -
 38
38 -
39
-
40
-
41
-
42
-
43
-
44
-
45
-
46
-
47
-
48
-
49
-
50
-
51
-
52
-
53
-
54
-
55
-
56
-
57
-
58
-
59
-
60
-
61
-
62
-
63
-
64
-
65
-
66
-
67
-
68
-
69
-
70
-
71
-
72
-
73
-
74
-
75
-
76
-
77
-
78
-
79
-
80
-
81
-
82
-
83
-
84
-
85
-
86
-
87
-
88
-
89
-
90
-
91
-
92
-
93
-
94
-
95
-
96
-
97
-
98
-
99
-
100
-
101
-
102
-
103
-
104
-
105
-
106
-
107
-
108
-
109
-
110
-
111
-
112
-
113
-
114
-
115
-
116
-
117
-
118
-
119
-
120
-
121
-
122
-
123
-
124
-
125
-
126
-
127
-
128
-
129
-
130
-
131
-
132
-
133
-
134
-
135
-
136
-
137
-
138
-
139
-
140
-
141
-
142
-
143
-
144
-
145
-
146
-
147
-
148
-
149
-
150
-
151
-
152
-
153
-
154
-
155
-
156
-
157
-
158
-
159
-
160
-
161
-
162
-
163
-
164
-
165
-
166
-
167
-
168
-
169
-
170
-
171
-
172
-
173
-
174
-
175
-
176
-
177
-
178
-
179
-
180
-
181
-
182
-
183
-
184
-
185
-
186
-
187
-
188
-
189
-
190
-
191
-
192
-
193
-
194
 |
 |