Garmin G2000 Cockpit Reference - Page 92
Defining Weather Data Request Coverage Area, Issuing/Cancelling an Immediate Weather Data Request
 |
View all Garmin G2000 manuals
Add to My Manuals
Save this manual to your list of manuals |
Page 92 highlights
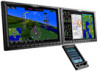
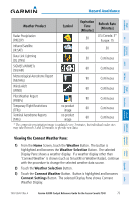
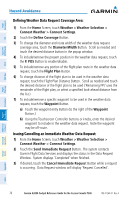
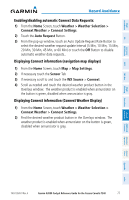
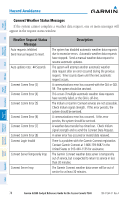
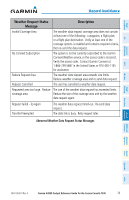
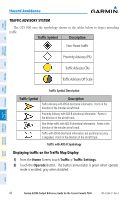
Instruments Flight EIS XPDR/Audio Nav/Com/ AFCS FMS Nav Flight Planning Hazard Avoidance Defining Weather Data Request Coverage Area: 1) From the Home Screen, touch Weather > Weather Selection > Connext Weather > Connext Settings. 2) Touch the Define Coverage Button. 3) To change the diameter and route width of the weather data request coverage area, touch the Diameter/Width Button. Scroll as needed and touch the desired distance button in the popup window. 4) To include/remove the present position in the weather data request, touch the P. POS Button to enable/disable. 5) To include/remove any portion of the flight plan route in the weather data request, touch the Flight Plan Button. 6) To change distance of the flight plan to be used in the weather data request, touch the Flight Plan Distance Button. Scroll as needed and touch the desired distance of the flight plan to be used ('Remaining FPL' uses the remainder of the flight plan, or select a specified look-ahead distance from the list.) 7) To include/remove a specific waypoint to be used in the weather data request, touch the Waypoint Button. a) Touch the waypoint entry Button (to the right of the Waypoint Button.) b) Using the Touchscreen Controller buttons or knobs, enter the desired waypoint to include in the weather data request. Note the waypoint may be off-route. Issuing/Cancelling an Immediate Weather Data Request: 1) From the Home Screen, touch Weather > Weather Selection > Connext Weather > Connext Settings. 2) Touch the Send Immediate Request Button. The system contacts Garmin Flight Data Services and displays the status in the Data Request Window. System displays 'Completed' when finished. 3) If desired, touch the Cancel Immediate Request Button while a request is occurring. Data Request window will display 'Request Cancelled'. Procedures Hazard Avoidance Additional Features Abnormal Operation Annun/ Alerts Appendix Index 76 Garmin G2000 Cockpit Reference Guide for the Cessna Corvalis T240 190-01264-01 Rev. A
-
 1
1 -
2
-
3
-
4
-
5
-
6
-
7
-
8
-
9
-
10
-
11
-
12
-
13
-
14
-
15
-
16
-
17
-
18
-
19
-
20
-
21
-
22
-
23
-
24
-
25
-
26
-
27
-
28
-
29
-
30
-
31
-
32
-
33
-
34
-
35
-
36
-
37
-
38
-
39
-
40
-
41
-
42
-
43
-
44
-
45
-
46
-
47
-
48
-
49
-
50
-
51
-
52
-
53
-
54
-
55
-
56
-
57
-
58
-
59
-
60
-
61
-
62
-
63
-
64
-
65
-
66
-
67
-
68
-
69
-
70
-
71
-
72
-
73
-
74
-
75
-
76
-
77
-
78
-
79
-
80
-
81
-
82
-
83
-
84
-
85
-
86
-
 87
87 -
 88
88 -
 89
89 -
 90
90 -
 91
91 -
 92
92 -
 93
93 -
 94
94 -
 95
95 -
 96
96 -
 97
97 -
98
-
99
-
100
-
101
-
102
-
103
-
104
-
105
-
106
-
107
-
108
-
109
-
110
-
111
-
112
-
113
-
114
-
115
-
116
-
117
-
118
-
119
-
120
-
121
-
122
-
123
-
124
-
125
-
126
-
127
-
128
-
129
-
130
-
131
-
132
-
133
-
134
-
135
-
136
-
137
-
138
-
139
-
140
-
141
-
142
-
143
-
144
-
145
-
146
-
147
-
148
-
149
-
150
-
151
-
152
-
153
-
154
-
155
-
156
-
157
-
158
-
159
-
160
-
161
-
162
-
163
-
164
-
165
-
166
-
167
-
168
-
169
-
170
-
171
-
172
-
173
-
174
-
175
-
176
-
177
-
178
-
179
-
180
-
181
-
182
-
183
-
184
-
185
-
186
-
187
-
188
-
189
-
190
-
191
-
192
-
193
-
194
 |
 |