Garmin GPSMAP 292 Owner's Manual
Garmin GPSMAP 292 - Marine GPS Receiver Manual
 |
View all Garmin GPSMAP 292 manuals
Add to My Manuals
Save this manual to your list of manuals |
Garmin GPSMAP 292 manual content summary:
- Garmin GPSMAP 292 | Owner's Manual - Page 1
Owner's Manual GPSMAP 292/298 - Garmin GPSMAP 292 | Owner's Manual - Page 2
. Except as expressly provided herein, no part of this manual may be reproduced, copied, transmitted, disseminated, downloaded or Garmin Web site (www.garmin.com) for current updates and supplemental information concerning the use and operation of this and other Garmin products. Garmin®, GPSMAP - Garmin GPSMAP 292 | Owner's Manual - Page 3
the GPSMAP 292/298, review the installation instructions listed in the Appendix. If you have any question about installing your chartplotter, contact Garmin Product Support or a professional installer. The GPSMAP 292/298 Sounder is CANet compatible. See the CANet accessory installation instructions - Garmin GPSMAP 292 | Owner's Manual - Page 4
4 Using the GPSMAP 292/298 Keypad 5 Entering Data and Selecting Options 6 Using the Map Pointer 7 Creating and Using Waypoints 8 Man OverBoard (MOB 10 Reviewing and Editing Waypoints 11 Navigating to a Destination 12 Routes 17 Find 19 Additional Information 21 DSC 21 AIS 25 Main Pages - Garmin GPSMAP 292 | Owner's Manual - Page 5
the GPSMAP 292/298 External GPS Antenna..... 87 Mounting the GPSMAP 292/298 88 Installing the Transducer 90 Connecting the Power/Data Cable 92 Interfacing 93 Caring for the Screen 93 Installing and Removing Data Cards 94 INTRODUCTION > TABLE OF CONTENTS Satellite Information 95 What is WAAS - Garmin GPSMAP 292 | Owner's Manual - Page 6
LAWS. Important Information MAP DATA INFORMATION: One of the goals of Garmin is to provide data sources contain some inaccurate or incomplete data. In some countries, complete and accurate map information is either not available or is prohibitively expensive. iv GPSMAP 292/298 Owner's Manual - Garmin GPSMAP 292 | Owner's Manual - Page 7
?". You are only asked this the first time you start the unit. The GPS Information Page appears as the receiver begins acquiring satellites. To turn off the GPSMAP 292/298: 1. Press and hold the POWER key. 2. When the screen is blank, release the POWER key. GPSMAP 292/298 Owner's Manual 1 - Garmin GPSMAP 292 | Owner's Manual - Page 8
satellite(s) and is collecting data. • Solid signal strength bars-the receiver is ready to use. When the receiver has collected information from at least three satellites, the top of the screen shows "Ready for Navigation", and the GPSMAP 292/298 is ready for use. 2 GPSMAP 292/298 Owner's Manual - Garmin GPSMAP 292 | Owner's Manual - Page 9
GPS receiver is turned off. Any satellite signal strength bars shown are only simulations and do not represent the strength of actual satellite signals. BASIC OPERATION > USING SIMULATOR MODE To place the GPSMAP 292/298 , press ADJ/MENU, and select Stop Simulator. GPSMAP 292/298 Owner's Manual 3 - Garmin GPSMAP 292 | Owner's Manual - Page 10
Highlight Set Position, and press ENTER to change the simulated location. 7. Press QUIT until you return to the Map Page. 4 To adjust the simulated speed and heading from the Compass or 3D Highway Pages: 1. Press maximum setting. 3. Press ENTER or QUIT when finished. GPSMAP 292/298 Owner's Manual - Garmin GPSMAP 292 | Owner's Manual - Page 11
down, right, or left to move through lists, highlight fields, on-screen buttons and icons, enter data, or move the map pointer. ADJ/MENU Key • Press and release to view options for a page. • Press and hold for points such as user waypoints, cities, and services. GPSMAP 292/298 Owner's Manual 5 - Garmin GPSMAP 292 | Owner's Manual - Page 12
and start options, and enter data to customize the GPSMAP 292/298 to fit your requirements. Use the ENTER key and the ROCKER to select options, enter names and numbers in data fields, and start your selections to highlight a button, and press ENTER. On-Screen buttons 6 GPSMAP 292/298 Owner's Manual - Garmin GPSMAP 292 | Owner's Manual - Page 13
and routes, and review position data of on-screen map items and waypoints. When you move the map pointer over a map item, a highlighted description of that item appears. Present location Map zoom range GPSMAP 292/298 Owner's Manual BASIC OPERATION > USING THE MAP POINTER To pan the map: 1. Use the - Garmin GPSMAP 292 | Owner's Manual - Page 14
Garmin GPSMAP 292/298 stores up to 3,000 alphanumeric waypoints with a user-defined symbol, comments, depth, and water temp, available for each waypoint. Waypoints can be created using two basic methods: ENTER/MARK Key-marks your present location, and provides options to select a map location or map - Garmin GPSMAP 292 | Owner's Manual - Page 15
a new waypoint from a map location: 1. Use the ROCKER to move the map pointer to a map location. If you want to create the new waypoint at an on-screen map item, highlight the map item on the screen. . 6. Highlight OK, and press ENTER/MARK to confirm the changes. GPSMAP 292/298 Owner's Manual 9 - Garmin GPSMAP 292 | Owner's Manual - Page 16
and the unit is on an active navigation to that point. Use any of the Navigation Pages to guide you back to the MOB point. The MOB waypoint is stored in the waypoint list and works like . 10 To stop navigation, press NAV/MOB highlight Stop Navigation, and press ENTER. GPSMAP 292/298 Owner's Manual - Garmin GPSMAP 292 | Owner's Manual - Page 17
any stored waypoint. Select the waypoint on the map or from the waypoint lists in the Main Menu-Points tab. Sub tabs BASIC OPERATION > REVIEWING AND EDITING WAYPOINTS 3. From the Waypoint Edit Page Use the ROCKER to enter a new name, and press ENTER when finished. GPSMAP 292/298 Owner's Manual 11 - Garmin GPSMAP 292 | Owner's Manual - Page 18
. 2. Use the ROCKER to edit or enter the data. To move to the next character, press right on the ROCKER. 3. Press map, Go To appears in addition to Go To Point. The Go To function is accessed from any list of points or graphically from the Map Page. 12 GPSMAP 292/298 Owner's Manual - Garmin GPSMAP 292 | Owner's Manual - Page 19
a waypoint at the map pointer location. To Go To an existing waypoint or map item from the Map Page: 1. Use the ROCKER to highlight the waypoint or on-screen map item. 2. Press NAV. Go To appears. 3. Press ENTER to start navigating to the waypoint. GPSMAP 292/298 Owner's Manual 13 - Garmin GPSMAP 292 | Owner's Manual - Page 20
To MAP Point highlighted, press ENTER. TracBack Navigation (Navigating a Track) The TracBack function retraces your path to the starting point using the track log automatically stored in the receiver's memory existing track log before you start your current trip. 14 GPSMAP 292/298 Owner's Manual - Garmin GPSMAP 292 | Owner's Manual - Page 21
To view the track on the map, highlight Show Map, and press ENTER. 4. Highlight OK, and press ENTER to save the track. Default track name Total distance Check this box to show track on the Map or 3D Highway Pages Total number of points Change color of track line GPSMAP 292/298 Owner's Manual 15 - Garmin GPSMAP 292 | Owner's Manual - Page 22
The receiver instructions on page 15. To Follow a Track: 1. Press NAV, highlight Follow Track, and press ENTER. 2. Highlight the track you want to follow, and press ENTER. 3. To stop Follow Track navigation, press NAV, highlight Stop Navigation, and press ENTER. 16 GPSMAP 292/298 Owner's Manual - Garmin GPSMAP 292 | Owner's Manual - Page 23
route, the data window at the top of the Map Page shows the waypoint/map item name, bearing and distance from your location, and coordinates of the map pointer. The the QUICK NAV Route instructions. 5. When finished, press QUIT twice to return to the Route List Page. GPSMAP 292/298 Owner's Manual 17 - Garmin GPSMAP 292 | Owner's Manual - Page 24
BASIC OPERATION > ROUTES ADD appears below the map pointer as you insert points. To create a route using text on the Route Review Page: 1. Press and hold ADJ/MENU to show the Main Menu. stop navigation of a route: Press NAV, highlight Stop Navigation, and press ENTER. GPSMAP 292/298 Owner's Manual - Garmin GPSMAP 292 | Owner's Manual - Page 25
data card is inserted into the unit. If you press FIND and you are in Pan Mode, the unit centers its search from the location where the map pointer is located. Your location or the map pointer must be within a map outline area to search for BlueChart information. GPSMAP 292/298 Owner's Manual - Garmin GPSMAP 292 | Owner's Manual - Page 26
a category from the list, and press ENTER. You can also Find items from the Map Pointer. The Find option also supports a "find from" feature that centers your search around an item you have just found From Anchoring Prohibited" appears as the new search from point. 20 GPSMAP 292/298 Owner's Manual - Garmin GPSMAP 292 | Owner's Manual - Page 27
on the GPSMAP 292/298. Digital Selective Calling (DSC) uses marine VHF radio and Global Positioning System (GPS) technologies to transmit and receive location information. The chartplotter repeats the call properties received from the VHF radio on the chartplotter. The GPSMAP 292/298 requires input - Garmin GPSMAP 292 | Owner's Manual - Page 28
receive a Maritime Mobile Service Identity (MMSI) number. Garmin does not provide MMSI numbers. For more information about Digital Selective Calling and Maritime Mobile Service Identity (MMSI) numbers, refer to page 97 in the "Appendix." Understanding Distress Calls When the GPSMAP 292/298 receives - Garmin GPSMAP 292 | Owner's Manual - Page 29
Review Page. BASIC OPERATION > DSC DSC Call List The DSC Call List shows the 50 most recent calls, even if the unit is left unattended. The Call List shows the most recent call from a vessel. If a second call from the same vessel is received Item, and press ENTER. GPSMAP 292/298 Owner's Manual 23 - Garmin GPSMAP 292 | Owner's Manual - Page 30
. Navigating to a Position Report or Distress Call After a Position Report or a Distress Call is received, navigation can be quickly set to the call location. New Directory Item Page When a Distress Call 2. With Go To MMSI/Name or DSC highlighted, press ENTER. 24 GPSMAP 292/298 Owner's Manual - Garmin GPSMAP 292 | Owner's Manual - Page 31
at which AIS vessels appear. • Heading Line-Off, Time: draws an extension from the end of the boat icon in the direction of travel. For Time, enter the numeric time value you want the line to extend. The Time line length automatically adjusts as your speed changes. GPSMAP 292/298 Owner's Manual 25 - Garmin GPSMAP 292 | Owner's Manual - Page 32
using the DATA/CNFG key. Press DATA/CNFG to remove the status bar and data fields from the top of any main page. Press and hold DATA/CNFG to customize the Main Pages. Map Page Map Split Page Sonar Page Flasher Page Compass Page Highway Page Active Route Page 26 GPSMAP 292/298 Owner's Manual - Garmin GPSMAP 292 | Owner's Manual - Page 33
the Map Page using the ROCKER. When the map pointer reaches the edge of the screen, the map scrolls forward under the map pointer. Data fields Map item Land Geographic name Position triangle Water Map zoom range Map Page Shown Using Optional Mapsource Data. GPSMAP 292/298 Owner's Manual 27 - Garmin GPSMAP 292 | Owner's Manual - Page 34
location shown. Press ENTER to show details of the map item. When using BlueChart or MapSource data, additional information tabs appear. Use the ROCKER to highlight the individual tabs, and show additional information and options. 3. Press QUIT to exit the review page. GPSMAP 292/298 Owner's Manual - Garmin GPSMAP 292 | Owner's Manual - Page 35
holding ENTER will mark a waypoint at your present position not at the map pointer's position.) If the map pointer is on a map item, press ENTER, and a new window with details about the Using BlueChart g2 or MapSource Data Overzoom, no additional data is available GPSMAP 292/298 Owner's Manual 29 - Garmin GPSMAP 292 | Owner's Manual - Page 36
available through the use of the optional preloaded BlueChart g2 data cards or other MapSource data. The GPSMAP 292/298 shows cartography as long as there is chart information available for the range you have selected. Map coverage conforms to the following conditions: • When the selected zoom - Garmin GPSMAP 292 | Owner's Manual - Page 37
3. Move the map pointer to the end measurement point. The bearing and distance from the reference point and map pointer coordinates is shown in the data window at the top of the screen. Press QUIT to finish. Map pointer coordinates Distance and Bearing Map pointer GPSMAP 292/298 Owner's Manual 31 - Garmin GPSMAP 292 | Owner's Manual - Page 38
direction of the destination (bearing) relative to the course over ground. The compass ring and map pointer work independently to show-at a glance-the direction of your movement and the direction to very low speeds. When you start moving, the map pointer is correct. 32 GPSMAP 292/298 Owner's Manual - Garmin GPSMAP 292 | Owner's Manual - Page 39
data shown. The round compass becomes a tape compass when the data configuration limits space. Refer to page 30 for data field configuration instructions. MAIN PAGES > 3D HIGHWAY PAGE 3D Highway Page The GPSMAP 292/298 course, steer toward the center of the highway. GPSMAP 292/298 Owner's Manual 33 - Garmin GPSMAP 292 | Owner's Manual - Page 40
and change the size of the data shown. Refer to page 30 for more information. To zoom in or out on the 3D Highway Page: Press either the RANGE Down or RANGE Up key to increase or decrease the zoom range. Data fields Compass tape Course Present location Zoom scale 34 GPSMAP 292/298 Owner's Manual - Garmin GPSMAP 292 | Owner's Manual - Page 41
is only available when an optional BlueChart g2 data card is inserted in the unit. • Setup-selects what waypoints and tracks are shown on the 3D Highway Page. Use the ROCKER and ENTER keys to select or deselect the options. Preview window 3D Highway Page Setup GPSMAP 292/298 Owner's Manual 35 - Garmin GPSMAP 292 | Owner's Manual - Page 42
route, the waypoint list automatically updates to indicate the next active point first. The Active Route and Route Review Pages share many of the Map Page Options. Refer to pages 17-19 for information on the Use Map, Add Before, and Remove options. Active Route Page 36 GPSMAP 292/298 Owner's Manual - Garmin GPSMAP 292 | Owner's Manual - Page 43
are visible to the receiver and whether or not they are being tracked. The signal strength is shown on a bar graph for each satellite, with the satellite number below. As the receiver locks onto satellites, a signal strength bar appears for each satellite in view. GPSMAP 292/298 Owner's Manual 37 - Garmin GPSMAP 292 | Owner's Manual - Page 44
The status field indicates "Ready for Navigation" when the GPSMAP 292/298 has collected the necessary data from satellites to calculate a fix. The unit then updates the location, date, and time. 38 Highlight WAAS Off, and press ENTER to disable the WAAS capabilities. GPSMAP 292/298 Owner's Manual - Garmin GPSMAP 292 | Owner's Manual - Page 45
TAB GPS Tab Options The GPS tab features an options page that provides access to functions and features relating to the GPS Info Page. To show and select the GPS Tab options: 1. Press ADJ/MENU. 2. Using the ROCKER, highlight an option, and press ENTER. GPS Tab Options GPSMAP 292/298 Owner's Manual - Garmin GPSMAP 292 | Owner's Manual - Page 46
(MLLW) appears as a solid, horizontal line near the bottom of the chart (this line appears only if the tide height range is zero or below). GPSMAP 292/298 Owner's Manual - Garmin GPSMAP 292 | Owner's Manual - Page 47
left side indicate the maximum and minimum levels. The four data fields below the chart indicate event times and levels at the message "None Found" appears. Use the Map Position option to select a location closer to a Tide Station. GPSMAP 292/298 Owner's Manual MAIN MENU > TIDE TAB Select from a - Garmin GPSMAP 292 | Owner's Manual - Page 48
On field, and press ENTER. 2. Enter a date, and press ENTER. The tide chart is updated to show tide information for the selected date. To view tide heights at various times on the tide at different times. Tide data shows in a black box when in map pointer mode. 42 GPSMAP 292/298 Owner's Manual - Garmin GPSMAP 292 | Owner's Manual - Page 49
At field, and press ENTER to open the Find Currents Page. 2. Highlight Current Position, and press ENTER to open the Find Near Current Position Page. GPSMAP 292/298 Owner's Manual 43 - Garmin GPSMAP 292 | Owner's Manual - Page 50
each Current Station in the list, the station is highlighted on the Map window. The distance and bearing from your location to the highlighted station are . To reset the data, choose from Reset Trip, Reset Max Speed, Reset Odometer, or Reset All, and press ENTER. 44 GPSMAP 292/298 Owner's Manual - Garmin GPSMAP 292 | Owner's Manual - Page 51
the moon as a light color. You can show this data for your present location, a location from the map, or a Find item location. Use the today's data, or select a different date and time. Position Date/Time . See page 68 for more information on setting time zones. GPSMAP 292/298 Owner's Manual 45 - Garmin GPSMAP 292 | Owner's Manual - Page 52
which manage a large number of waypoints quickly and efficiently. The sub tabs also provide a continuously updated proximity waypoint alarm function that can be used to define an alarm circle around items such as and Time, and press ENTER. Main Menu tabs Main Menu 46 GPSMAP 292/298 Owner's Manual - Garmin GPSMAP 292 | Owner's Manual - Page 53
master list of all waypoints currently stored in memory. From the User list, you can review, edit, rename or delete individual waypoints, or delete all user waypoints. The total number using an optional PC cable and interface software or record them manually. GPSMAP 292/298 Owner's Manual 47 - Garmin GPSMAP 292 | Owner's Manual - Page 54
waypoint menu options: Using the ROCKER, highlight the User tab, and press ADJ/MENU. To scroll through and review the waypoint list: 1. With the ROCKER, highlight the Points tab, and then highlight User. 2. Use the . 3. Press ENTER to confirm the deletion warning. 48 GPSMAP 292/298 Owner's Manual - Garmin GPSMAP 292 | Owner's Manual - Page 55
overlap points, use caution when navigating in these areas. If you enter an alarm circle overlap, you are only alerted to the closest proximity waypoint. GPSMAP 292/298 Owner's Manual 49 - Garmin GPSMAP 292 | Owner's Manual - Page 56
-creates a waypoint and adds it to the proximity list. • Delete-removes a selected waypoint from proximity list. • Delete All-removes all waypoints from proximity list. 50 GPSMAP 292/298 Owner's Manual - Garmin GPSMAP 292 | Owner's Manual - Page 57
highlighted, press ENTER again to confirm the deletion. If you highlight a route name from the Route List and press NAV, the name automatically appears. GPSMAP 292/298 Owner's Manual 51 - Garmin GPSMAP 292 | Owner's Manual - Page 58
. To enter a custom route name: 1. From the Route Review Page, highlight the route you want to change, and press ENTER. 2. Press ADJ/MENU, and use the ROCKER to select Edit Route Name. Press ENTER. 3. Use the ROCKER to enter a name, and press ENTER when finished. 52 GPSMAP 292/298 Owner's Manual - Garmin GPSMAP 292 | Owner's Manual - Page 59
highlighted. This allows you to review each point on the route by pressing ENTER repeatedly. MAIN MENU > ROUTES TAB Route Review Options Menu Route Review Menu Options Menu options available from the Route Review Page are Use Map, Add Before, Remove, and Plan. GPSMAP 292/298 Owner's Manual 53 - Garmin GPSMAP 292 | Owner's Manual - Page 60
1. From the Route Review Page, press ADJ/MENU, highlight Use Map, and press ENTER. 2. Use the map pointer to highlight the waypoint, and press ADJ/MENU. 3. Highlight the Move option, and press ENTER. 4. Move the map pointer to the new map location, and press ENTER. 54 GPSMAP 292/298 Owner's Manual - Garmin GPSMAP 292 | Owner's Manual - Page 61
in, and press ENTER. 2. Move the map pointer to the new map location, existing waypoint, or map item (ADD is shown below the arrow and , or add a point to the end: 1. From either the Route Review or Active Route Pages, use the ROCKER to highlight the point you want GPSMAP 292/298 Owner's Manual 55 - Garmin GPSMAP 292 | Owner's Manual - Page 62
units of measure (statute, nautical or metric) do not affect the fuel flow measure. You should enter fuel flow rates based on available information for your vehicle's (operator's manual, or performance specifications.) Make note of the units of measure (gallons or liters.) GPSMAP 292/298 Owner's Manual - Garmin GPSMAP 292 | Owner's Manual - Page 63
, define how it is recorded, or save track log data for future use. The Track Logs Page also provides an indicator a list of any saved track logs, allows for TracBack activation, and Map Page of saved logs. The active log stores up to approximately 10, GPSMAP 292/298 Owner's Manual Active Track Tab 57 - Garmin GPSMAP 292 | Owner's Manual - Page 64
track log is continuously recorded, wrapping through the available memory (replacing the oldest track data with new data). • Interval-defines the frequency at which the track plots are recorded. Three memory. • Delete All-deletes all saved track logs from memory. 58 GPSMAP 292/298 Owner's Manual - Garmin GPSMAP 292 | Owner's Manual - Page 65
Card, and press ENTER to combine the selected items with those of your GPSMAP 292/298. Highlight Replace From Card, and press ENTER to overwrite all selected items on your GPSMAP 292/298. 4. A Transfer Complete message appears after the data is transferred. Press QUIT. GPSMAP 292/298 Owner's Manual - Garmin GPSMAP 292 | Owner's Manual - Page 66
Msgs Tab The Message tab on the Main Menu shows a list of messages generated by your GPSMAP 292/298. Use the ROCKER to scroll through the entire list of messages on the Log tab. To to highlight a message. Press ENTER to view detailed information about that message. 60 GPSMAP 292/298 Owner's Manual - Garmin GPSMAP 292 | Owner's Manual - Page 67
the drawing light sectors on the map. • Spot Soundings-On,Warn Depth, Off: turns on the depth spot sounding data. • Warn Depth-shows the spot sounding below the set value in red. This field is only available when Warn Depth is selected in the Spot Soundings field. GPSMAP 292/298 Owner's Manual 61 - Garmin GPSMAP 292 | Owner's Manual - Page 68
, Services, Saved Tracks, Track Log, and Lat/Lon Grid-Auto, Off, 120 ft-800 mi: sets the maximum zoom range the feature should appear on the Map Page. Some types of data only in the direction of travel. AIS Sub Tab Refer to page 25 for more information on AIS. 62 GPSMAP 292/298 Owner's Manual - Garmin GPSMAP 292 | Owner's Manual - Page 69
press ENTER, and use the ROCKER to scroll up, down, left, and right, or press ADJ/MENU and choose a scroll option. NOTE: The Advanced Map information is only available when you have a data card with additional map data, such as BlueChart g2, installed in the unit. GPSMAP 292/298 Owner's Manual 63 - Garmin GPSMAP 292 | Owner's Manual - Page 70
requires input from a temperature transducer/sensor or from a connected NMEA device that provides temperature data. The most recent temperature measured shows on the far right side of the chart with the section on page 72 for more information on sonar setup options. 64 GPSMAP 292/298 Owner's Manual - Garmin GPSMAP 292 | Owner's Manual - Page 71
and sunset information. GPSMAP 292/298 Owner's Manual MAIN MENU > SYSTM (SYSTEM) TAB • System Mode-sets Normal or Simulator Mode. The Setup button allows you to simulate navigation. • Set Position*-sets your location while in Simulator Mode. See page 3 for additional instructions. • Track Control - Garmin GPSMAP 292 | Owner's Manual - Page 72
a map or chart that specifies a different datum. WARNING: Selecting the wrong map datum can result in substantial position errors. Unless otherwise specified by the navigation documentation you are using, use the default WGS 84 datum for best overall performance. 66 GPSMAP 292/298 Owner's Manual - Garmin GPSMAP 292 | Owner's Manual - Page 73
calculate and update the magnetic variation at your present location. Failure to update this setting can result in substantial differences between the information shown on your unit and external references, such as a magnetic compass. GPSMAP 292/298 Owner's Manual Manually enter a magnetic - Garmin GPSMAP 292 | Owner's Manual - Page 74
. • Garmin Remote Sonar-required for use with the GSD 20, GSD 21, or GSD 22. • NMEA In/NMEA Out-supports the input/output of standard NMEA 0183 data, and sonar NMEA input support for the DPT, MTW and VHW sentences. • None-provides no interfacing capabilities. 68 GPSMAP 292/298 Owner's Manual - Garmin GPSMAP 292 | Owner's Manual - Page 75
ENTER. MAIN MENU > UNITS TAB To select a transfer mode: 1. Use the ROCKER to select Garmin Data Transfer in the Serial Data Format field. 2. Highlight the Transfer Mode field, and press ENTER. 3. Use the ROCKER to adjust the number of Lat/Lon output precision digits. GPSMAP 292/298 Owner's Manual 69 - Garmin GPSMAP 292 | Owner's Manual - Page 76
sounds when the GPS position accuracy falls outside the user-set value. Nav Sub Tab • Anchor Drag-sets an alarm to sound when you have exceeded a specified drift distance. Enter a value in the distance field, and use the control field to turn the alarm on and off. 70 GPSMAP 292/298 Owner's Manual - Garmin GPSMAP 292 | Owner's Manual - Page 77
the control field to turn the off course alarm on and off. Sonar Sub Tab You must be receiving sonar data for these functions to work. See "Using Sonar" page 72 for more information. • Shallow Water/Deep set the alarm you want. Press ENTER to acknowledge an alarm. GPSMAP 292/298 Owner's Manual 71 - Garmin GPSMAP 292 | Owner's Manual - Page 78
GPSMAP 298 when used in conjunction with a transducer and the GPSMAP 292 when used in conjunction with a GSD 22 or GSD 21 and tranducer. Read the GSD 22 or GSD 21 Installation Instructions to your GPSMAP 292 to use the sonar features. Adjustment Menu Sonar Page 72 GPSMAP 292/298 Owner's Manual - Garmin GPSMAP 292 | Owner's Manual - Page 79
with the selected option highlighted. GPSMAP 292/298 Owner's Manual USING SONAR > SONAR PAGE 2. Press the ROCKER up or down to place the map pointer or setting bar at the setting, range, receiver. This provides some flexibility in what is seen on the screen. To see more detail, increase the receiver - Garmin GPSMAP 292 | Owner's Manual - Page 80
(default) represents the latest in sonar data presentation and is recommended for all applications. that the transducer sends and receives. You can choose 200kHz, 50kHz select a scroll rate from 90% to 100%. Auto automatically adjusts the scroll rate according to the GPSMAP 292/298 Owner's Manual - Garmin GPSMAP 292 | Owner's Manual - Page 81
it matches the scrolling data. Split When Zoomed-turns this option on or off. If you turn on Zoom, then this setting splits the screen. Swap Split-available on a split Sonar Page when you are using dual frequency. This switches on which side the frequencies appear. GPSMAP 292/298 Owner's Manual 75 - Garmin GPSMAP 292 | Owner's Manual - Page 82
that has scrolled off the screen. The depth is updated while the screen is paused, but the unit does not show any new sonar data until the standard Sonar Page is resumed. You can or press ADJ/MENU, highlight Hide Pointer, and press ENTER. Show Map Pointer Option 76 GPSMAP 292/298 Owner's Manual - Garmin GPSMAP 292 | Owner's Manual - Page 83
OPTIONS General Sub Tab Water Type-because sound waves travel through fresh and salt water at different rates it is necessary to select the water type to ensure accurate readings on the unit. Keel Offset of Keel Enter (-) negative number to show depth from surface GPSMAP 292/298 Owner's Manual 77 - Garmin GPSMAP 292 | Owner's Manual - Page 84
(default) represents the latest in sonar data presentation and is recommended for all applications. % scroll rate when you reach that speed. One half of that speed produces a 50% scroll rate, and uses GPS ground speed for comparison on the calibration. If a GPS ground GPSMAP 292/298 Owner's Manual - Garmin GPSMAP 292 | Owner's Manual - Page 85
a cruising speed. Both the top GPS ground speed and uncalibrated water speed appear increase boat speed. If there is a problem with the speed sensor, or if of the speed sensor cables. USING SONAR > SONAR interpret the sonar return data. -suspended targets appear as GPSMAP 292/298 Owner's Manual 79 - Garmin GPSMAP 292 | Owner's Manual - Page 86
unit automatically shows this information, only if it is received from the transducer. Color Scheme-sets the color on data. Stronger returns show in darker colors, with the most intense color for the color scheme selected (default is red) being the strongest return. 80 GPSMAP 292/298 Owner's Manual - Garmin GPSMAP 292 | Owner's Manual - Page 87
the water, including areas beyond the sides of your boat. At a 30-foot depth, the wide beam covers the area of approximately a 20-foot circle. GPSMAP 292/298 Owner's Manual 81 - Garmin GPSMAP 292 | Owner's Manual - Page 88
approximately a 6-foot diameter circle at a 30-foot depth. Dual frequency mode combines both frequencies to get the best coverage area and contour/depth readings. 82 GPSMAP 292/298 Owner's Manual - Garmin GPSMAP 292 | Owner's Manual - Page 89
as the weakest colors. One of the unique features offered by Garmin is See-Thru® technology, which allows the GPSMAP 292/298 to hear both weak and strong signals simultaneously so as to identify Thick Whiteline: Hard bottom Whiteline On Whiteline Off GPSMAP 292/298 Owner's Manual Thermocline 83 - Garmin GPSMAP 292 | Owner's Manual - Page 90
colors will give you information. You need to interpret it. Experience and experimentation are the keys to being very good at reading your flasher. 84 GPSMAP 292/298 Owner's Manual - Garmin GPSMAP 292 | Owner's Manual - Page 91
The Map Split Page is horizontally divided into two main areas, the Map and the Sonar. This page only appears if the unit is receiving sonar information. Refer to page 27 for information on the Map and page 72 for the Sonar. Flasher Page without Data Fields GPSMAP 292/298 Owner's Manual Map Split - Garmin GPSMAP 292 | Owner's Manual - Page 92
Receiver: Differential-ready 12 parallel channel WAAS-capable receiver Acquisition Times: Warm: Approx. 15 seconds Cold: Approx. 45 seconds AutoLocate: Approx. 2 minutes Update Rate: 1/second, continuous GPS on water salinity, bottom type, and other water conditions. GPSMAP 292/298 Owner's Manual - Garmin GPSMAP 292 | Owner's Manual - Page 93
GPSMAP 292/298 External GPS Antenna The GPSMAP 292/298 with external antenna must be properly installed according to the following instructions to get the best possible performance. To complete the external antenna installation, you need the appropriate fasteners and a 1" x 14-thread marine antenna - Garmin GPSMAP 292 | Owner's Manual - Page 94
the case to allow connection of the antenna (external antenna only), power/data cables. • The mounting surface should be heavy enough to support the unit and protect it from excessive vibration and shock. • For GPSMAP 292/298 unit's with the built-in internal antenna, should be mounted in a location - Garmin GPSMAP 292 | Owner's Manual - Page 95
unit (see unit dimensions on page 86) and leave 1.25" (32 mm) clearance below the data card slot for inserting or removing data cards. A Flush Mount Template is provided in the package. Use the instructions on the template to complete the flush mount installation. GPSMAP 292/298 Owner's Manual 89 - Garmin GPSMAP 292 | Owner's Manual - Page 96
wide and narrow cone angles. A 50/200 kHz dual frequency 40°/10° cone angle, temperature sensing, transom mount transducer is included in the GPSMAP 298 (with transducer) package. This transducer provides good allaround performance. dead zone fish not seen X X 90 GPSMAP 292/298 Owner's Manual - Garmin GPSMAP 292 | Owner's Manual - Page 97
for mounting the transducer included with the GPSMAP 292/298 with transducer package. If the transducer lead is too short, extension cables are available from your Garmin dealer. DO NOT cut the transducer that may degrade the boat's performance and damage the prop. GPSMAP 292/298 Owner's Manual 91 - Garmin GPSMAP 292 | Owner's Manual - Page 98
CONNECTING THE POWER/DATA CABLE Connecting the Power/Data Cable The power/data cable connects the GPSMAP 292/298 to a DC supply the unit. Orange (Accessory On) DC Positive (CANet L) (CANet H) (RX NMEA) (TX NMEA) Accessory On DC Power Source CANet L CANet H 92 GPSMAP 292/298 Owner's Manual - Garmin GPSMAP 292 | Owner's Manual - Page 99
GPSMAP 292/298 accepts NMEA input with support for the DBT, DPT, MTW, VHW, and WPL sentences. You can download a copy of Garmin's proprietary communication protocol on the Help and Support section of our Web site at www.garmin wipe and air dry the unit before reuse. GPSMAP 292/298 Owner's Manual 93 - Garmin GPSMAP 292 | Owner's Manual - Page 100
AND REMOVING DATA CARDS Installing and Removing Data Cards The GPSMAP 292/298 uses optional Garmin marine BlueChart g2 and MapSource data cards to show digital charts and maps on-screen. Data cards are installed in the card slot located at the bottom right of the unit. Data cards can be installed - Garmin GPSMAP 292 | Owner's Manual - Page 101
is being applied to that satellite. Date, Time, and Current Location The GPS gets date and time information from the satellite's on-board atomic clock. When the GPS receiver has achieved a GPS location, the current location appears in the selected location format. GPSMAP 292/298 Owner's Manual 95 - Garmin GPSMAP 292 | Owner's Manual - Page 102
degrade the accuracy to less than that provided by GPS satellites alone. For this reason, when you enable WAAS on your Garmin GPS receiver, the receiver automatically uses the method that achieves the best accuracy. For more information, go to http://gps.faa.gov. 96 GPSMAP 292/298 Owner's Manual - Garmin GPSMAP 292 | Owner's Manual - Page 103
Service Identity (MMSI) number, users must register their VHF radio with the FCC (Form 605). Garmin service is limited to registering recreational vessels only. To receive license contact: http://wireless.fcc.gov/marine/ fctsht14.html. If your vessel requires review GPSMAP 292/298 Owner's Manual 97 - Garmin GPSMAP 292 | Owner's Manual - Page 104
DOP (Dilution of Precision)-reflects the quality of the GPS signals and satellite geometry. Elevation-height above mean sea level ( Max Speed-the maximum second-by-second speed recorded since last reset. Moving Average Speed-average speed while the unit is moving. Moving GPSMAP 292/298 Owner's Manual - Garmin GPSMAP 292 | Owner's Manual - Page 105
Map Pointer running tally of distance travelled since last reset. See also "Odometer." GPSMAP 292/298 Owner's Manual APPENDIX > NAVIGATION TERMS Total Average water temperature. This field is only active if the GPSMAP 292/298 is receiving speed readings from a transducer or NMEA device. Waypoint - Garmin GPSMAP 292 | Owner's Manual - Page 106
Garmin Product Support if the problem persists. Can't Write User Card, Data Card Is Read-Only-the data card in your unit contains data copy protection. Database Error-internal problem with the unit. Contact your dealer or Garmin Product Support to have the unit serviced GPSMAP 292/298 Owner's Manual - Garmin GPSMAP 292 | Owner's Manual - Page 107
to transfer user data from a data card that does not contain the specified type of data. Make sure there is data to transfer on data card. Off Course Alarm is an internal problem with the unit. Contact your dealer or Garmin Product Support to have the unit serviced. GPSMAP 292/298 Owner's Manual 101 - Garmin GPSMAP 292 | Owner's Manual - Page 108
only) the external sonar device you are connected to needs a software update. Sonar Service Lost-(GPSMAP 292 only) the external sonar device you were connected to has either been disconnected or the GPSMAP 292 has lost communication with the sonar device for some other reason. Track Already Exists - Garmin GPSMAP 292 | Owner's Manual - Page 109
fluence Zone. From the perspective of a mariner, the system is used for ocean and coastal using LORAN to using GPS. The GPSMAP 292/298 unit automatically converts GPS coordinates to LORAN TDs receiving LORAN signals. Change to Loran TD from the Units tab on the Main Menu. GPSMAP 292/298 Owner's Manual - Garmin GPSMAP 292 | Owner's Manual - Page 110
secondary stations. You must adjust the TD coordinates accordingly. Remember that the GPS is not relying on the LORAN signal for navigation and actually converts the Format Handbook, available at the Garmin Web site (www.garmin.com/support/userManual.jsp.) 104 GPSMAP 292/298 Owner's Manual - Garmin GPSMAP 292 | Owner's Manual - Page 111
data cards. GPSMAP 292/298 Owner's Manual APPENDIX > OPTIONAL ACCESSORIES Programmable Data Cards-blank data cards are available in 16 MB, 32 MB, 64 MB, 128 MB, and 256 MB sizes. Download streetlevel map detail, points of interest, business addresses and phone numbers, marine data, topographical - Garmin GPSMAP 292 | Owner's Manual - Page 112
back of the GPSMAP 292/298) in case your GPSMAP 292/298 needs service. Keep the original sales receipt, or a photocopy, in a safe place. Serial Number Contact Garmin Contact Garmin if you have any questions while using your GPSMAP 292/298. In the USA contact Garmin Product Support by phone: (913 - Garmin GPSMAP 292 | Owner's Manual - Page 113
dealer or call Garmin Product Support for shipping instructions and an RMA tracking number. Securely pack the unit and a copy of the original sales receipt, which is required as the proof of purchase for warranty repairs. Write the tracking GPSMAP 292/298 Owner's Manual APPENDIX > LIMITED WARRANTY - Garmin GPSMAP 292 | Owner's Manual - Page 114
requirements and other relevant provisions of Directive 1999/5/EC. To view the full Declaration of Conformity, see the Garmin Web site for your Garmin product: www.garmin.com/products/ gpsmap298/. Click Manuals, and then select the Declaration of Conformity link. 108 GPSMAP 292/298 Owner's Manual - Garmin GPSMAP 292 | Owner's Manual - Page 115
accessories 105 accuracy 37 Accuracy Circle 62 Active Route Page 36 options 36 additional information 21 advanced map card range 80 D data cards 94 data entry 6 GPSMAP 292/298 Owner's Manual date and G gain 73 Garmin Data Transfer 68 Go To 13 Distress Call 24 Position Report 24 GPS Tab 37 Options - Garmin GPSMAP 292 | Owner's Manual - Page 116
51 Routes Tab 51 Route Review Page 52 Options 53 S Satellite Location 95 satellite sky view 95 scroll speed 78 selecting options 6 Shallow/Deep Water Alarm 71 simulator mode 3 software update card 65 soft bottom 84 Tab 68 time zone 68 tools 75 TracBack 14 Activate 16 GPSMAP 292/298 Owner's Manual - Garmin GPSMAP 292 | Owner's Manual - Page 117
44 U underwater waypoints 76 Units Tab 66 V view 75 W WAAS 96 Disable/Enable 38 water speed 78, 80 Water Temperature Alarm 71 Reviewing 11 Underwater 76 waypoint lists Proximity 49 User 47 whiteline 74, 83 wiring installation 92 Z zoom 75 Zoom Keys 5 zoom settings 29 GPSMAP 292/298 Owner's Manual - Garmin GPSMAP 292 | Owner's Manual - Page 118
- Garmin GPSMAP 292 | Owner's Manual - Page 119
- Garmin GPSMAP 292 | Owner's Manual - Page 120
For the latest free software updates (excluding map data) throughout the life of your Garmin products, visit the Garmin Web site at www.garmin.com. © Copyright 2006 Garmin Ltd. or its subsidiaries Garmin International, Inc. 1200 East 151st Street, Olathe, Kansas 66062, USA Garmin (Europe) Ltd. Unit
-
 1
1 -
 2
2 -
 3
3 -
 4
4 -
 5
5 -
 6
6 -
 7
7 -
8
-
9
-
10
-
11
-
12
-
13
-
14
-
15
-
16
-
17
-
18
-
19
-
20
-
21
-
22
-
23
-
24
-
25
-
26
-
27
-
28
-
29
-
30
-
31
-
32
-
33
-
34
-
35
-
36
-
37
-
38
-
39
-
40
-
41
-
42
-
43
-
44
-
45
-
46
-
47
-
48
-
49
-
50
-
51
-
52
-
53
-
54
-
55
-
56
-
57
-
58
-
59
-
60
-
61
-
62
-
63
-
64
-
65
-
66
-
67
-
68
-
69
-
70
-
71
-
72
-
73
-
74
-
75
-
76
-
77
-
78
-
79
-
80
-
81
-
82
-
83
-
84
-
85
-
86
-
87
-
88
-
89
-
90
-
91
-
92
-
93
-
94
-
95
-
96
-
97
-
98
-
99
-
100
-
101
-
102
-
103
-
104
-
105
-
106
-
107
-
108
-
109
-
110
-
111
-
112
-
113
-
114
-
115
-
116
-
117
-
118
-
119
-
120
 |
 |
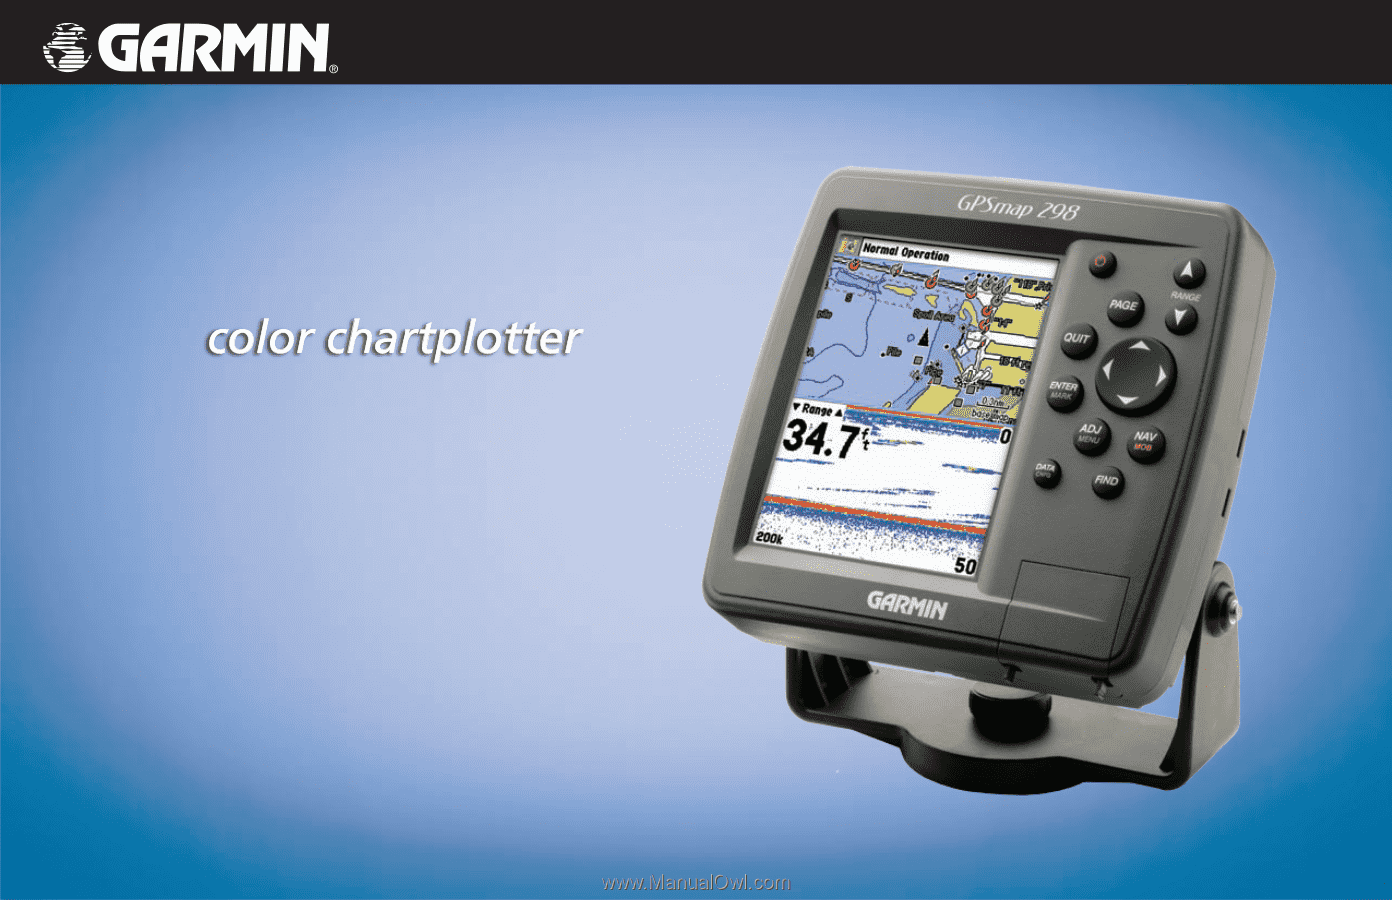
Owner’s Manual
GPSMAP 292/298