Garmin aera 796 Pilot's Guide - Page 24
Dedicated Icons, Buttons (Optional), Weather, Terrain, Vision, Charts
 |
View all Garmin aera 796 manuals
Add to My Manuals
Save this manual to your list of manuals |
Page 24 highlights
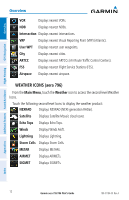
Overview DEDICATED ICONS Located on the bezel (below the touchscreen) are four dedicated touch icons. Touch or touch and hold the following icons to perform the associated function: Overview GPS Navigation Additional Features Hazard Avoidance Flight Planning Dedicated Icons Back Returns to previous screen. Cancels the map pointer. Main Menu (Shortcut) Touch and hold to display the Main Menu. Menu Displays the context sensitive option menu. Direct-to Displays the Direct-to function. NRST Displays the Nearest Icons. Touch and hold to quickly access the nearest airports. PAGE BUTTONS (OPTIONAL) NOTE: The aera 795/796 Optional Page Buttons are User Configurable. Six different configurable Page Buttons are located above the Dedicated Icons. The Page Buttons default to (Map, WPT Info, Weather (aera 796), Terrain, 3D Vision, and Charts). Page Buttons Configuring the Page Buttons: 1) Main Menu, touch Tools > Setup > Display > Choose Buttons 2) From the available Page Buttons at the top half of the screen, touch the new Page Button that will replace one of the current Page Buttons. 3) From the current Page Buttons along the bottom of the screen, touch the 10 Garmin aera 795/796 Pilot's Guide 190-01194-00 Rev. A Appendices Index
-
 1
1 -
2
-
3
-
4
-
5
-
6
-
7
-
8
-
9
-
10
-
11
-
12
-
13
-
14
-
15
-
16
-
17
-
18
-
 19
19 -
 20
20 -
 21
21 -
 22
22 -
 23
23 -
 24
24 -
 25
25 -
 26
26 -
 27
27 -
 28
28 -
 29
29 -
30
-
31
-
32
-
33
-
34
-
35
-
36
-
37
-
38
-
39
-
40
-
41
-
42
-
43
-
44
-
45
-
46
-
47
-
48
-
49
-
50
-
51
-
52
-
53
-
54
-
55
-
56
-
57
-
58
-
59
-
60
-
61
-
62
-
63
-
64
-
65
-
66
-
67
-
68
-
69
-
70
-
71
-
72
-
73
-
74
-
75
-
76
-
77
-
78
-
79
-
80
-
81
-
82
-
83
-
84
-
85
-
86
-
87
-
88
-
89
-
90
-
91
-
92
-
93
-
94
-
95
-
96
-
97
-
98
-
99
-
100
-
101
-
102
-
103
-
104
-
105
-
106
-
107
-
108
-
109
-
110
-
111
-
112
-
113
-
114
-
115
-
116
-
117
-
118
-
119
-
120
-
121
-
122
-
123
-
124
-
125
-
126
-
127
-
128
-
129
-
130
-
131
-
132
-
133
-
134
-
135
-
136
-
137
-
138
-
139
-
140
-
141
-
142
-
143
-
144
-
145
-
146
-
147
-
148
-
149
-
150
-
151
-
152
-
153
-
154
-
155
-
156
-
157
-
158
-
159
-
160
-
161
-
162
-
163
-
164
-
165
-
166
-
167
-
168
-
169
-
170
-
171
-
172
-
173
-
174
-
175
-
176
-
177
-
178
-
179
-
180
-
181
-
182
-
183
-
184
-
185
-
186
-
187
-
188
-
189
-
190
-
191
-
192
-
193
-
194
-
195
-
196
-
197
-
198
-
199
-
200
-
201
-
202
-
203
-
204
-
205
-
206
-
207
-
208
-
209
-
210
 |
 |
