Garmin dezl OTR Owners Manual - Page 23
Daily Operation Guidelines, Starting a Drive
 |
View all Garmin dezl OTR manuals
Add to My Manuals
Save this manual to your list of manuals |
Page 23 highlights
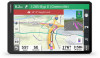
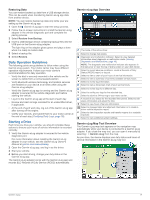
Restoring Data You can restore backed up data from a USB storage device. This can be useful when transferring Garmin eLog app data from another device. NOTE: You can restore backed up data only while your are setting up the Garmin eLog app. 1 Open the Garmin eLog app to start the setup process. 2 Follow the on-screen instructions to install the Garmin eLog adapter in the vehicle diagnostic port and complete the pairing process. 3 Select Restore from Backup. 4 Insert a USB storage device containing backup files into the USB port on the Garmin eLog adapter. The light ring on the adapter glows green and plays a tone when it is ready to restore data. 5 Select a backup file. 6 Select Restore. Daily Operation Guidelines The following points are guidelines to follow when using the Garmin eLog system. Your motor carrier may have different operation requirements. Follow your motor carrier's recommendations for daily operation. • Verify the dēzl is securely mounted in the vehicle and its screen is visible from a normal seated position. • Verify Bluetooth wireless technology and location services are enabled on your device at all times while using the Garmin eLog adapter. • Verify the Garmin eLog app is running and the Garmin eLog adapter is secured to the vehicle diagnostic port before starting the vehicle. • Log in to the Garmin eLog app at the start of each day. • Review and claim all logs recorded for an unidentified driver, if applicable. • At the end of each work day, log out of the Garmin eLog app after turning off the engine. • Certify your records, and submit them to your motor carrier at the end of each day (Certifying Daily Logs, page 18). Starting a Drive Each time you drive your vehicle, you should complete these actions to ensure your hours of service information is recorded correctly. 1 Verify the Garmin eLog adapter is secured to the vehicle diagnostic port. For more information about installing the Garmin eLog adapter in your vehicle, see the Garmin eLog Owner's Manual at garmin.com/manuals/elog. 2 Open the Garmin eLog app, and log in as the driver. 3 Start your vehicle. 4 Before you start driving, change your duty status in the Garmin eLog app. The Garmin eLog adapter syncs with the Garmin eLog app and records ELD Records of Duty Service (RODS) automatically. Garmin eLog App Overview The name of the active driver. Select to change duty status. Diagnostic and malfunction indicator. Select to view detailed information about diagnostic or malfunction alerts (Viewing Diagnostics and Malfunctions, page 19). NOTE: The diagnostic and malfunction indicator also appears in the status bar or near the top of every screen on your dēzl device. Select to record adverse conditions, create a Records of Duty Status (RODS) report, or log out. Select to view a chart of your hours of service information. Select to view a summary of currently available on-duty hours. Select to review log information. Select to view a full-screen chart of your service hours. Select to review logs for a different day. Select to certify your logs for the selected day. Select to submit a 24-hour log to your motor carrier. A record of your status for the recorded time period. Select to edit status information and adjust the time. Select to view hours of service information. Select to manage trailer and shipment information or to create a driver vehicle inspection report. Select to view inspection reports and transfer reports to a roadside inspector. Select to view additional system settings. Garmin eLog Map Tool Overview The Garmin eLog map tool appears on the navigation map automatically while your device is connected to a Garmin eLog adapter. If you close the map tool, you can open it manually by selecting > Garmin eLog from the map. As you drive, the device displays your duty status and hours of service information in the Garmin eLog map tool. Garmin eLog 17
-
 1
1 -
2
-
3
-
4
-
5
-
6
-
7
-
8
-
9
-
10
-
11
-
12
-
13
-
14
-
15
-
16
-
17
-
 18
18 -
 19
19 -
 20
20 -
 21
21 -
 22
22 -
 23
23 -
 24
24 -
 25
25 -
 26
26 -
 27
27 -
 28
28 -
29
-
30
-
31
-
32
-
33
-
34
-
35
-
36
 |
 |
