Gateway 995 Gateway 995 Series Server Rack Installation Guide - Page 6
then attach a clip nut to that hole on each front post. The thumbscrews
 |
View all Gateway 995 manuals
Add to My Manuals
Save this manual to your list of manuals |
Page 6 highlights
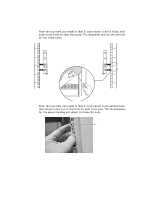
6 From the top mark you made in Step 5, count down 6 and 8 holes, then mark those holes on each front post. The alignment pins on the rails will fit into these holes. 1 1 2 2 3 3 4 4 5 5 6 6 7 7 8 8 9 9 10 10 11 11 12 12 7 From the top mark you made in Step 5, count down to the second hole, then attach a clip nut to that hole on each front post. The thumbscrews for the server handles will attach to these clip nuts. Clip nut 6 www.gateway.com
-
 1
1 -
 2
2 -
 3
3 -
 4
4 -
 5
5 -
 6
6 -
 7
7 -
 8
8 -
 9
9 -
 10
10 -
 11
11 -
 12
12
 |
 |

6
www.gateway.com
6
From the top mark you made in Step 5, count down 6 and 8 holes, then
mark those holes on each front post. The alignment pins on the rails will
fit into these holes.
7
From the top mark you made in Step 5, count down to the second hole,
then attach a clip nut to that hole on each front post. The thumbscrews
for the server handles will attach to these clip nuts.
1
2
3
4
5
6
7
8
9
10
11
12
1
2
3
4
5
6
7
8
9
10
11
12
Clip nut