Gateway FX6800-01e 8511858 - FX-Series Hardware Reference Guide (for Windows V - Page 47
Setting up multiple monitors - custom bios
 |
UPC - 884483304356
View all Gateway FX6800-01e manuals
Add to My Manuals
Save this manual to your list of manuals |
Page 47 highlights
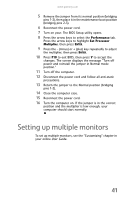
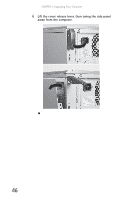
www.gateway.com 5 Remove the jumper from its normal position (bridging pins 1-2), then place it in the maintenance boot position (bridging pins 2-3). 6 Reconnect the power cord. 7 Turn on your. The BIOS Setup utility opens. 8 Press the arrow keys to select the Performance tab. Press the arrow keys to highlight Set Processor Multiplier, then press ENTER. 9 Press the - (minus) or + (plus) key repeatedly to adjust the multiplier, then press ENTER. 10 Press F10 to exit BIOS, then press Y to accept the changes. The screen displays the message "Turn off power and reinstall the jumper in Normal mode position." 11 Turn off the computer. 12 Disconnect the power cord and follow all anti-static precautions. 13 Return the jumper to the Normal position (bridging pins 1-2). 14 Close the computer case. 15 Reconnect the power cord. 16 Turn the computer on. If the jumper is in the correct position and the multiplier is low enough, your computer should start normally. Setting up multiple monitors To set up multiple monitors, see the "Customizing" chapter in your online User Guide. 41
-
 1
1 -
2
-
3
-
4
-
5
-
6
-
7
-
8
-
9
-
10
-
11
-
12
-
13
-
14
-
15
-
16
-
17
-
18
-
19
-
20
-
21
-
22
-
23
-
24
-
25
-
26
-
27
-
28
-
29
-
30
-
31
-
32
-
33
-
34
-
35
-
36
-
37
-
38
-
39
-
40
-
41
-
 42
42 -
 43
43 -
 44
44 -
 45
45 -
 46
46 -
 47
47 -
 48
48 -
 49
49 -
 50
50 -
 51
51 -
 52
52 -
53
-
54
-
55
-
56
-
57
-
58
-
59
-
60
-
61
-
62
-
63
-
64
-
65
-
66
-
67
-
68
-
69
-
70
-
71
-
72
-
73
-
74
-
75
-
76
-
77
-
78
-
79
-
80
-
81
-
82
-
83
-
84
-
85
-
86
-
87
-
88
-
89
-
90
-
91
-
92
-
93
-
94
-
95
-
96
-
97
-
98
-
99
-
100
-
101
-
102
-
103
-
104
-
105
-
106
-
107
-
108
-
109
-
110
-
111
-
112
-
113
-
114
-
115
-
116
-
117
-
118
-
119
-
120
-
121
-
122
-
123
-
124
-
125
-
126
-
127
-
128
-
129
-
130
-
131
-
132
-
133
-
134
-
135
-
136
-
137
-
138
-
139
-
140
-
141
-
142
-
143
-
144
-
145
-
146
-
147
-
148
-
149
-
150
-
151
-
152
-
153
-
154
 |
 |