Gateway M250 Gateway Notebook User Guide - Page 72
cover, then remove it., Remove the two screws securing the hard drive kit to the notebook.
 |
View all Gateway M250 manuals
Add to My Manuals
Save this manual to your list of manuals |
Page 72 highlights
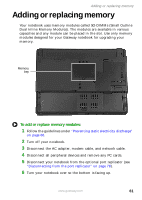
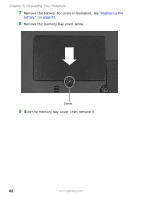
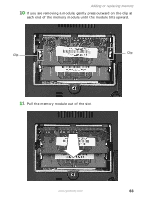
Chapter 6: Upgrading Your Notebook 8 Remove the battery. For more information, see "Changing batteries" on page 53. 9 Remove the hard drive bay cover screw, slide the hard drive bay cover, then remove it. Screw 10 Remove the two screws securing the hard drive kit to the notebook. Screw Screw 66 www.gateway.com
-
 1
1 -
2
-
3
-
4
-
5
-
6
-
7
-
8
-
9
-
10
-
11
-
12
-
13
-
14
-
15
-
16
-
17
-
18
-
19
-
20
-
21
-
22
-
23
-
24
-
25
-
26
-
27
-
28
-
29
-
30
-
31
-
32
-
33
-
34
-
35
-
36
-
37
-
38
-
39
-
40
-
41
-
42
-
43
-
44
-
45
-
46
-
47
-
48
-
49
-
50
-
51
-
52
-
53
-
54
-
55
-
56
-
57
-
58
-
59
-
60
-
61
-
62
-
63
-
64
-
65
-
66
-
 67
67 -
 68
68 -
 69
69 -
 70
70 -
 71
71 -
 72
72 -
 73
73 -
 74
74 -
 75
75 -
 76
76 -
 77
77 -
78
-
79
-
80
-
81
-
82
-
83
-
84
-
85
-
86
-
87
-
88
-
89
-
90
-
91
-
92
-
93
-
94
-
95
-
96
-
97
-
98
-
99
-
100
-
101
-
102
-
103
-
104
-
105
-
106
-
107
-
108
-
109
-
110
-
111
-
112
-
113
-
114
-
115
-
116
-
117
-
118
-
119
-
120
-
121
-
122
-
123
-
124
-
125
-
126
-
127
-
128
-
129
-
130
-
131
-
132
-
133
-
134
-
135
-
136
-
137
-
138
-
139
-
140
-
141
-
142
 |
 |

66
www.gateway.com
Chapter 6: Upgrading Your Notebook
8
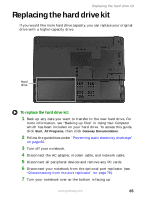
Remove the battery. For more information, see
“Changing batteries”
on page 53
.
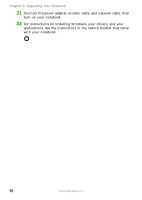
9
Remove the hard drive bay cover screw, slide the hard drive bay
cover, then remove it.
10
Remove the two screws securing the hard drive kit to the notebook.
Screw
Screw
Screw