Gateway NX100X Reference Guide - Page 93
Remove the metal shield covering the old drive.
 |
View all Gateway NX100X manuals
Add to My Manuals
Save this manual to your list of manuals |
Page 93 highlights
www.gateway.com 9 Remove the two hard drive bay cover screws. Screw Screw 10 Slide the hard drive bay cover, then remove it. The hard drive is attached to the back of the cover. 11 Remove the screws on the side of the hard drive that secure the hard drive to the hard drive cover. Screw Screw Screw Screw 12 Remove the metal shield covering the old drive. 13 Insert the new drive label side up onto the cover so the screw holes line up. 87
-
 1
1 -
2
-
3
-
4
-
5
-
6
-
7
-
8
-
9
-
10
-
11
-
12
-
13
-
14
-
15
-
16
-
17
-
18
-
19
-
20
-
21
-
22
-
23
-
24
-
25
-
26
-
27
-
28
-
29
-
30
-
31
-
32
-
33
-
34
-
35
-
36
-
37
-
38
-
39
-
40
-
41
-
42
-
43
-
44
-
45
-
46
-
47
-
48
-
49
-
50
-
51
-
52
-
53
-
54
-
55
-
56
-
57
-
58
-
59
-
60
-
61
-
62
-
63
-
64
-
65
-
66
-
67
-
68
-
69
-
70
-
71
-
72
-
73
-
74
-
75
-
76
-
77
-
78
-
79
-
80
-
81
-
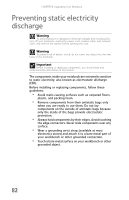
82
-
83
-
84
-
85
-
86
-
87
-
 88
88 -
 89
89 -
 90
90 -
 91
91 -
 92
92 -
 93
93 -
 94
94 -
 95
95 -
 96
96 -
 97
97 -
 98
98 -
99
-
100
-
101
-
102
-
103
-
104
-
105
-
106
-
107
-
108
-
109
-
110
-
111
-
112
-
113
-
114
-
115
-
116
-
117
-
118
-
119
-
120
-
121
-
122
-
123
-
124
-
125
-
126
-
127
-
128
-
129
-
130
-
131
-
132
-
133
-
134
-
135
-
136
-
137
-
138
-
139
-
140
-
141
-
142
 |
 |

www.gateway.com
87
9
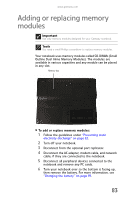
Remove the two hard drive bay cover screws.
10
Slide the hard drive bay cover, then remove it. The hard
drive is attached to the back of the cover.
11
Remove the screws on the side of the hard drive that
secure the hard drive to the hard drive cover.
12
Remove the metal shield covering the old drive.
13
Insert the new drive label side up onto the cover so the
screw holes line up.
Screw
Screw
Screw
Screw
Screw
Screw