GE 45236 User Manual - Page 11
Wall Mount
 |
UPC - 043180452368
View all GE 45236 manuals
Add to My Manuals
Save this manual to your list of manuals |
Page 11 highlights
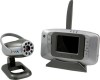
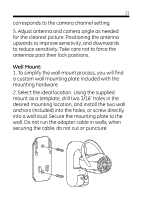
11 corresponds to the camera channel setting. 5. Adjust antenna and camera angle as needed for the clearest picture. Positioning the antenna upwards to improve sensitivity, and downwards to reduce sensitivity. Take care not to force the antennas past their lock positions. Wall Mount: 1. To simplify the wall mount process, you will find a custom wall mounting plate included with the mounting hardware. 2. Select the ideal location. Using the supplied mount as a template, drill two 3/16" holes in the desired mounting location, and install the two wall anchors (included) into the holes, or screw directly into a wall stud. Secure the mounting plate to the wall, Do not run the adapter cable in walls; when securing the cable, do not cut or puncture.
-
 1
1 -
2
-
3
-
4
-
5
-
 6
6 -
 7
7 -
 8
8 -
 9
9 -
 10
10 -
 11
11 -
 12
12 -
 13
13 -
 14
14 -
 15
15 -
 16
16 -
17
-
18
 |
 |