GE 45236 User Manual - Page 6
Channel, Selection - camera
 |
UPC - 043180452368
View all GE 45236 manuals
Add to My Manuals
Save this manual to your list of manuals |
Page 6 highlights
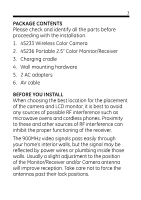
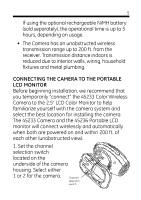
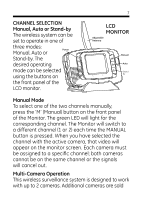
6 2. Similarly, set the slide switch located inside the battery compartment area of the Portable LCD monitor to match the channel used by the camera. 3. Plug AC power adapter of the LCD monitor into the power jack at the rear of the charging base. This provides power to the Portable LDC monitor and also charges the LCD monitor's battery. 4. Turn on the LCD monitor by pressing the POWER button on the front of the monitor. Adjust the volume to the midpoint position. 5. Be sure to charge the Portable LCD Monitor for at least 3 hours before removing from the charging cradle in order to sufficiently charge the battery. Battery Standby time: up to 5hrs., continuous operation up to 3 hrs. Volume Adjustment Menu Alarm Sensitivity Adjustment CHANNEL SELECTION Channel Selection Switch TRIGGER 2 1 Battery Compartment
-
 1
1 -
 2
2 -
 3
3 -
 4
4 -
 5
5 -
 6
6 -
 7
7 -
 8
8 -
 9
9 -
 10
10 -
 11
11 -
 12
12 -
13
-
14
-
15
-
16
-
17
-
18
 |
 |