GE DSXH47EGWW Owners Manual - Page 10
Installation Instructions - owners manual
 |
UPC - 084691158943
View all GE DSXH47EGWW manuals
Add to My Manuals
Save this manual to your list of manuals |
Page 10 highlights
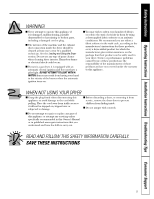
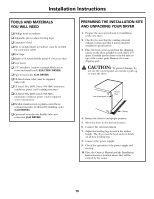
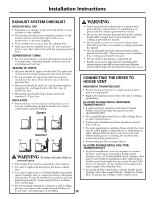
Installation Instructions TOOLS AND MATERIALS YOU WILL NEED Phillips head screwdriver Adjustable pliers (adjust leveling legs) Carpenter's level Flat or straight blade screwdriver (may be needed for cord strain relief) Duct tape Rigid or UL-listed flexible metal 4″ (10.2 cm) duct Vent hood 1/4″ nut driver (remove terminal block access cover and install cord) (ELECTRIC DRYER) Pipe thread sealer (GAS DRYER) UL-listed strain relief (may be supplied with cord) UL-listed 30A, 240V, 3-wire, #10 AWG minimum conductor power cord (existing structure) UL-listed 30A, 240V, 4-wire, #10 AWG minimum conductor power cord is required (new construction) Flexible stainless steel or plastic-coated brass connnecting tube (if allowed by building code) (GAS DRYER) Open-end wrenches for flexible tube and connector (GAS DRYER) PREPARING THE INSTALLATION SITE AND UNPACKING YOUR DRYER 1. Prepare the area and exhaust for installation of the new dryer. 2. Check to be sure that the existing external exhaust is clean and that it meets attached installation specifications. 3. Place the four corner posts from the shipping carton on the floor, parallel to each other, 2-3″ apart. Carefully lay the dryer on its left side on top of the corner posts. Remove the foam shipping pad. CAUTION: To prevent damage, do not use the control panel as a means to pick up or move the dryer. Foam shipping pad Back of Dryer Packing 4. Return the dryer to an upright position. 5. Move the dryer to the desired location. 6. Connect the external exhaust. 7. Adjust the leveling legs to match the washer height. The dryer must be level and rest firmly on all four leveling legs. 8. Connect the power supply. 9. Check the operation of the power supply and venting. 10. Place the Owner's Manual and the Installation Instructions in a location where they will be noticed by the owner. 10
-
 1
1 -
2
-
3
-
4
-
 5
5 -
 6
6 -
 7
7 -
 8
8 -
 9
9 -
 10
10 -
 11
11 -
 12
12 -
 13
13 -
 14
14 -
 15
15 -
16
-
17
-
18
-
19
-
20
-
21
-
22
-
23
-
24
-
25
-
26
-
27
-
28
-
29
-
30
-
31
-
32
-
33
-
34
-
35
-
36
-
37
-
38
-
39
-
40
-
41
-
42
-
43
-
44
-
45
-
46
-
47
-
48
 |
 |