GE DSXH47EGWW Owners Manual - Page 18
Warning, Caution - review
 |
UPC - 084691158943
View all GE DSXH47EGWW manuals
Add to My Manuals
Save this manual to your list of manuals |
Page 18 highlights
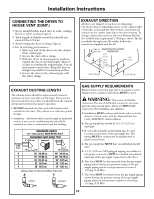
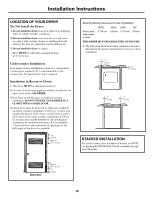
Installation Instructions GAS CONNECTION FOR GAS DRYERS 1. Remove the shipping cap from gas pipe at the rear of the dryer. Conversion to LP Gas: DO NOT connect the dryer to LP gas service without converting the gas valve. An LP conversion kit (Pub. No. 14-A038) MUST be installed by a qualified gas technician. a. Connect a 1/2″ (1.27 cm) I.D. semi-rigid or approved pipe from gas supply line to the 3/8″ (0.96 cm) pipe located on the back of the dryer. Use a 1/2″ to 3/8″ (1.27 cm to 0.96 cm) reducer for a connection. Apply an approved thread sealer that is resistant to the corrosive action of liquefied gases on all pipe connections. b. Open the shutoff valve in the gas supply line. c. Test all connections by brushing on a soapy water solution. WARNING: NEVER TEST FOR GAS LEAKS WITH AN OPEN FLAME. 2. Connect the exhaust duct to outside exhaust system. Use duct tape to seal all joints. 3. With the dryer in its final position, adjust one or more of the legs until the dryer is resting solidly on all four legs. Place a level on top of the dryer. THE DRYER MUST BE LEVEL AND RESTING SOLIDLY ON ALL FOUR LEGS. 4. Plug the power cord into a grounded outlet. NOTE: Check to ensure the power is off at circuit breaker/fuse box before plugging the power cord into the outlet. 5. Turn on the power at the circuit breaker/fuse box. CAUTION: Before operating the dryer, make sure the dryer area is clear and free from combustible materials, gasoline, and other flammable vapors. Also see that nothing (such as boxes, clothing, etc.) obstructs the flow of combustion and ventilation air. 6. Run the dryer through a cycle check for proper operation. NOTE: On gas dryers, before the burner will light, it is necessary for the gas line to be bled of air. If the burner does not light within 45 seconds the first time the dryer is turned on, the safety switch will shut the burner off. If this happens, turn the timer to OFF and wait 5 minutes before making another attempt to light. 7. If your dryer does not operate, please review the Troubleshooting Tips section in this manual before calling for service. 8. Place these instructions in a location near the dryer for future reference. REVERSING THE DRYER DOOR SWING 1. Open the dryer door. Remove the 4 hinge hole plugs or screws from the left side of door opening. Place nearby for future installation. NOTE: You may need a plastic knife to help pull out the plugs. Be careful not to scratch the paint. 2. Remove the four screws that secure the door hinges to the dryer front panel. NOTE: Remove 1 screw from each of the 2 hinges first. Hold the door firmly before removing the last 2 screws. 3. Rotate the door 180° and reinstall the door hinges to the dryer front panel with the 4 screws. 4. Install the 4 hinge hole plugs or screws that were removed in step 1 into the open screw holes on the right side of the door opening. Remove 4 screws-one from each hinge first 18
-
 1
1 -
2
-
3
-
4
-
5
-
6
-
7
-
8
-
9
-
10
-
11
-
12
-
 13
13 -
 14
14 -
 15
15 -
 16
16 -
 17
17 -
 18
18 -
 19
19 -
 20
20 -
 21
21 -
 22
22 -
 23
23 -
24
-
25
-
26
-
27
-
28
-
29
-
30
-
31
-
32
-
33
-
34
-
35
-
36
-
37
-
38
-
39
-
40
-
41
-
42
-
43
-
44
-
45
-
46
-
47
-
48
 |
 |
