GE HO98064 User Manual - Page 11
Editing a Video, Editing Single Frame Snapshots, Editing Audio
 |
View all GE HO98064 manuals
Add to My Manuals
Save this manual to your list of manuals |
Page 11 highlights
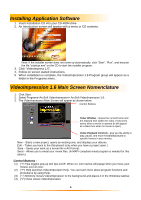
Editing Single Frame Snapshots To edit still images, double click on the review window in "Still Image Template" Play Movie - Takes you back to the View Screen where you can play, save, and email your movie. Transitions - Takes you to the Transitions Screen (See " Options on the Storyboard " ). Album - Takes you to the Album Screen (See "Working with Albums" ) Text - Allows you to add text to images. You can select the font type, style and size. You can also apply effects to the text, and adjust their duration. Brightness Slider - Allows you to change the brightness of an image. This is the top slider below the preview window. Contrast Slider - Lets you adjust the contrast of an image. This is the bottom slider below the preview window. Editing a Video To edit a video, double click on the preview window in "Video Template" Play - Starts the video. Pause - Stops the video. Clicking the button again resumes play. Previous Frame (-) - Moves the video back one frame. Next Frame (+) - Moves the video forward one frame. Playback Slider - Shows a marker that moves across the slider as the video plays. Starting Mark - Allows you to set where you want the video to begin (the green mark). Ending Mark - Lets you set where you want the video to finish (the red mark). Note: If you are a PC user, you can adjust the starting/ending frame by right-clicking the video and selecting "Setting" in the pop-up window . Editing Audio To edit Audio, Play - Starts the audio. Pause - Interrupts the audio (Clicking the button again will resume the audio) Forward - Moves the audio forward Reverse - Moves the audio backwards Audio Volume - Adjusts the volume of the audio Starting Mark - Sets the beginning point of the audio Ending Mark - Sets the ending point of the audio 11
-
 1
1 -
2
-
3
-
4
-
5
-
 6
6 -
 7
7 -
 8
8 -
 9
9 -
 10
10 -
 11
11 -
 12
12 -
 13
13 -
 14
14 -
 15
15 -
 16
16 -
17
-
18
-
19
-
20
-
21
-
22
-
23
 |
 |
