GE HO98064 User Manual - Page 4
Windows Installation of EasyCam Pro Camera and Driver
 |
View all GE HO98064 manuals
Add to My Manuals
Save this manual to your list of manuals |
Page 4 highlights
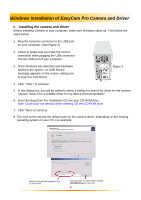
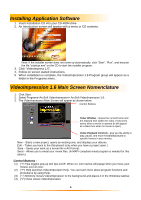
Windows Installation of EasyCam Pro Camera and Driver 1. Installing the camera and driver Before installing Camera to your computer, make sure Windows starts up. Then follow the steps below: 1. Plug the camera's connector to the USB port on your computer. (See Figure 2) 2. Check to make sure you have the correct orientation while plugging the USB connector into the USB port of your computer. 3. Once Windows has detected new hardware added to the system, an USB Device message appears on the screen, asking you to search a new device. Figure 2 4. Click " Next " to continue. 5. In this dialog box, you will be asked to select a method to search for driver for the camera. Choose "Search for a suitable driver for my device (Recommended)." 6. Insert the EasyCam Pro Installation CD into your CD-ROM drive. Note: Close auto-run window while inserting CD into CD-ROM drive. 7. Click "Next" to continue. 8. The next screen shows the default path for the camera driver, depending on the existing operating system on your PC. For example: Letter D indicates the location of your CD ROM drive. Click "Browser" to select driver location CD-ROM:\Driver on your CD. 4
-
 1
1 -
 2
2 -
 3
3 -
 4
4 -
 5
5 -
 6
6 -
 7
7 -
 8
8 -
 9
9 -
 10
10 -
11
-
12
-
13
-
14
-
15
-
16
-
17
-
18
-
19
-
20
-
21
-
22
-
23
 |
 |
