GE JGP990WELWW Owners Manual
GE JGP990WELWW - Profile 30'' Downdraft Gas Modular Cooktop Manual
 |
View all GE JGP990WELWW manuals
Add to My Manuals
Save this manual to your list of manuals |
GE JGP990WELWW manual content summary:
- GE JGP990WELWW | Owners Manual - Page 1
9 Electric Ignition 8 Features 6 Griddle 14 Grill Module 10-13 Surface Burner Modules 6, 8-10 Ventilation System 6, 9 Installation Owner's Manual Instructions 18-29 & Installation LP Conversion 30-33 Instructions Troubleshooting Tips 34, 35 JGP990 Consumer Support Consumer Support - GE JGP990WELWW | Owners Manual - Page 2
Consumer Support Troubleshooting Tips Care and Cleaning Operating Instructions Safety Instructions D IMPORTANT SAFETY INFORMATION. READ ALL INSTRUCTIONS BEFORE USING. WARNING! For your safety, the information in this manual must be followed to minimize the risk of fire or explosion, electric shock, - GE JGP990WELWW | Owners Manual - Page 3
Instructions Operating Instructions Care and Cleaning Troubleshooting Tips Consumer Support ge Instructions. Your model is factory adjusted for use with natural gas. s Do not attempt to repair or replace any part of your cooktop unless it is specifically recommended in this manual. All other service - GE JGP990WELWW | Owners Manual - Page 4
Support Troubleshooting Tips Care and Cleaning Operating Instructions Safety Instructions IMPORTANT SAFETY INFORMATION. READ ALL INSTRUCTIONS appliance shall be conducted according to the manufacturer's instructions. WARNING: To reduce the risk of fire, electrical : For general ventilating use - GE JGP990WELWW | Owners Manual - Page 5
Instructions Operating Instructions Care and Cleaning Troubleshooting Tips Consumer Support ge gas to the cooktop and call a qualified service technician. Never use an open flame to parts listed in this Owner's Manual. READ AND FOLLOW THIS SAFETY INFORMATION CAREFULLY. SAVE THESE INSTRUCTIONS 5 - GE JGP990WELWW | Owners Manual - Page 6
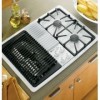
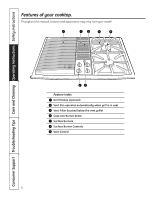
Consumer Support Troubleshooting Tips Care and Cleaning Operating Instructions Safety Instructions Features of your cooktop. Throughout this manual, features and appearance may vary from your model. 1 2 3 4 5 67 Feature Index 1 Grill Module (optional) 2 Vent (fan operates automatically when - GE JGP990WELWW | Owners Manual - Page 7
Safety Instructions Operating Instructions Care and Cleaning Troubleshooting Tips Consumer Support Cooktop accessories. Throughout this manual, features and appearance may vary from your model. Grill Model JXGG90L Consists of a black grill grate and a grill burner. ge.com Sealed Burner Module - GE JGP990WELWW | Owners Manual - Page 8
Support Troubleshooting Tips Care and Cleaning Operating Instructions Safety Instructions Using the gas surface burners. Throughout this manual, features and appearance may vary from your model. Electric Ignition Your surface burners are lit by electric 5 minutes. Before Lighting a Gas Burner s - GE JGP990WELWW | Owners Manual - Page 9
Safety Instructions Operating Instructions Care and Cleaning Troubleshooting Tips Consumer Support Using your cooktop. ge.com Use a flat-bottomed wok. Wok This Way We recommend that you use a flat-bottomed wok, available at your local retail store. Only a flat-bottomed - GE JGP990WELWW | Owners Manual - Page 10
Consumer Support Troubleshooting Tips Care and Cleaning Operating Instructions Safety Instructions Surface burner and grill modules. Throughout this manual, features and appearance may vary from your model. Sealed Burner Module To Install the Sealed Burner Module: 1. Make sure that all control - GE JGP990WELWW | Owners Manual - Page 11
Instructions Operating Instructions Care and Cleaning Troubleshooting Tips Consumer Support Grilling. ge excessive fat can create cleaning and flare-up problems. • Allowing excessive amounts of grease or for a second or two. This is a normal part of the cooking process. • Never leave the grill - GE JGP990WELWW | Owners Manual - Page 12
Consumer Support Troubleshooting Tips Care and Cleaning Operating Instructions Safety Instructions Grilling. Grilling Tips • With your increase your enjoyment of the equipment. Be sure to follow directions in this manual for using the grill. • Suggested cooking times and control settings are - GE JGP990WELWW | Owners Manual - Page 13
Safety Instructions Operating Instructions Care and Cleaning Troubleshooting Tips Consumer Support Grilling guide. ge.com Preheat the 12 minutes 13 to 16 minutes 15 to 25 minutes 15 to 20 minutes 25 to 30 minutes 20 to 30 minutes Turn after 3 to 5 minutes.† Turn after 5 to 8 minutes. Turn after - GE JGP990WELWW | Owners Manual - Page 14
Consumer Support Troubleshooting Tips Care and Cleaning Operating Instructions Safety Instructions Griddle. Griddle Accessory Using the OR GRIDDLE IF THE VENTILATION SYSTEM IS NOT OPERATIONAL. Griddle Guide NOTE: These are suggested guides for control settings and times. Factors such as low gas - GE JGP990WELWW | Owners Manual - Page 15
Safety Instructions Operating Instructions Care and Cleaning Troubleshooting Tips Consumer Support Care and cleaning of the cooktop. ge.com Before Cleaning Before cleaning any part of your cooktop, be sure all controls are off and DISCONNECT ELECTRICAL POWER TO THE COOKTOP at the fuse box or - GE JGP990WELWW | Owners Manual - Page 16
Consumer Support Troubleshooting Tips Care and Cleaning Operating Instructions Safety Instructions Care and cleaning of the cooktop. Grill Burner The grill burner should be . When replacing the filter, make sure it rests, at an angle, on the supports in the vent opening. Latch it in place. 16 - GE JGP990WELWW | Owners Manual - Page 17
Safety Instructions Operating Instructions Care and Cleaning Troubleshooting Tips Consumer Support ge.com Igniters Electrodes grill and surface burners and should be cleaned after each use of the grill. To remove light soil, clean with soapy water or with a cleaner such as 409®. For easier cleanup - GE JGP990WELWW | Owners Manual - Page 18
to the service panel. IMPORTANT SAFETY INSTRUCTIONS The cooktop has been design-certified by CSA International. As with any appliance using gas Manual. Read them carefully. • Be sure your cooktop is installed properly by a qualified installer or service technician. • The cooktop must be electrically - GE JGP990WELWW | Owners Manual - Page 19
Installation Instructions UNPACK YOUR COOKTOP PARTS INCLUDED • Cooktop with side hold-down bolts (2) • Blower assembly • Blower • Attached 120-volt grounded plug cord • LP Conversion (attached to the electrical box) Burner Grate Grease Jar Vent Grille Shipping Tape Cooktop with Side Hold- - GE JGP990WELWW | Owners Manual - Page 20
as recommended by GE. Recommended wall caps and transitions must be used for proper operation and installation. Select appropriate duct cutout. (See ducting installation instructions.) 43⁄ 16″ 10.64 cm 181⁄ 2″ 47 cm Minimum Clearance 2″ 5.08 cm Minimum Clearance Appliance Pressure Regulator 141 - GE JGP990WELWW | Owners Manual - Page 21
units. If the cabinets are installed above the cooktop, allow a minimum 30″ (76.2 cm) clearance between the cooking surface and the bottom of microwave oven or cooking appliance over the cooktop shall conform to the installation instructions packed with that appliance. Working areas adjacent to - GE JGP990WELWW | Owners Manual - Page 22
Instructions support rail on the cabinet, and the rear of the opening must clear the rear support any servicing is carried out. 3″ (7.6 cm) Min. Gas pipe location Electrical outlet 12″ (30.5 cm appliance must be isolated from the gas supply piping system by closing its individual manual - GE JGP990WELWW | Owners Manual - Page 23
Installation Instructions cabinet 7 BLOWER TO DUCTWORK ALIGNMENT In general, the use of flexible ducting is discouraged x 10″ Rectangular to 6″ Round Transition Concrete Slab 6″ (15 cm) Dia. Metal Duct 12″ (30 cm) Min. 6″ (15 cm) Dia. PVC Coupling 6″ (15 cm) Dia. PVC Sewer Pipe Elbow 16″ - GE JGP990WELWW | Owners Manual - Page 24
Use the following examples as a guide. 3. Using good quality ducting material, install per these instructions. A few minutes and pennies spent proper performance. • After reading these instructions, plan the duct run. • Install the duct hardware. GENERAL CONSIDERATIONS: 1. Use quality metal duct - GE JGP990WELWW | Owners Manual - Page 25
Installation Instructions DUCTWORK CALCULATIONS Calculate Total Equivalent Ductwork Length Duct Pieces Equivalent Number Equivalent Length* x Used = Length 6″ round straight 1 ft. x ( )† = ft . 31⁄ 4″ x 10″ straight 1 ft. x ( )† = ft . 6″, 90° - GE JGP990WELWW | Owners Manual - Page 26
Installation Instructions INSTALL THE COOKTOP 10 PREPARE THE COOKTOP Remove the vent styrofoam to protect cooktop Loosen side hold-down screws Install the plenum to the cooktop using 4 screws. The motor opening on the box goes toward the left side of the unit (the side with the grease jar lid - GE JGP990WELWW | Owners Manual - Page 27
the wires to the motor. 9-pin connectors Connector an approved flexible metal appliance connector may be used instructions: 1. Purchase a liquid leak detector or prepare a soap solution of one part water, one part piping system by closing the individual manual shut-off valve to the cooktop - GE JGP990WELWW | Owners Manual - Page 28
Installation Instructions INSTALL THE COOKTOP 12 INSTALL THE COOKTOP Lower the cooktop into the countertop opening, guiding it into -prong grounding wall receptacle to minimize the possibility of electric shock hazard from this appliance. The customer should have the wall receptacle and circuit - GE JGP990WELWW | Owners Manual - Page 29
rests, at an angle, on the supports in the vent opening. Latch it in igniter will spark and the burner will light; igniter will cease sparking when the Instructions). Adjust the low flame setting (see LP Conversion Instructions). Place the vent grille onto the downdraft opening so that the open part - GE JGP990WELWW | Owners Manual - Page 30
by a qualified service agency in accordance with the manufacturer's instructions and all applicable instructions for future reference. When converting to LP, save the original parts for possible future use. • Product failure due to improper installation is not covered under the GE Appliance - GE JGP990WELWW | Owners Manual - Page 31
LP Conversion Instructions GAS SUPPLY the cooktop from the gas supply piping system by closing the individual manual shut-off valve to the cooktop during any pressure testing of the gas LP gas Nut Shut-off valve Electrical supply D Re-install the nut onto the regulator. E Apply the LP Conversion - GE JGP990WELWW | Owners Manual - Page 32
Instructions Re-tighten the screw. 4 CHECK IGNITION A Connect electrical supply cord. B Turn on the gas; check igniter will spark and the burner will light. The first test may require some time A, turn off the burner and make sure all parts are assembled correctly. Reassemble and check. Normal burner - GE JGP990WELWW | Owners Manual - Page 33
Conversion Instructions 5 is needed to access the screw. A Light two other burners and set the knobs to a medium to high setting. B Light the burner to be adjusted and turn opening to alert others in the future that this appliance has been converted to LP gas. If converting back to natural gas - GE JGP990WELWW | Owners Manual - Page 34
Consumer Support Troubleshooting Tips Care and Cleaning Operating Instructions Safety Instructions Before you call for service... Troubleshooting Tips Save time and money! Review the charts on the following pages first and you may not need to call for service. Problem Burners do not light - GE JGP990WELWW | Owners Manual - Page 35
Instructions Operating Instructions Care and Cleaning Troubleshooting Tips Consumer Support ge.com Problem Possible Causes What To Do Flames too high or too Adjust the low flame setting. 1 Light electrical switching noise. This is normal. Burner flames very large or yellow Burner parts - GE JGP990WELWW | Owners Manual - Page 36
Consumer Support Troubleshooting Tips Care and Cleaning Operating Instructions Safety Instructions Notes. 36 - GE JGP990WELWW | Owners Manual - Page 37
repairs. Place your confidence in GE and call us in the U.S. toll-free at 800.626.2224 for more information. *All brands covered, up to 20 years old, in the continental U.S. ✁ Cut here Please place in envelope and mail to: General Electric Company Warranty Registration Department P.O. Box 32150 - GE JGP990WELWW | Owners Manual - Page 38
service. Our service number is 800.GE.CARES (800.432.2737). 3 Read your Owner's Manual carefully. It will help you operate your new appliance Month Day Year Phone _ _ Number GE Consumer & Industrial Appliances General Electric Company Louisville, KY 40225 ge.com * Please provide your e-mail - GE JGP990WELWW | Owners Manual - Page 39
Safety Instructions Operating Instructions Care and Cleaning Troubleshooting Tips Consumer Support GE Gas Cooktop Warranty. All warranty service provided by our Factory Service Centers, or an authorized Customer Care® technician. To schedule service, on-line, visit us at ge.com, or call 800.GE. - GE JGP990WELWW | Owners Manual - Page 40
Support. GE Appliances Website ge.com Have a question or need assistance with your appliance? Try the GE Appliances Website any day of the year! For greater convenience and faster service, you can now download Owner's Manuals, order parts or even schedule service on-line. Schedule Service ge - GE JGP990WELWW | Owners Manual - Page 41
con tiro descendente Estufa de cubierta a gas ge.com Instrucciones importantes de seguridad 2-5 Instrucciones de operación Accesorios para uso con gas LP 30-34 Solucionar problemas 35-37 Apoyo al consumidor Apoyo al consumidor 40 Garantía 39 Manual del propietario e Instrucciones de - GE JGP990WELWW | Owners Manual - Page 42
IMPORTANTES DE SEGURIDAD. LEA ESTAS INSTRUCCIONES ANTES DE USAR ESTE APARATO. ¡ADVERTENCIA! Por su seguridad, se debe seguir la información de este manual para reducir el riesgo de incendio o explosión, choque eléctrico o para evitar daños a la propiedad, lesiones personales o la pérdida de la - GE JGP990WELWW | Owners Manual - Page 43
ge.com Seguridad Operación Cuidado y limpieza Solucionar problemas Apoyo al consumidor sido ajustado en la fábrica para usarse con gas natural. s No trate de reparar o reemplazar cualquier parte de su estufa a menos que se recomiende en forma específica en este instructivo. Cualquier otro tipo - GE JGP990WELWW | Owners Manual - Page 44
o grasa en o cerca de la estufa. s No opere el quemador sin todas las partes en su lugar. s No limpie la estufa con líquidos inflamables o volátiles. s No que se esté preparando. PRECAUCION: Unicamente para usarse como ventilación general. No se utilice para extraer por succión materiales o vapores - GE JGP990WELWW | Owners Manual - Page 45
Operación Cuidado y limpieza Solucionar problemas Apoyo al consumidor ge.com ADVERTENCIA! QUEMADORES DE LA SUPERFICIE Use el una ventilación apropiada. s Limpie únicamente las partes que aparecen señaladas en este manual del propietario. LEA ESTAS INSTRUCCIONES DE SEGURIDAD CUIDADOSAMENTE. - GE JGP990WELWW | Owners Manual - Page 46
Características de su estufa de cubierta. Su modelo puede tener otras características y apariencia que las ilustradas en este manual. 1 2 3 4 5 Operación Apoyo al consumidor Solucionar problemas Cuidado y limpieza 67 Indice de las características 1 Módulo del asador (opcional) 2 Rejilla de - GE JGP990WELWW | Owners Manual - Page 47
Accesorios. Su modelo puede tener otras características y apariencia que las ilustradas en este manual. Asador Modelo JXGG90L Consta de una parrilla negra para asar y un quemador de asador. ge.com Módulo de quemadores sellados Modelos JXGB90B (negra), JXGB90S (acero inoxidable) y JXGB90W (blanca - GE JGP990WELWW | Owners Manual - Page 48
Cómo usar los quemadores de la superficie. Seguridad Su modelo puede tener otras características y apariencia que las ilustradas en este manual. Ignición eléctrica Sus quemadores se encienden por ignición eléctrica, eliminando así la necesidad de pilotos permanentes con llamas que estén - GE JGP990WELWW | Owners Manual - Page 49
ollas tipo "wok" con fondo plano con un soporte. ge.com No utilice ollas tipo "wok" con arillos de calientan rápido y parejo. La mayor parte de los alimentos se doran uniformemente en los olores al cocinar y la humedad que por lo general crea una necesidad frecuente de limpieza. En la configuraci - GE JGP990WELWW | Owners Manual - Page 50
tener otras características y apariencia que las ilustradas en este manual. Módulo de quemadores sellados Para instalar el módulo de quemadores ón de grasa. Consulte la sección Cuidado y limpieza. 3. Con la parte posterior del módulo de quemadores inclinado y las dos aberturas redondas y tres - GE JGP990WELWW | Owners Manual - Page 51
y limpieza Solucionar problemas Apoyo al consumidor Para asar. ge.com Cómo utilizar el asador • El ventilador se sta se incendiará y despedirá aire o fuego por un segundo o dos. Esto es una parte normal del proceso de cocción. • Nunca deje sin vigilancia el asador cuando esté funcionando. - GE JGP990WELWW | Owners Manual - Page 52
Las siguientes sugerencias son buenas reglas a seguir e incrementarán el placer de disfrutar de su equipo. Asegúrese de seguir las instrucciones de este manual en lo que se refiere al uso del asador. • Los tiempos de cocción y los ajustes de control sugeridos son aproximados debido a las variaciones - GE JGP990WELWW | Owners Manual - Page 53
Guía para asar. ge.com Precaliente el asador 13 a 16 minutos 15 a 25 minutos 15 a 20 minutos 25 a 30 minutos 20 a 30 minutos Voltee después 3 a 5 minutos.† Voltee después 5 a 8 minutos . Voltee a la mitad del tiempo. Comience con la parte de la piel hacia abajo. Úntele mantequilla. Voltee a - GE JGP990WELWW | Owners Manual - Page 54
Seguridad Operación Plancha para asar. La plancha para asar Como usar la plancha para asar: 1. Antes de utilizarla por primera vez, lave la plancha nueva en agua caliente jabonosa, enjuague y seque. Luego, "acondicione o cure" la superficie untándole una capa delgada de aceite para cocinar o - GE JGP990WELWW | Owners Manual - Page 55
Seguridad Operación Cuidado y limpieza Solucionar problemas Apoyo al consumidor Cuidado y limpieza. ge.com Antes de limpiar Antes de limpiar cualquier parte de la estufa, asegúrese de que todos los controles estén apagados y DESCONECTE LA ENERGIA ELECTRICA DE LA ESTUFA en la caja de fusibles o - GE JGP990WELWW | Owners Manual - Page 56
siempre debe colocarse en un ángulo. Estando usted de frente a la estufa, la parte superior del filtro debe descansar en la parte izquierda de la abertura de ventilación y la parte inferior del filtro deberá descansar en la parte derecha de la cámara de ventilación al fondo. Si el filtro está plano - GE JGP990WELWW | Owners Manual - Page 57
Seguridad ge.com Ignitores Es importante mantener las aberturas del puerto de enjuague con agua limpia. Usted puede restregar con una esponja de restregar plástica para remover las partículas de alimentos quemados. Contenedor de porcelana de los quemadores Esta área está localizada debajo del - GE JGP990WELWW | Owners Manual - Page 58
Preguntas? Llame a 800.GE.CARES (800.432.2737) o visite nuestro sitio Web: ge.com En el Estado Instrucciones importantes de seguridad en esta manual. Léala detenidamente. • Asegúrese deje una distancia mínima de 30″ (76,2 cm) entre la superficie para cocinar y la parte de abajo de los gabinetes que - GE JGP990WELWW | Owners Manual - Page 59
Instrucciones de instalación DESEMPAQUE LA ESTUFA PARTES INCLUIDAS • Estufa con los pernos de sujetado (2) • Ensamblaje del soplador • Cámara del soplador • Protector del ventilador y tuercas de montaje (4) • Tornillos para plancha metálica (7) • Rejilla - GE JGP990WELWW | Owners Manual - Page 60
ÓN HERRAMIENTAS Y PARTES NECESARIAS • Destornillador Min. 4,76 cm IMPORTANTE Distancia del motor-Proporciona 2″ mínimo (5,1 cm) de distancia entre el gabinete y el motor destinado al enfriamiento. NOTA: Donde manera diferente a la recomendada por GE. Deben utilizarse las protecciones para cables - GE JGP990WELWW | Owners Manual - Page 61
cerca afectará su funcionamiento. 18″ 45,7 cm 43⁄ 8″ 11,1 cm 1 CÓMO INSTALAR LOS GABINETES EN LA PARTE SUPERIOR DE LA ESTUFA 30″ mín (76,2 cm) 13″ (33 cm) 30″ (76,2 cm) 18″ (45,7 cm) 1 CÓMO INSTALAR LOS GABINETES EN LA PARTE SUPERIOR DE LA ESTUFA (cont.) Si los gabinetes se instalan en la - GE JGP990WELWW | Owners Manual - Page 62
± 0,16 cm 29 ± 1⁄ 16″ 73,66 cm ± 0,16 cm Parte delantera de la encimera 813⁄ 16″ (22,2 cm) corte No menos de Enchufe eléctrico de 12″ desconectada (30,5 cm) por del suministro eléctrico antes de gas cerrando su llave de paso individual manual durante cualquier prueba de presión del sistema de - GE JGP990WELWW | Owners Manual - Page 63
exterior Peninsula 7 ALINEACIÓN DE LOS CONDUCTOS DEL SOPLADOR En general, no instamos al uso de conductos flexibles porque éste (15,2 cm) Codo del conducto de desfogue de PVC de 6″ de diám. (15,2 cm) 30′-0″ (9.14 m) máx. Rellene muy bien alrededor de los ductos con grava o arena Codo del ducto - GE JGP990WELWW | Owners Manual - Page 64
instrucciones, planee la trayectoria del ducto. • Instale el ducto. CONSIDERACIONES GENERALES: 1. Utilice una tubería de metal de buena calidad, galvanizada, muy bajo. Consulte la sección Preparación para el ducto de este manual para ver que otro tipo de tubería puede elegir. Los códigos locales - GE JGP990WELWW | Owners Manual - Page 65
Instrucciones de instalación CÁLCULOS DE LOS DUCTOS Calcule el total de longitud equivalente de los ductos Longitud Número Longitud Pedazos de conducto equivaente* x usado = equivalente Ducto recto de 6″ de diámetro 1′ x ( )† = pies Ducto recto de 31⁄4″ x 10″ 1′ x ( )† = pies Codo de 90° - GE JGP990WELWW | Owners Manual - Page 66
Instale la cámara a la estufa usando 4 tornillos. La abertura del motor en la caja se dirige hacia el lado izquierdo de la unidad (el estufa y la cámara hacia adelante y con cuidado colóquela sobre su parte posterior en el embalaje de espuma poliestireno. Instale el ensamblaje del soplador en - GE JGP990WELWW | Owners Manual - Page 67
forma de U con los cables hacia el motor. Conectadores de 9 púas Cubierta del conectador de jabón y agua. Una parte de agua, una parte detergente líquido. 2. Cuando todas de gas cerrando la válvula de cierre de gas individual manual hacia la estufa durante cualquier prueba del sistema de presión - GE JGP990WELWW | Owners Manual - Page 68
sujetado para asegurar la estufa a la encimera. Para encimeras de menos de 1″ de grueso, pegue los bloques de relleno de madera con seguridad a la parte inferior de la estufa donde los pernos de sujetado serán apretados. Encimera Bloques de relleno de madera de Perno de sujetado menos de 1″ a trav - GE JGP990WELWW | Owners Manual - Page 69
de conversión a LP). Coloque la rejilla de ventilación sobre la abertura de ventilación descendente para que la parte abierta de la rejilla esté hacia la parte posterior de la unidad. Rejilla INSPECCIONE LA OPERACIÓN DE VENTILACIÓN DESCENDENTE Gire el control de velocidad del ventilador - GE JGP990WELWW | Owners Manual - Page 70
.GE.CARES (800.432.2737) o visite nuestro sitio Web: ge.com instrucciones proporcionadas con este kit por parte del fabricante. • Esta estufa viene Cuando convierta a LP, guarde las partes originales para posible uso en el futuro ía de electrodomésticos de GE. HERRAMIENTAS QUE NECESITARÁ Llave - GE JGP990WELWW | Owners Manual - Page 71
sistema a presiones de prueba mayores de 1/2 psig. Aísle la estufa del sistema de tuberías de suministro de gas cerrando la válvula de desconexión manual individual de la estufa durante cualquier prueba de presión del sistema de tubería de suministro de gas a presiones iguales o mayores de 1/2 psig - GE JGP990WELWW | Owners Manual - Page 72
Instrucciones de conversión a LP 2 CONVIERTA LOS QUEMADORES DE SUPERFICIE 3 AJUSTE EL OBTURADOR DE AIRE PARA EL QUEMADOR DEL ASADOR Obturador de aire Afloje el tornillo Ajuste la apertura del obturador de aire Apriete el tornillo Gire en dirección de las agujas del reloj para apretar Orificio - GE JGP990WELWW | Owners Manual - Page 73
quemador son normales. Si las llamas del quemador lucen como las que se muestran en A, apague el quemador y asegúrese que todas de las partes están ensambladas correctamente. Ensamble otra vez e inspeccione. Las llamas de un quemador normal deberían lucir como las B o C, dependiendo de qué tipo de - GE JGP990WELWW | Owners Manual - Page 74
Instrucciones de conversión a LP 5 AJUSTE LA LLAMA BAJA (PARA HERVIR A FUEGO LENTO) (cont.) E Cómo probar la estabilidad de la llama: Prueba 1: Gire la perilla de la posición HI a la posición LOW rápidamente. Si la llama LOW se apaga, aumente el tamaño de la llama y pruebe otra vez. Prueba 2: Con - GE JGP990WELWW | Owners Manual - Page 75
primero y quizás no tenga que llamar para solicitar servicio. ge.com Problema Los quemadores no encienden Causas posibles Qué hacer El quemador de asador mostrará llamas anaranjadas debido a derrames de grasa. Las partes del quemador no • Consulte la sección Cuidado y limpieza. se reemplazaron - GE JGP990WELWW | Owners Manual - Page 76
quemador Cerciórese de que la perilla esté en la posición OFF. • Retire la perilla halándola en línea recta fuera del vástago y revise la parte de abajo de la perilla en busca de cualquier acumulación de suciedad. Sonido ocasional de chispa Cambio de la velocidad del calefactor. • Este es un - GE JGP990WELWW | Owners Manual - Page 77
Seguridad Operación ge.com Problema El ventilador no funciona Causas posibles Qué hacer El cable está conectado • Revise las conexiones. Conecte la electricidad incorrectamente o la energía en la - GE JGP990WELWW | Owners Manual - Page 78
Notas. 38 Apoyo al consumidor Solucionar problemas Cuidado y limpieza Operación Seguridad - GE JGP990WELWW | Owners Manual - Page 79
producto está situado en un área que no dispone de servicio por parte de un proveedor de servicio autorizado de GE, podría tener que hacerse cargo de los costes de envío o o la oficina del Prucurador (Attorney General) en su localidad. Garante: General Electric Company. Louisville, KY 40225 39 - GE JGP990WELWW | Owners Manual - Page 80
normales de oficina. GE Consumer Home Services estará aún ahí cuando su garantía termine. Piezas y accesorios ge.com Aquellos individuos con o escríbanos a: General Manager, Customer Relations GE Appliances, Appliance Park Louisville, KY 40225 Registre su electrodoméstico ge.com ¡Registre su
-
 1
1 -
 2
2 -
 3
3 -
 4
4 -
 5
5 -
 6
6 -
 7
7 -
8
-
9
-
10
-
11
-
12
-
13
-
14
-
15
-
16
-
17
-
18
-
19
-
20
-
21
-
22
-
23
-
24
-
25
-
26
-
27
-
28
-
29
-
30
-
31
-
32
-
33
-
34
-
35
-
36
-
37
-
38
-
39
-
40
-
41
-
42
-
43
-
44
-
45
-
46
-
47
-
48
-
49
-
50
-
51
-
52
-
53
-
54
-
55
-
56
-
57
-
58
-
59
-
60
-
61
-
62
-
63
-
64
-
65
-
66
-
67
-
68
-
69
-
70
-
71
-
72
-
73
-
74
-
75
-
76
-
77
-
78
-
79
-
80
 |
 |

JGP990
ge.com
4226-0016-01
49-80515
10-07 JR
Owner’s Manual
& Installation
Instructions
Cooktop
Safety Instructions
. . .2–5
Operating Instructions
Accessories . . . . . . . . . . . . . . . . .7
Controls . . . . . . . . . . . . . . . . . . 8, 9
Cookware . . . . . . . . . . . . . . . . . . 9
Electric Ignition . . . . . . . . . . . . . 8
Features . . . . . . . . . . . . . . . . . . . . 6
Griddle . . . . . . . . . . . . . . . . . . . . .14
Grill Module
. . . . . . . . . . . .10–13
Surface Burner
Modules . . . . . . . . . . . . . . 6, 8–10
Ventilation System
. . . . . . . 6, 9
Care and Cleaning
Control Knobs and
Control Panel Seal . . . . . . . . . 15
Grease Jar . . . . . . . . . . . . . . . . 15
Griddle Accessory . . . . . . . . . 17
Grill Burner . . . . . . . . . . . . . . . . 16
Grill Grate . . . . . . . . . . . . . . . . . 16
Igniters . . . . . . . . . . . . . . . . . . . .17
Porcelain Burner Basin . . . . . 17
Porcelain Cooktop . . . . . . . . . 15
Sealed Burner Module . . . . . 17
Stainless Steel Surfaces . . . .15
Vent Grille and Filter . . . . . . . 16
Installation
Instructions
. . . . . . . . .18–29
LP Conversion
. . . . . . .30–33
Troubleshooting
Tips
. . . . . . . . . . . . . . . . . . .34, 35
Consumer Support
Consumer Support . . . . . . . . .40
Product Registration . . . .37, 38
Warranty . . . . . . . . . . . . . . . . . .39
Gas Downdraft
Write the model and serial
numbers here:
Model #
__________________
Serial #
__________________
Find these numbers on a label
under the cooktop.