GE JGP990WELWW Owners Manual - Page 24
Install The Ductwork, Plan The Duct Run
 |
View all GE JGP990WELWW manuals
Add to My Manuals
Save this manual to your list of manuals |
Page 24 highlights
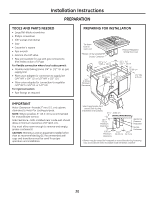
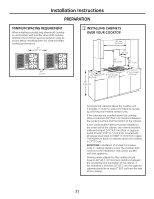
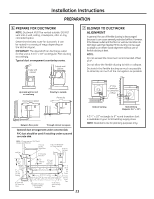
Installation Instructions PREPARATION 8 PLAN THE DUCT RUN 1. Make a sketch of the total system. Identify the type of each fitting and the length of straight pipe. Refer to the examples on page 25. 2. Enter your run into the Duct Length Chart on page 25. Elbows, wall caps and other fittings are shown in the chart with their equivalent straight duct length. Each fitting value must be added to the amount of straight duct length used to determine the overall straight duct equivalent length. Use the following examples as a guide. 3. Using good quality ducting material, install per these instructions. A few minutes and pennies spent now will pay long term dividends for the life of the cooktop. 9 INSTALL THE DUCTWORK • Ducting must conform to local code materials. • IMPORTANT: Save for local electrical inspector's use. • Use galvanized or aluminum duct in 6″ round or 31⁄4″ x 10″ size, or a combination of both. • NOTE: Local building codes must be followed in specifying approved type and schedule of ALL duct used. • Always use an appropriate roof or wall cap with damper. Through cabinet toe space Between floor joist Downward venting • Laundry type wall caps should NEVER be used. • Install ductwork, making male-female connections in the direction of airflow as shown. Secure all joints with sheet metal screws and duct tape to assure an airtight seal. Air flow Duct tape over seam and screw • Use the shortest and straightest duct run possible. For satisfactory performance, the duct run should not exceed 100 feet equivalent length. • Use the Duct Length Chart on page 25 to find the equivalent length of the run. • Ducting a cooktop is easy but critical for proper performance. • After reading these instructions, plan the duct run. • Install the duct hardware. GENERAL CONSIDERATIONS: 1. Use quality metal duct of at least 26-gauge galvanized or 24-gauge aluminum. Inferior quality pipe and fittings can cause up to twice the restriction shown and are a poor value. See the Prepare for DuctWork section of this manual for optional under-slab ducting. Local codes may require a heavier gauge material or restrict PVC. 2. Distance between adjacent fittings (elbows, transitions, etc.) should be at least 18″. The farther the better. Closer distance promotes turbulence which reduces airflow. 3. The number of downstream elbows or transitions should be limited to three. 4. Handmade crimps are likely to cause restrictions. 5. If an alternate wall or roof cap is used, be certain duct size is not reduced and that there is a backdraft damper. It is best to use listed caps to be certain of proper performance. 6. Thermal breaks: In areas of extreme cold weather, it may be necessary to provide a short length of nonmetallic duct as close to the wall as possible to prevent conduction along the metal duct. 7. High altitude installations: It is advisable to reduce allowable duct run by 20%. 8. Follow the duct calculation in this manual carefully for best performance and satisfaction. Screw 24
-
 1
1 -
2
-
3
-
4
-
5
-
6
-
7
-
8
-
9
-
10
-
11
-
12
-
13
-
14
-
15
-
16
-
17
-
18
-
 19
19 -
 20
20 -
 21
21 -
 22
22 -
 23
23 -
 24
24 -
 25
25 -
 26
26 -
 27
27 -
 28
28 -
 29
29 -
30
-
31
-
32
-
33
-
34
-
35
-
36
-
37
-
38
-
39
-
40
-
41
-
42
-
43
-
44
-
45
-
46
-
47
-
48
-
49
-
50
-
51
-
52
-
53
-
54
-
55
-
56
-
57
-
58
-
59
-
60
-
61
-
62
-
63
-
64
-
65
-
66
-
67
-
68
-
69
-
70
-
71
-
72
-
73
-
74
-
75
-
76
-
77
-
78
-
79
-
80
 |
 |
