GE PSB48YSXSS Use and Care Manual - Page 25
Full-width Overlay Custom Panels With Pre-installed Handles
 |
UPC - 084691175933
View all GE PSB48YSXSS manuals
Add to My Manuals
Save this manual to your list of manuals |
Page 25 highlights
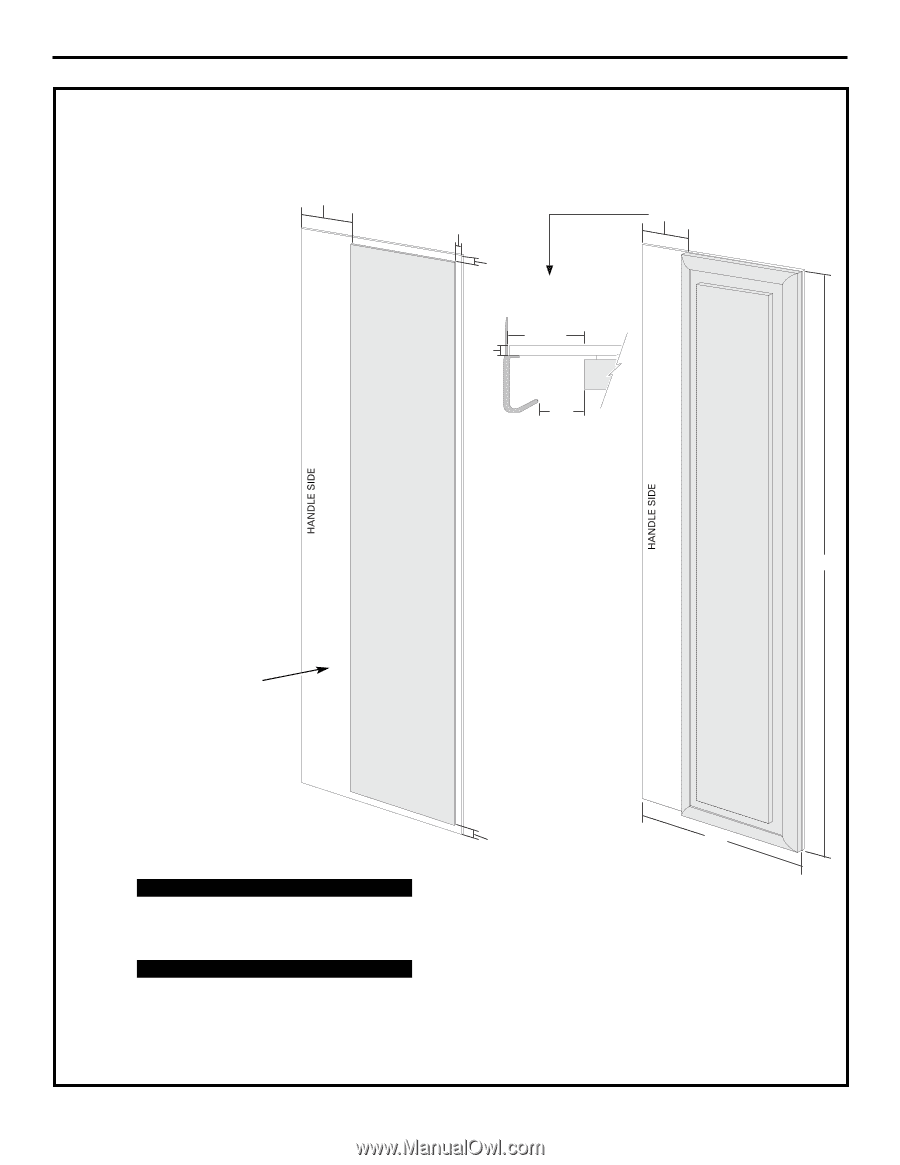
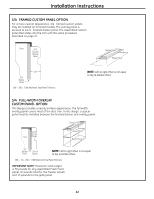
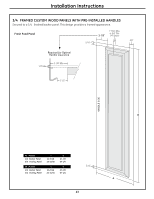
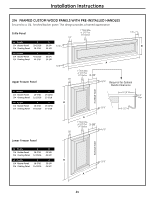
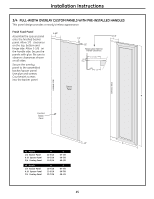
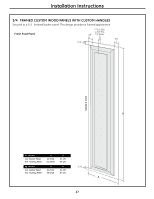
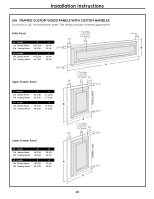
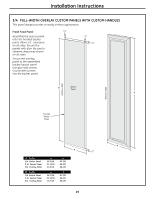
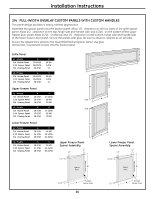
Installation Instructions 3/4″ FULL-WIDTH OVERLAY CUSTOM PANELS WITH PRE-INSTALLED HANDLES This panel design provides a nearly trimless appearance. Fresh Food Panel 3-5/8" Assemble the spacer panel onto the finished backer panel. Allow 1/2″ clearance on the top, bottom and hinge side. Allow 3-5/8″ on the handle side. Secure the panels with glue. Be sure to observe clearances shown on all sides. Secure the overlay panel to the assembled backer/spacer panel. Use glue and screws. Countersink screws into the backer panel. 1/2" 1/2" Required for Optimal Handle Clearance 3-1/8" Min. 1/4" Max. 2-1/2" 3-1/8" Spacer Panel B Finished Backer Panel 1/2" A 42″ Models 1/4″ Backer Panel 0.10″ Spacer Panel 3/4″ Overlay Panel 48″ Models 1/4″ Backer Panel 0.10″ Spacer Panel 3/4″ Overlay Panel A 22-5/16″ 18-3/16″ 19-5/16″ A 26-7/16″ 22-5/16″ 23-7/16″ B 67-7/8″ 66-7/8″ 68-1/8″ B 67-7/8″ 66-7/8″ 68-1/8″ 25
-
 1
1 -
2
-
3
-
4
-
5
-
6
-
7
-
8
-
9
-
10
-
11
-
12
-
13
-
14
-
15
-
16
-
17
-
18
-
19
-
 20
20 -
 21
21 -
 22
22 -
 23
23 -
 24
24 -
 25
25 -
 26
26 -
 27
27 -
 28
28 -
 29
29 -
 30
30 -
31
-
32
-
33
-
34
-
35
-
36
-
37
-
38
-
39
-
40
-
41
-
42
-
43
-
44
-
45
-
46
-
47
-
48
-
49
-
50
-
51
-
52
-
53
-
54
-
55
-
56
-
57
-
58
-
59
-
60
-
61
-
62
-
63
-
64
-
65
-
66
-
67
-
68
-
69
-
70
-
71
-
72
-
73
-
74
-
75
-
76
-
77
-
78
-
79
-
80
-
81
-
82
-
83
-
84
-
85
-
86
-
87
-
88
-
89
-
90
-
91
-
92
-
93
-
94
-
95
-
96
-
97
-
98
-
99
-
100
 |
 |