GE PSB48YSXSS Use and Care Manual - Page 32
Remove Packaging, Top-heavy, Note: Do Not Lay Cabinet Down, In Order To Remove Skid
 |
UPC - 084691175933
View all GE PSB48YSXSS manuals
Add to My Manuals
Save this manual to your list of manuals |
Page 32 highlights
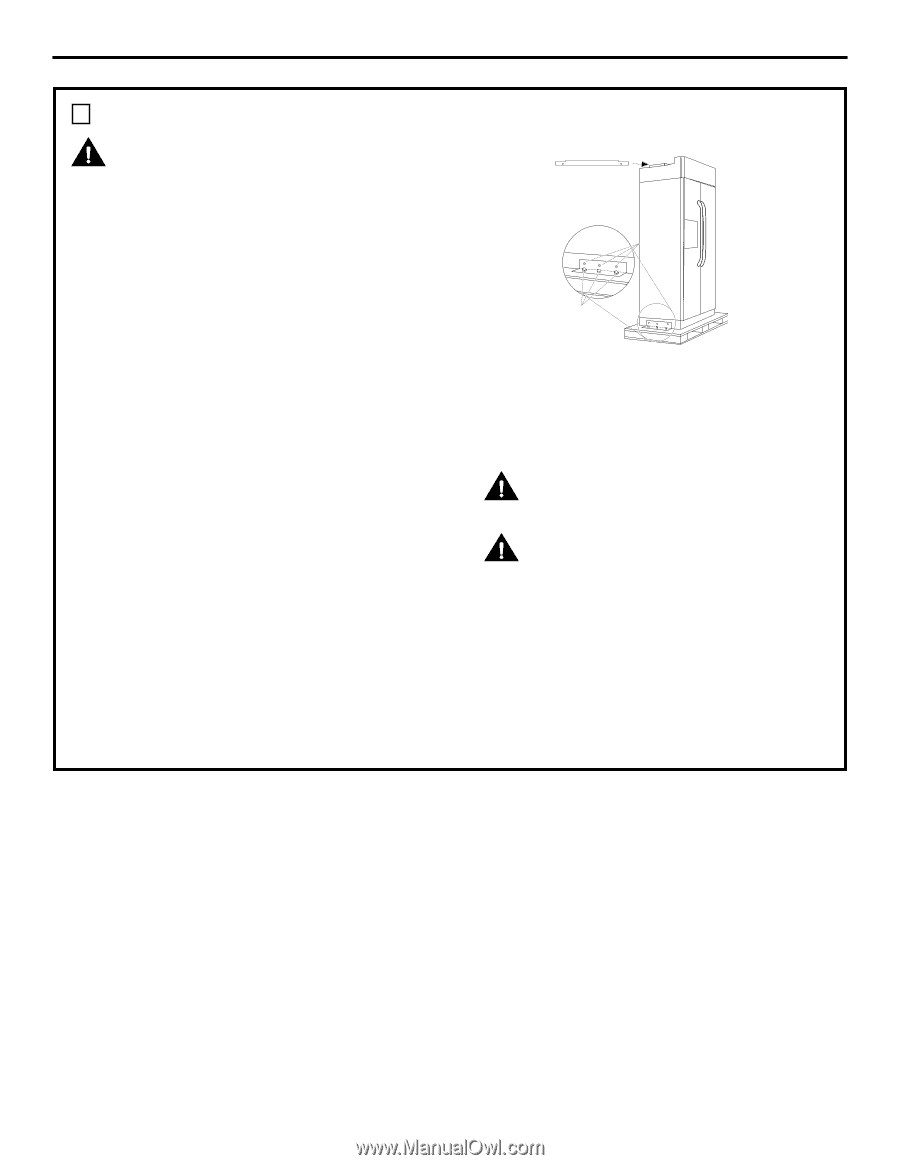
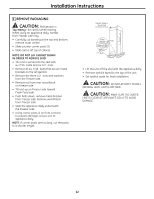
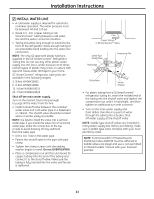
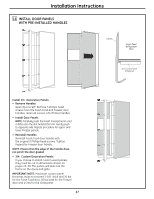
Installation Instructions 1 REMOVE PACKAGING CAUTION: Refrigerator is Top-Heavy-be careful when moving. When using an appliance dolly, handle from Freezer side only. • Carefully cut banding at the top and bottom; remove outer carton. • Slide out rear corner posts (2). • Slide carton off top of cabinet. NOTE: DO NOT LAY CABINET DOWN IN ORDER TO REMOVE SKID! • The unit is secured to the skid with six 7/16″ bolts and six 1/2″ nuts. • Remove all six 7/16″ bolts that secure metal brackets to the refrigerator. • Remove the three 1/2″ nuts and washers from the Freezer side. • Remove nut from rear wood block on Freezer side. • Tilt unit up on Freezer side toward Fresh Food side. • Push bolts down, remove metal bracket from Freezer side. Remove wood block from Freezer side. • Slide the appliance dolly underneath the Freezer side. • Using corner posts (2 on front corners) to prevent damage, secure unit to appliance dolly. NOTE: If corner posts are too long, cut the posts to a shorter length. Toekick Taped to Top of Unit Metal Bracket Bolts 1/2" Nuts • Lift the unit off the skid with the appliance dolly. • Remove toekick taped to the top of the unit. • Set toekick aside for final installation. CAUTION: DO NOT ATTEMPT TO ROLL OR DRAG UNTIL UNIT IS OFF SKID. CAUTION: MAKE SURE THE WATER LINE IS CLEAR OF APPLIANCE DOLLY TO AVOID DAMAGE. 32
-
 1
1 -
2
-
3
-
4
-
5
-
6
-
7
-
8
-
9
-
10
-
11
-
12
-
13
-
14
-
15
-
16
-
17
-
18
-
19
-
20
-
21
-
22
-
23
-
24
-
25
-
26
-
 27
27 -
 28
28 -
 29
29 -
 30
30 -
 31
31 -
 32
32 -
 33
33 -
 34
34 -
 35
35 -
 36
36 -
 37
37 -
38
-
39
-
40
-
41
-
42
-
43
-
44
-
45
-
46
-
47
-
48
-
49
-
50
-
51
-
52
-
53
-
54
-
55
-
56
-
57
-
58
-
59
-
60
-
61
-
62
-
63
-
64
-
65
-
66
-
67
-
68
-
69
-
70
-
71
-
72
-
73
-
74
-
75
-
76
-
77
-
78
-
79
-
80
-
81
-
82
-
83
-
84
-
85
-
86
-
87
-
88
-
89
-
90
-
91
-
92
-
93
-
94
-
95
-
96
-
97
-
98
-
99
-
100
 |
 |