Gigabyte GA-8I945PL-G Manual - Page 5
Configuring RAID set in RAID BIOS - manual
 |
View all Gigabyte GA-8I945PL-G manuals
Add to My Manuals
Save this manual to your list of manuals |
Page 5 highlights
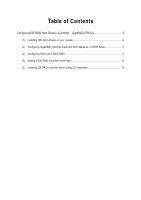
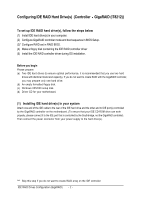
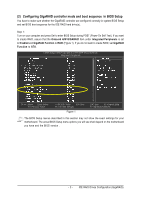
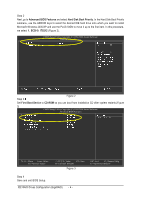
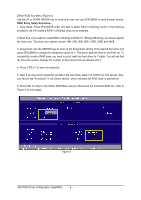
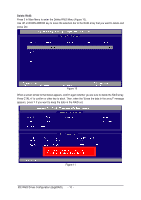
(3) Configuring RAID set in RAID BIOS Enter the RAID setup utility to create RAID set on the GigaRAID controller. Skip this step and proceed to Section 4 if you do not want to create RAID. Step 1: If you have attached hard drives to the GigaRAID controller correctly, after the Power-On Self Test (POST) memory test begins and before the operating system boot begins, the GigaRAID BIOS will detect the drives attached and show the following screen. Figure 4 After entering the GigaRAID Setup Utility, you should see a screen similar to Figure 5 below. Navigate the GigaRAID Setup Utility: You can use Number keys 1 to 5 to select the item you need. Auto Configuration [1]: It will guide you to set an array and this is the simplest and fastest way to create your first array. Define RAID [2]: To manually create an array, press 2 to enter the Define RAID menu. Delete RAID [3]: To delete existing RAID set, press 3 to enter the Delete RAID menu. Rebuild RAID [4]: To rebuild RAID 1 or RAID 0+1 set, press 4 to enter the Rebuild RAID menu. RAID Card Configuration [5]: To check information about the RAID controller and current hard drive status, press 5 to enter the RAID Card Configuration screen. Figure 5 - 5 - IDE RAID Drives Configuration (GigaRAID)
-
 1
1 -
 2
2 -
 3
3 -
 4
4 -
 5
5 -
 6
6 -
 7
7 -
 8
8 -
 9
9 -
 10
10 -
 11
11 -
12
-
13
-
14
-
15
-
16
-
17
-
18
 |
 |