Gigabyte GA-8I945PL-G Manual - Page 8
RAID Array Setup Sequence
 |
View all Gigabyte GA-8I945PL-G manuals
Add to My Manuals
Save this manual to your list of manuals |
Page 8 highlights
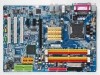
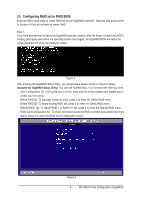
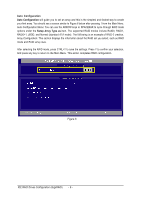
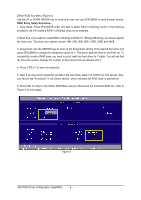
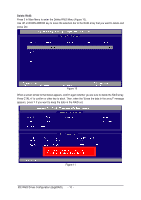
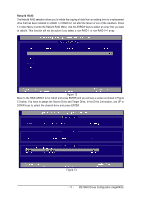
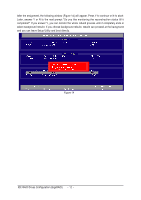
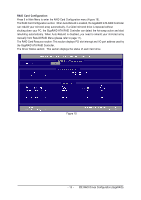
Ác Define RAID Sub-Menu (Figure 8): Use the UP or DOWN ARROW key to move to an item and use SPACEBAR to cycle through options. Åé RAID Array Setup Sequence-- ¤¤ 1. Array Mode: Press SPACEBAR under this item to select RAID 0 (Striping) mode. In the following procedure, we will create a RAID 0 (Striping) array as an example. ¤å 2. Block Size: If you select to create RAID 0 (Striping) or RAID 0+1 (Striping+Mirroring), you have to specify the block size. The block size options include 1KB, 2KB, 4KB, 8KB, 16KB, 32KB and 64KB. 3. Assignment: Use the ARROW keys to move to the Assignment section of the desired hard drive and press SPACEBAR to change the Assignment option to Y. This action adds the drive to the RAID set. To successfully create a RAID array, you need to set at least two hard drives to Y status. You will see that the Drive No section displays the number of hard drives that are labeled with Y. 4. Press CTRL+Y to save the selection. 5. Next, if you are sure to erase the old data in the hard drive, press Y to confirm (or N to cancel). Now, you should see "Functional" in the Status section, which indicates the RAID array is operational. 6. Press ESC to return to the Define RAID Menu and you should see the functional RAID set (refer to Figure 9 on next page). Figure 8 IDE RAID Drives Configuration (GigaRAID) - 8 -
-
 1
1 -
2
-
 3
3 -
 4
4 -
 5
5 -
 6
6 -
 7
7 -
 8
8 -
 9
9 -
 10
10 -
 11
11 -
 12
12 -
 13
13 -
14
-
15
-
16
-
17
-
18
 |
 |