Gigabyte GA-965P-DS3 Manual - Page 64
To con SATA hard drives, follow the steps below, Installing SATA hard drives in your computer - windows 8 drivers
 |
View all Gigabyte GA-965P-DS3 manuals
Add to My Manuals
Save this manual to your list of manuals |
Page 64 highlights
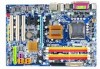
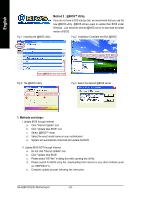
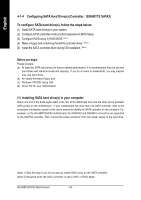
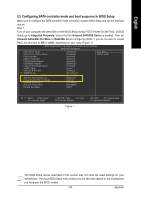
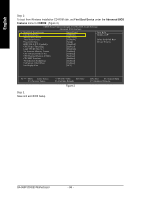
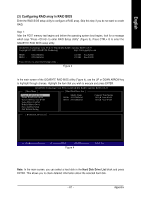
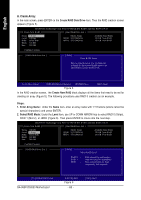
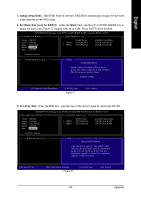
English 4-1-4 Configuring SATA Hard Drive(s) (Controller: GIGABYTE SATA2) To configure SATA hard drive(s), follow the steps below: (1) Install SATA hard drive(s) in your system. (2) Configure SATA controller mode and boot sequence in BIOS Setup. (3) Configure RAID array in RAID BIOS.(Note 1) (4) Make a floppy disk containing the SATA controller driver. (Note 2) (5) Install the SATA controller driver during OS installation. (Note 2) Before you begin Please prepare: (a) At least two SATA hard drives (to ensure optimal performance, it is recommended that you use two hard drives with identical model and capacity). If you do not want to create RAID, you may prepare only one hard drive. (b) An empty formatted floppy disk. (c) Windows XP/2000 setup disk. (d) Driver CD for your motherboard. (1) Installing SATA hard drive(s) in your computer Attach one end of the SATA signal cable to the rear of the SATA hard drive and the other end to available SATA port(s) on the motherboard. If your motherboard has more than one SATA controller, refer to the connectors introduction section of the user's manual to identify the SATA controller for the connector. For example, on the GA-965P-DS3/S3 motherboard, the GSATAII0 and GSATAII1 connectors are supported by the GSATA2 controller. Then connect the power connector from your power supply to the hard drive. (Note 1) Skip this step if you do not want to create RAID array on the SATA controller. (Note 2) Required when the SATA controller is set to AHCI or RAID Mode GA-965P-DS3/S3 Motherboard - 64 -
-
 1
1 -
2
-
3
-
4
-
5
-
6
-
7
-
8
-
9
-
10
-
11
-
12
-
13
-
14
-
15
-
16
-
17
-
18
-
19
-
20
-
21
-
22
-
23
-
24
-
25
-
26
-
27
-
28
-
29
-
30
-
31
-
32
-
33
-
34
-
35
-
36
-
37
-
38
-
39
-
40
-
41
-
42
-
43
-
44
-
45
-
46
-
47
-
48
-
49
-
50
-
51
-
52
-
53
-
54
-
55
-
56
-
57
-
58
-
 59
59 -
 60
60 -
 61
61 -
 62
62 -
 63
63 -
 64
64 -
 65
65 -
 66
66 -
 67
67 -
 68
68 -
 69
69 -
70
-
71
-
72
-
73
-
74
-
75
-
76
-
77
-
78
-
79
-
80
-
81
-
82
-
83
-
84
-
85
-
86
-
87
-
88
 |
 |
