HTC Touch Pro US Cellular User Manual - Page 106
The Review screen, Advanced Options
 |
View all HTC Touch Pro US Cellular manuals
Add to My Manuals
Save this manual to your list of manuals |
Page 106 highlights
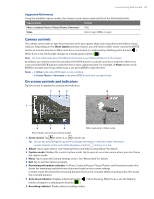
106 Experiencing Multimedia The Review screen After capturing, the Review screen lets you view, send, or delete the photo or video clip by tapping an icon at the bottom of the screen. Review screen icons Icon Function Back Return to the live Camera screen. View View the captured image or video in the Album program. Delete Delete the captured image or video. Send Send the captured image or video via e-mail. Assign to Contact After capturing in Contacts Picture mode, tap this icon to assign the photo to a selected contact. Advanced Options The Advanced Options let you adjust options for your selected capture mode and set Camera program preferences. Access the Advanced Options by tapping Advanced on the Menu Panel. You can either tap on-screen or press Navigation up/down (Landscape orientation) to navigate through the Advanced Options screen. Tap an item to change the setting. Tap to go back to the Camera screen. Tap to go through the different Advanced Camera Settings screens. • Review Duration. Set a time length for displaying the captured image/video on the Review screen. Select No Limit if you do not want to impose a time limit. Select No Review to immediately return to the live Camera screen after capturing and saving. • Resolution. Select the resolution to use when taking photos or capturing videos. • Quality. Select the JPEG image quality level for all captured still images. Choose from Basic, Normal, Fine, and Super Fine. • Capture Format. Select the desired file format. • Time Stamp (Photo mode). Choose whether or not to include the shooting date and time on captured photos.
-
 1
1 -
2
-
3
-
4
-
5
-
6
-
7
-
8
-
9
-
10
-
11
-
12
-
13
-
14
-
15
-
16
-
17
-
18
-
19
-
20
-
21
-
22
-
23
-
24
-
25
-
26
-
27
-
28
-
29
-
30
-
31
-
32
-
33
-
34
-
35
-
36
-
37
-
38
-
39
-
40
-
41
-
42
-
43
-
44
-
45
-
46
-
47
-
48
-
49
-
50
-
51
-
52
-
53
-
54
-
55
-
56
-
57
-
58
-
59
-
60
-
61
-
62
-
63
-
64
-
65
-
66
-
67
-
68
-
69
-
70
-
71
-
72
-
73
-
74
-
75
-
76
-
77
-
78
-
79
-
80
-
81
-
82
-
83
-
84
-
85
-
86
-
87
-
88
-
89
-
90
-
91
-
92
-
93
-
94
-
95
-
96
-
97
-
98
-
99
-
100
-
 101
101 -
 102
102 -
 103
103 -
 104
104 -
 105
105 -
 106
106 -
 107
107 -
 108
108 -
 109
109 -
 110
110 -
 111
111 -
112
-
113
-
114
-
115
-
116
-
117
-
118
-
119
-
120
-
121
-
122
-
123
-
124
-
125
-
126
-
127
-
128
-
129
-
130
-
131
-
132
-
133
-
134
-
135
-
136
-
137
-
138
-
139
-
140
-
141
-
142
-
143
-
144
-
145
-
146
-
147
-
148
-
149
-
150
-
151
-
152
-
153
-
154
-
155
-
156
-
157
-
158
-
159
-
160
 |
 |
